


Welcome to D2D Ministry App
Discover how to make the most of every feature with clear, step-by-step tutorials designed to help you navigate the app with confidence and ease. From documenting field ministry conversations with Notice of Event (NOE), managing Return Visits, and creating personalized Messages with scannable QR codes, to recording and maintaining respectful Do Not Call (DNC) requests, each tutorial walks you through the tools you need. Learn how to connect and communicate through Chat and Groups, organize gatherings and manage RSVPs with Events, support event security through Attendants, and stay informed with Notifications. You’ll also learn how to manage your profile, preferences, and essential information through Settings. Explore the tutorials below and discover how the D2D Ministry App can help you stay organized, connected, and confident in every aspect of your ministry.
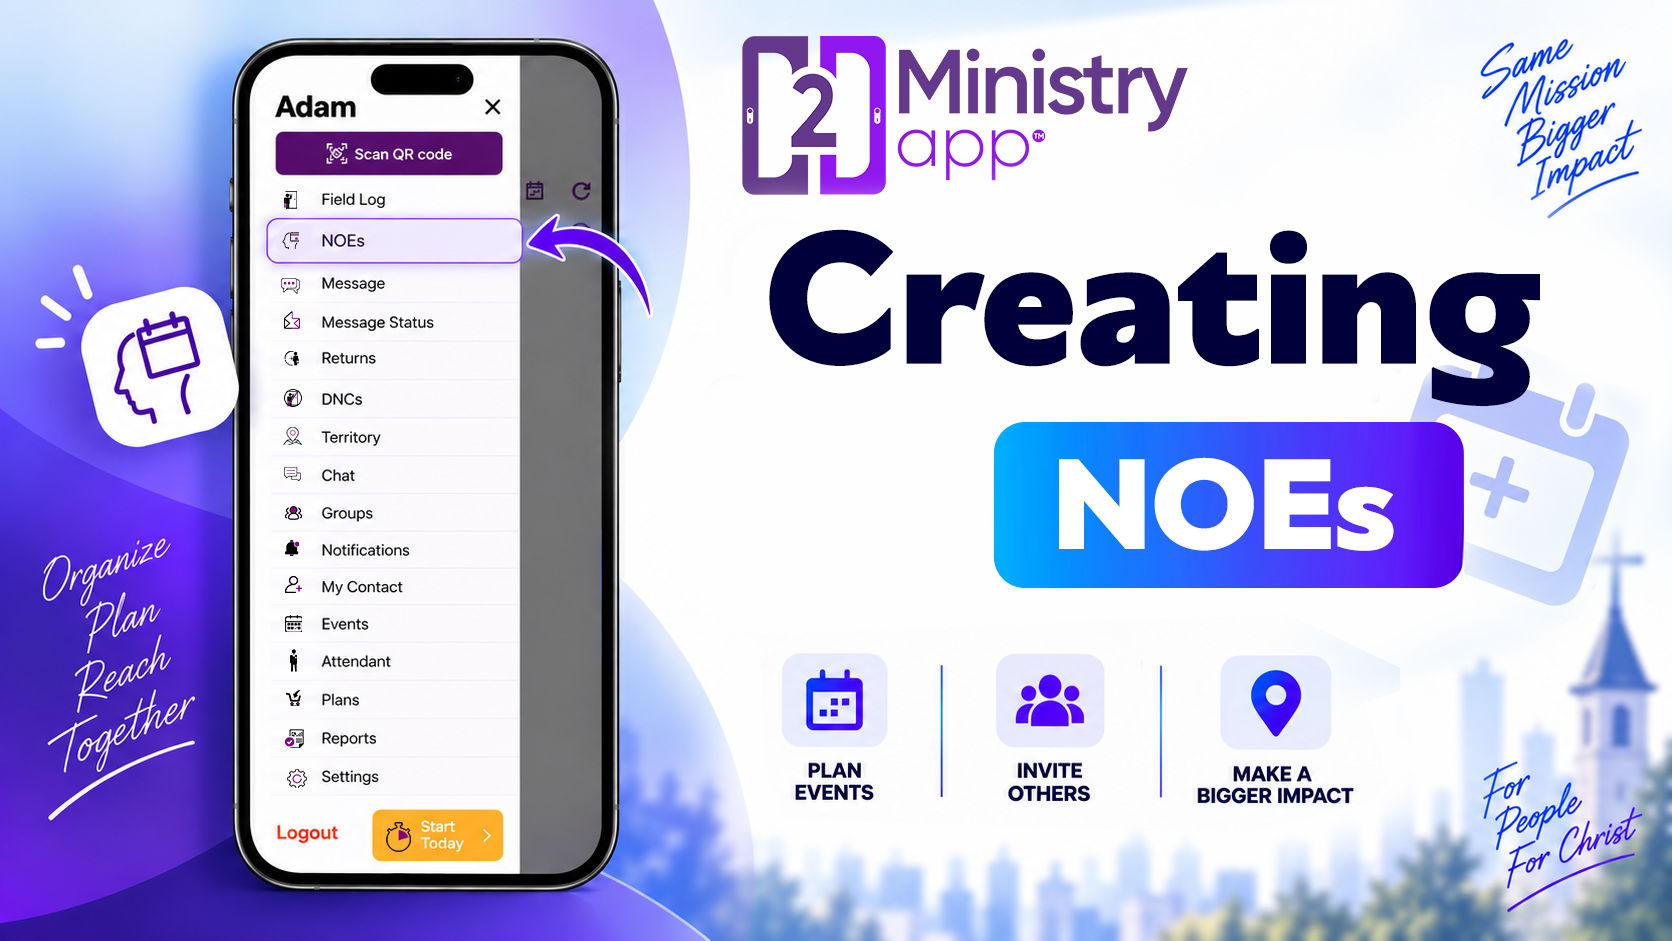
Notice Of Events (NOEs)
Learn how to create a Notice of Event (NOE), one of the D2D Ministry App’s key features for organizing and documenting ministry activity. Each NOE captures important details from meaningful ministry conversations, helping you keep accurate records, follow up with greater continuity, and make future visits more natural, organized, and effective.
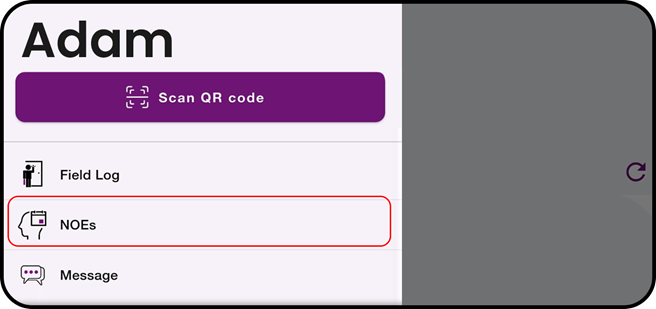
1. Open the NOEs Feature: Open the main Menu & tap NOEs.
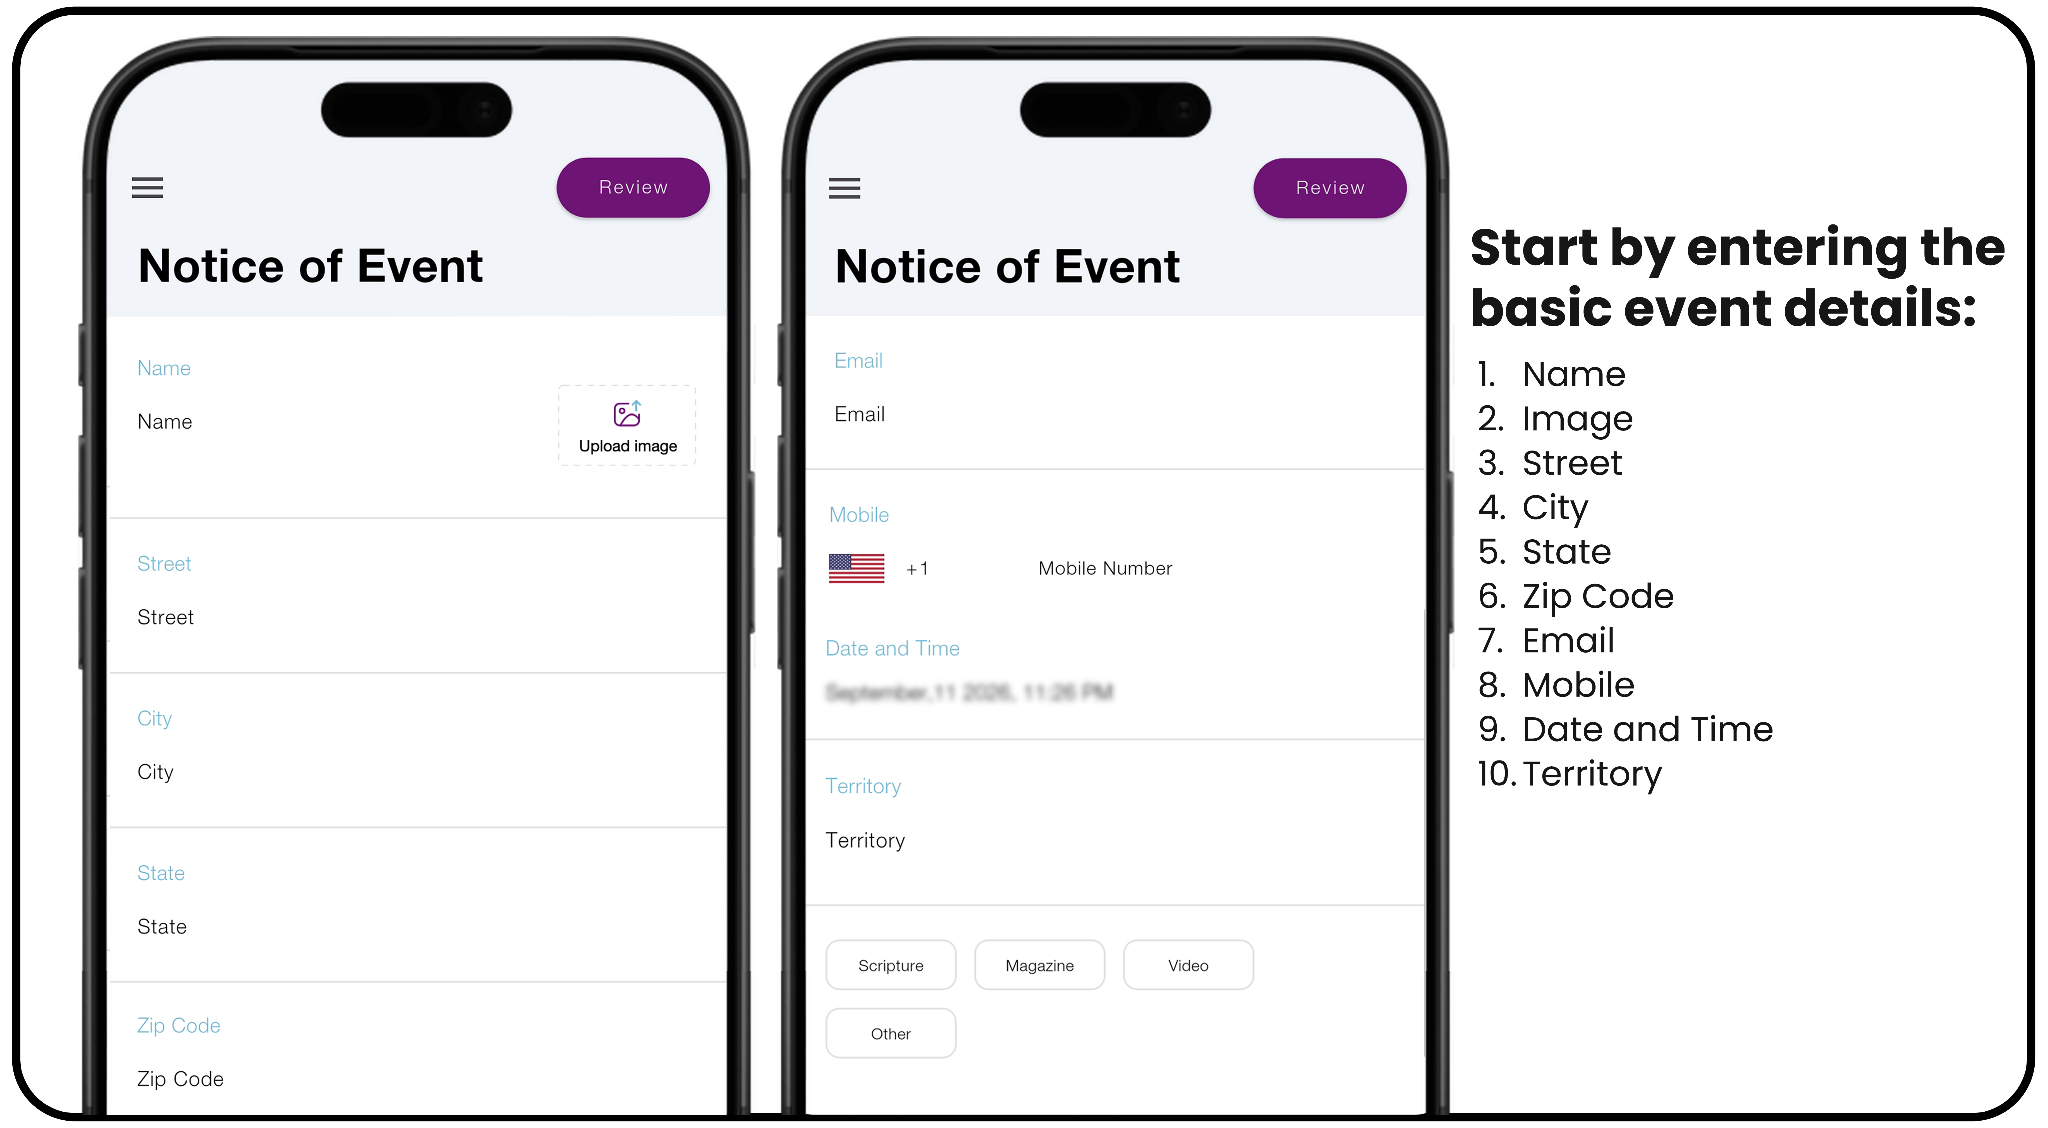
2. Enter details: Name, location, email, phone number, date, and territory number if
possible.
3. Notes: Add the scriptures discussed, publications or video names to maintain clear notes
for future.
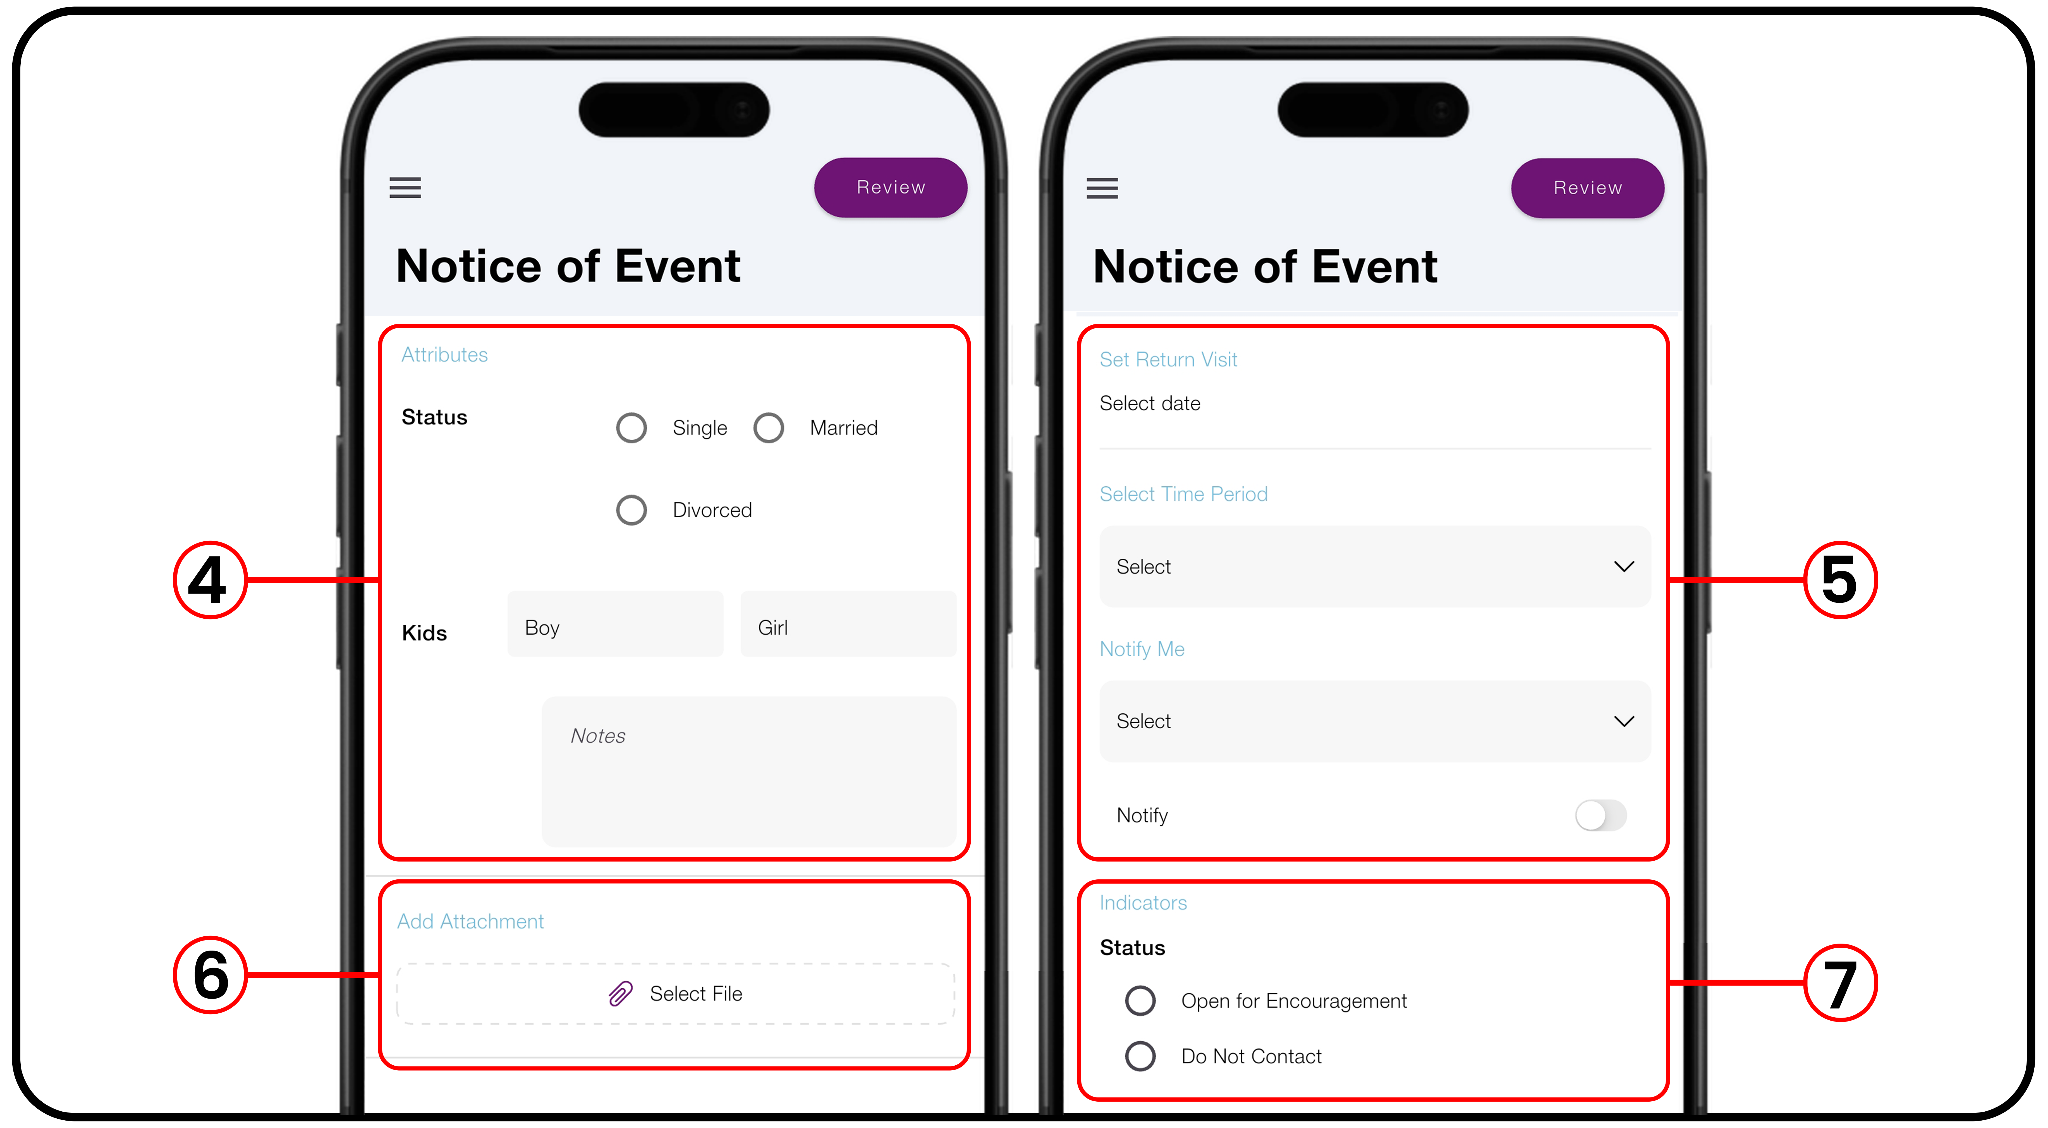
4. Record Attributes and Special Notes: Record helpful household information, such as
marital status & number of children. Use Notes field to write any meaningful information.
5. Attach Supporting Files: Attach any photo, document or voice note if needed.
6. Set a Return Visit: In Set Return Visit section-
-
- Select the return visit date and time
- Choose the desired follow-up interval
- Enable Notify Me to receive a reminder before the appointment
- If required enable Notify to send a reminder to householder
7. Indicators: Choose the appropriate ministry indicator
-
- Open for Encouragement - will be visible to other service group members
- Do Not Contact - will not be visible to other service group members
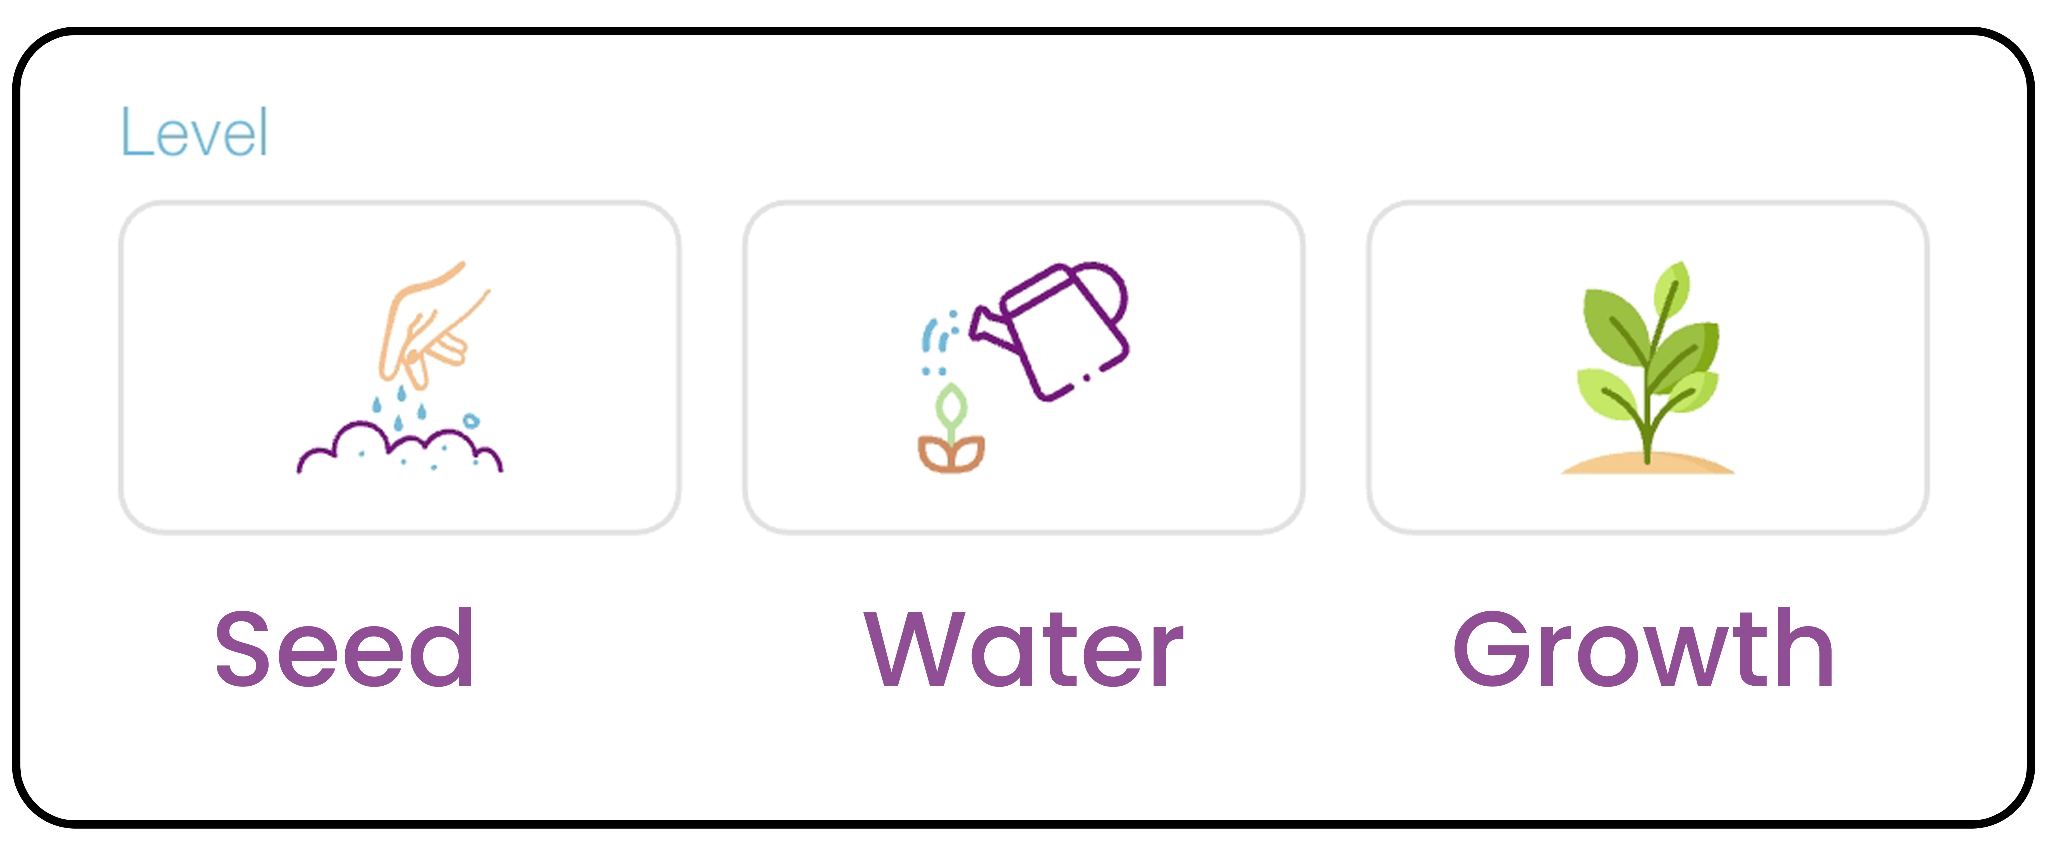
8. Set the Progress Level:
-
- Seed – An initial witness has been given and future visits can help build interest.
- Water – The individual has responded positively to Bible discussions and continued
encouragement is appropriate. - Growth – A Bible study has begun or meaningful spiritual progress is being made.
9. Review & Save:
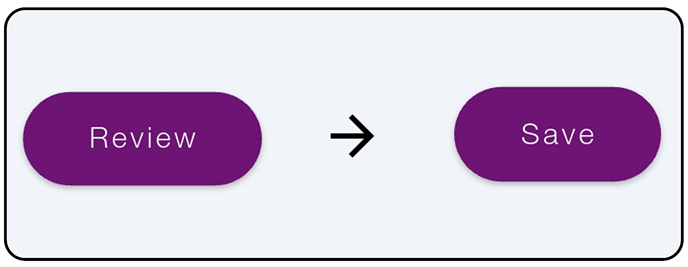
Before saving, tap Review in the top right corner to verify all the details entered.
Then, tap Save in the top right corner.
10. Your Notice of Event will be automatically added to your Field Log.
Creating detailed Notice of Event helps preserve every meaningful conversation,
improves continuity, and supports more effective return visits.
Creating Messages
Learn how to create a new message using the D2D Ministry App and make the most of the Messages feature. Create and share personalized text, audio, or video messages, add attachments, and generate a QR code that can be associated with materials left for the householder, making it easy to share helpful information and support meaningful follow-up.
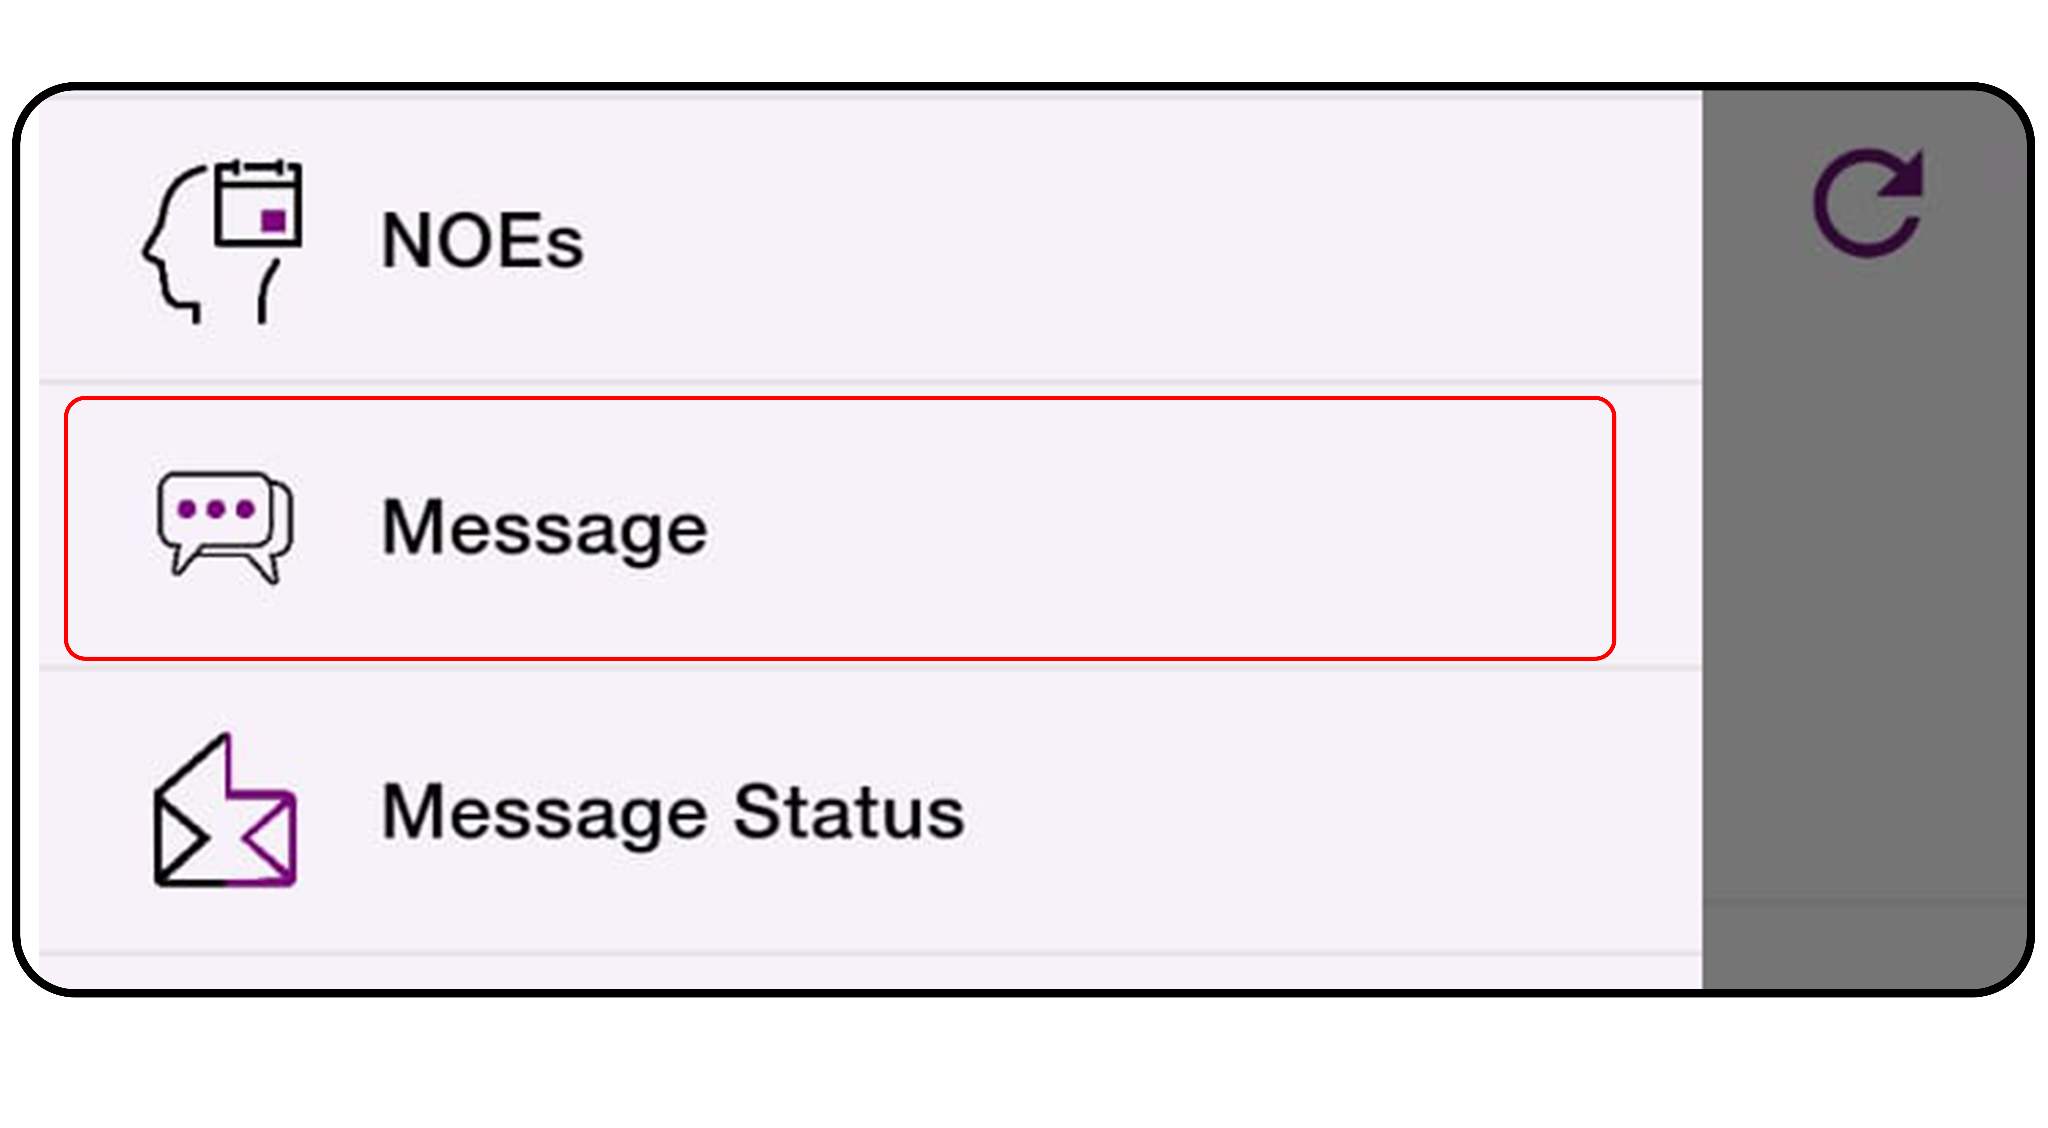
1. Open Messages: Open the D2D Ministry App and navigate to the
Messages feature.
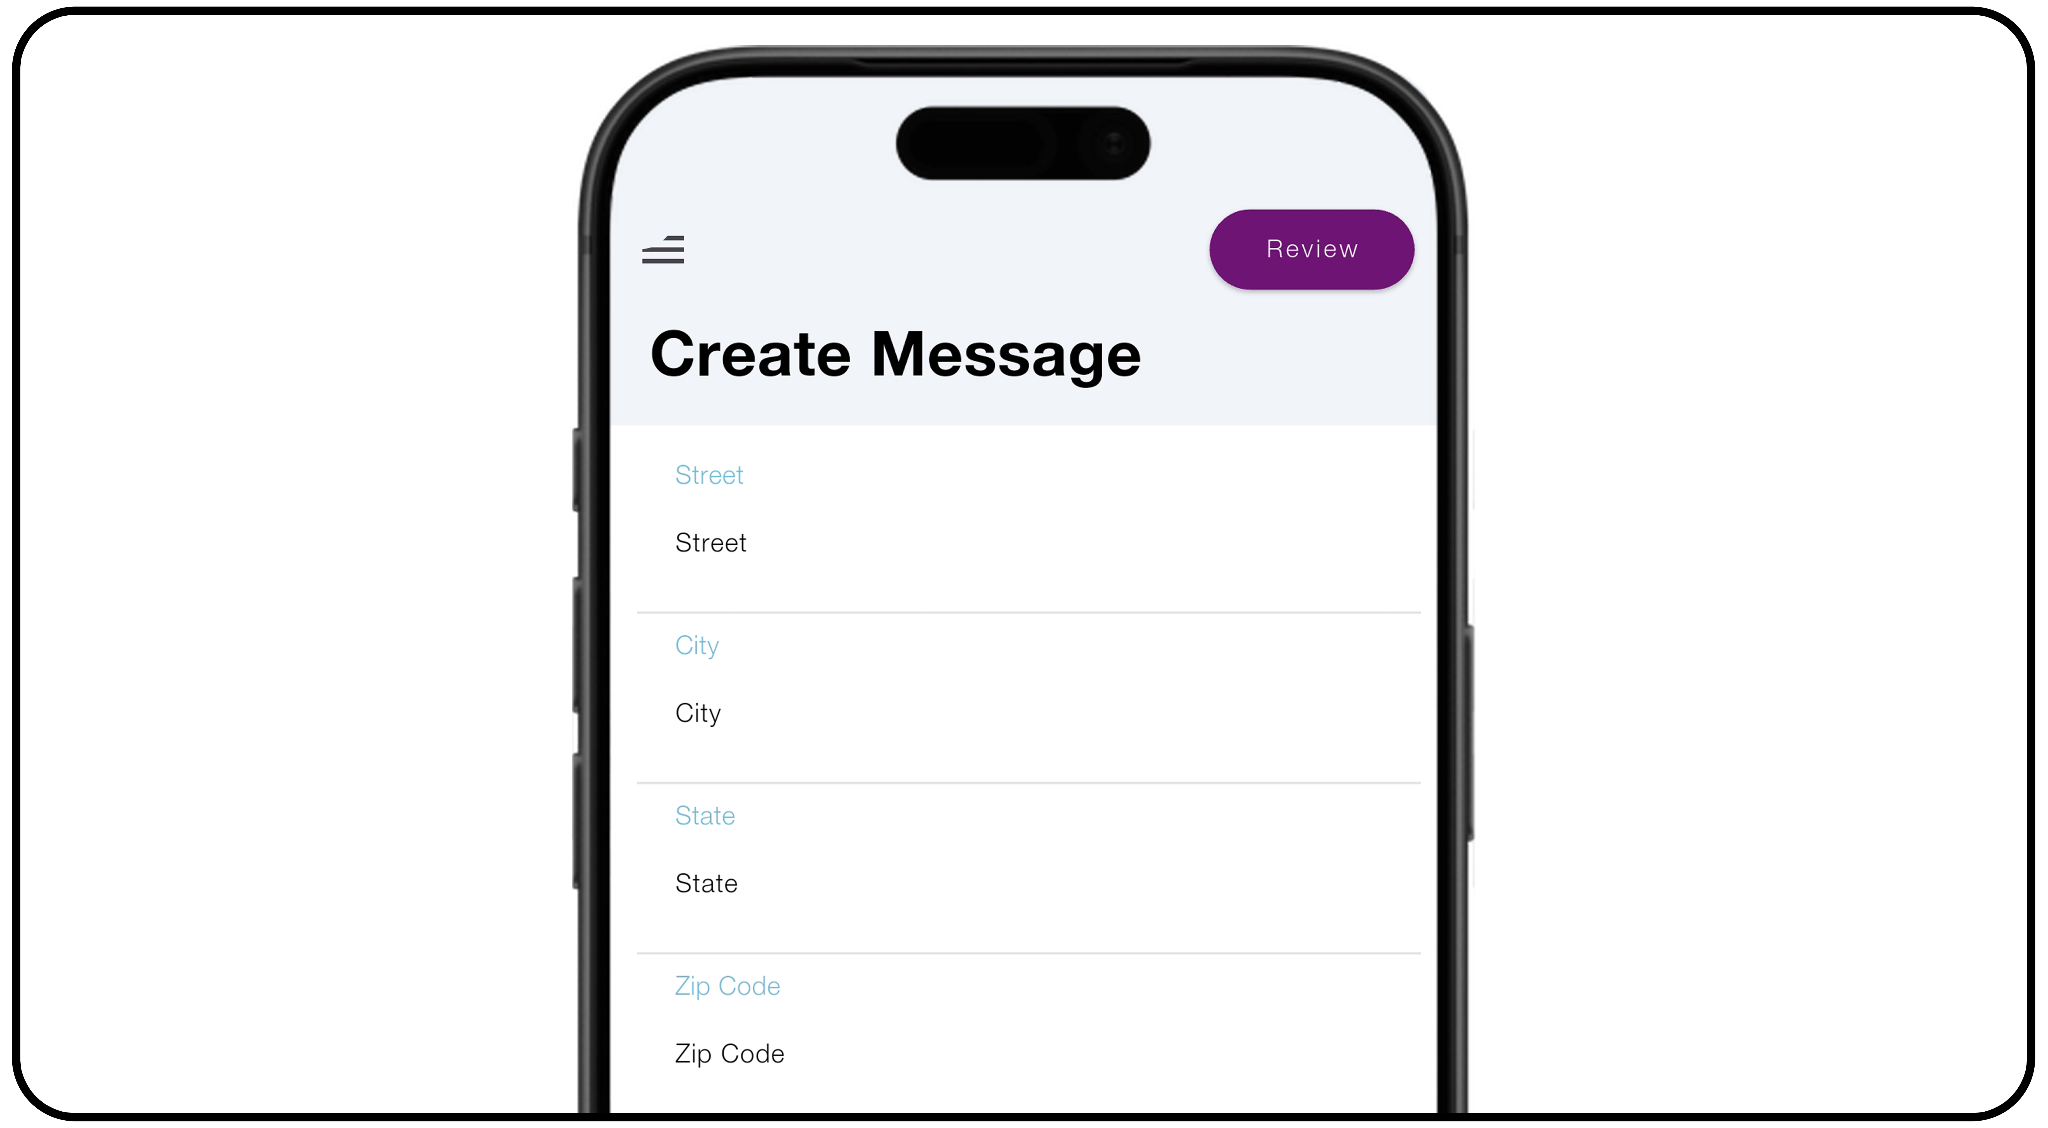
2. Enter the Location:
- First, enter the street address for the house.
- For example, enter: 111 Example Street.
- Then enter the city, state, and ZIP code.
- This information associates the message with the specific location where the
message will be delivered.
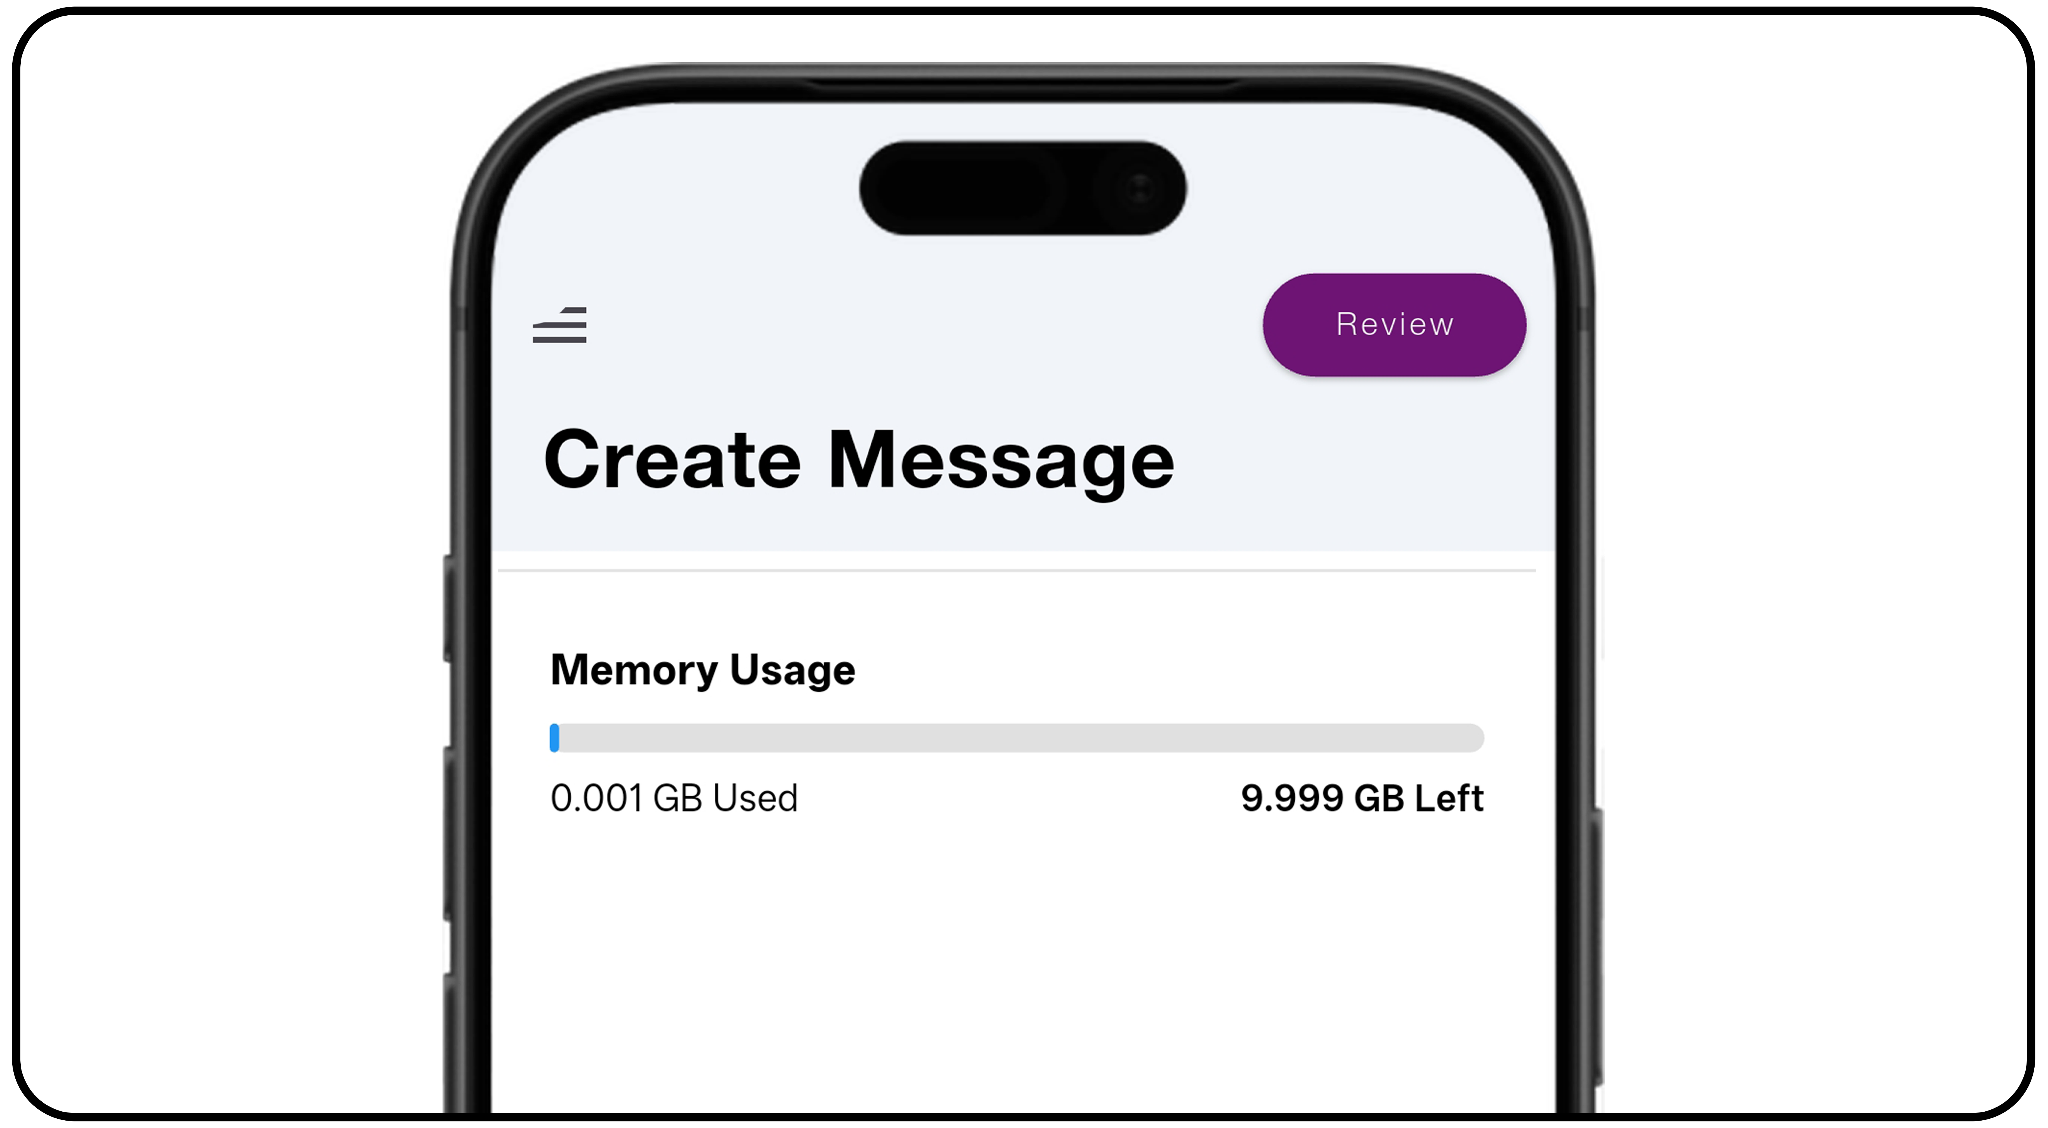
3. Check Memory:
- Before creating your message, check the Memory Usage section.
- Here you'll see how much storage space is currently being used and
how much memory remains available. - If your device is running low on storage, you can review previously recorded
messages and delete videos you no longer need. - This will create space for new messages.
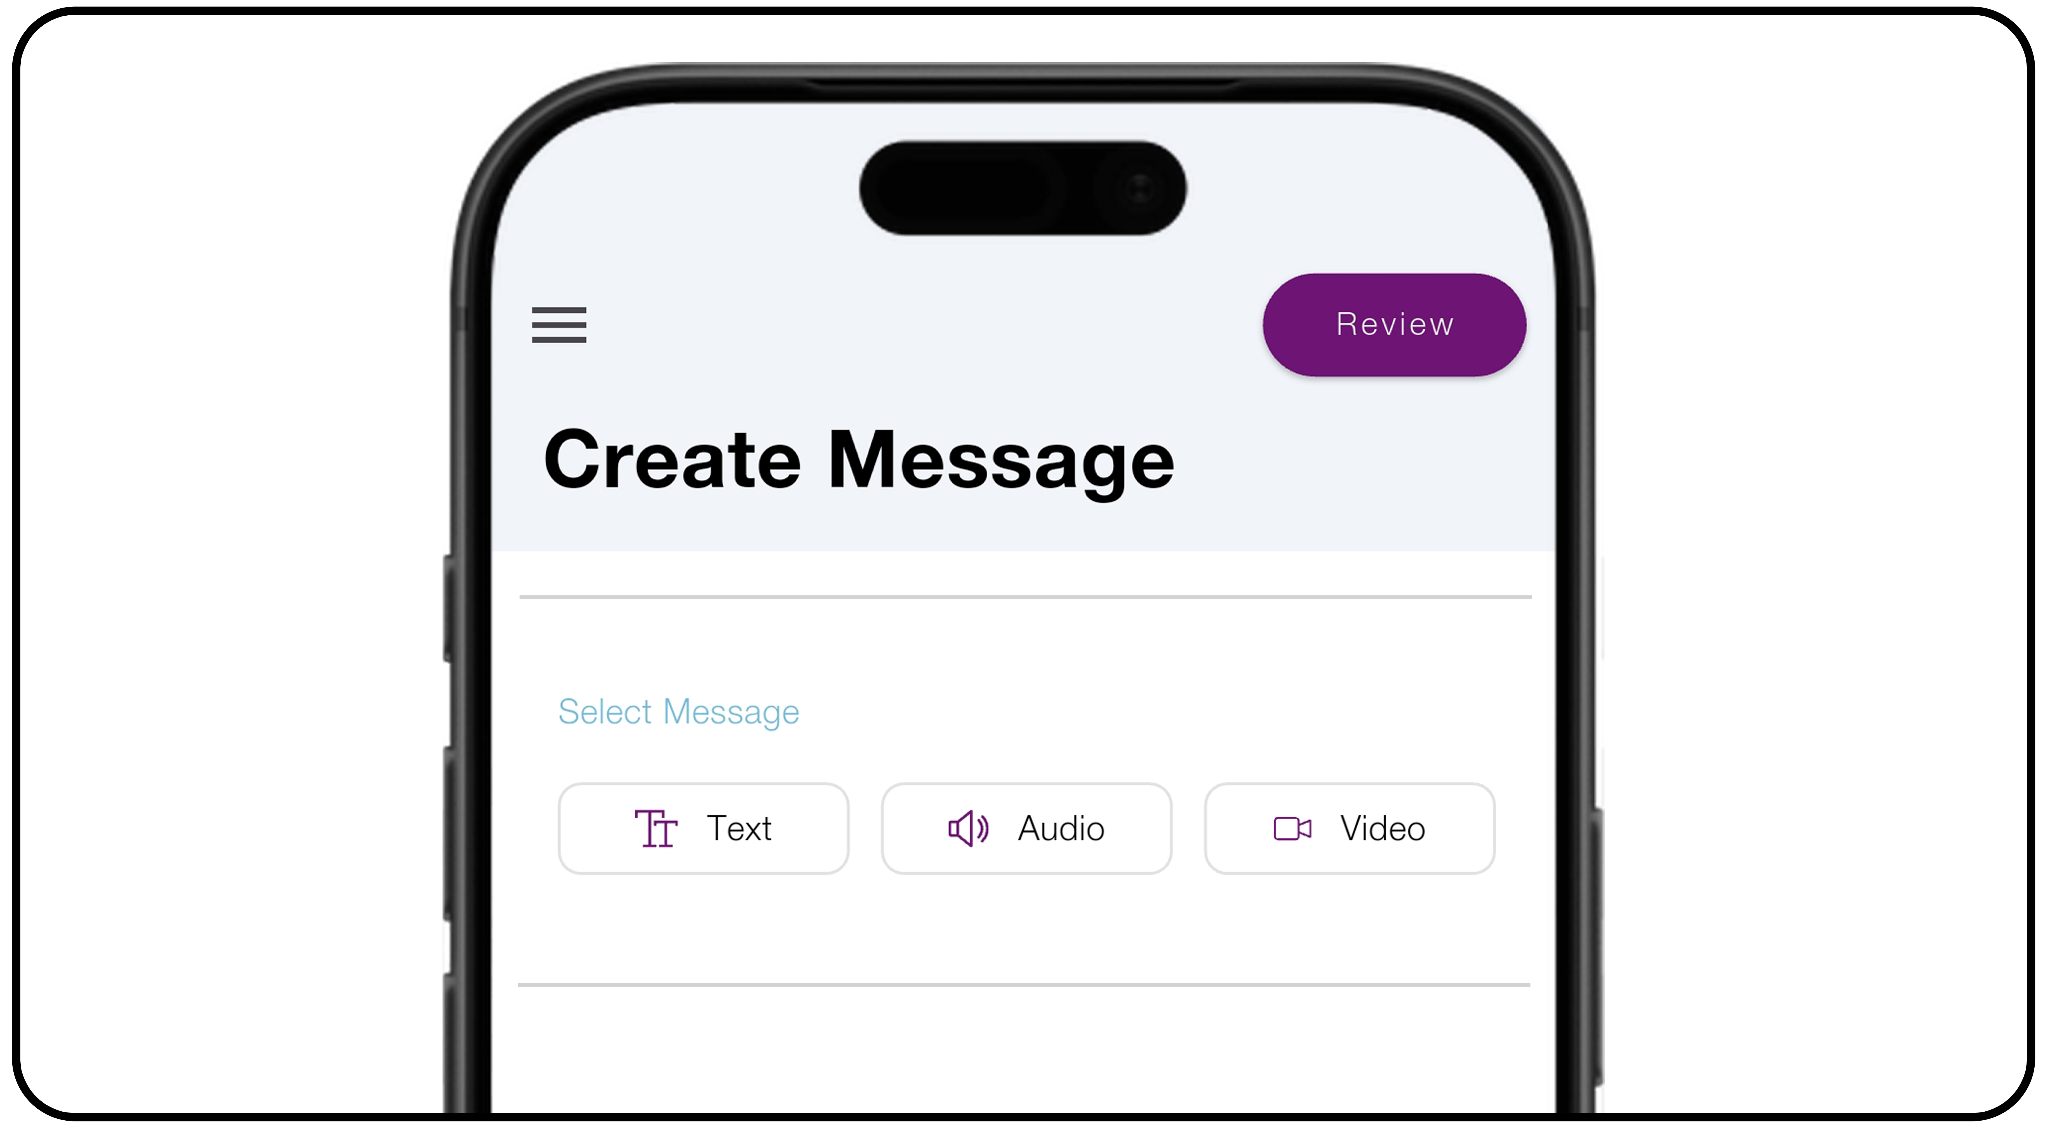
4. Select Your Message Type:
Next, select the type of message you want to create.
You have three options: Text, Audio, or Video.
- If you select Text, you can create a message using text only.
- If you select Audio, you can record a new audio message. You'll also
see previously recorded audio messages that can be selected or used as
a reference when creating a new message. - If you select Video, you'll have access to previously recorded video messages.
You can select an existing video or record a new video message. Once your new
video has been recorded, save it to your message.
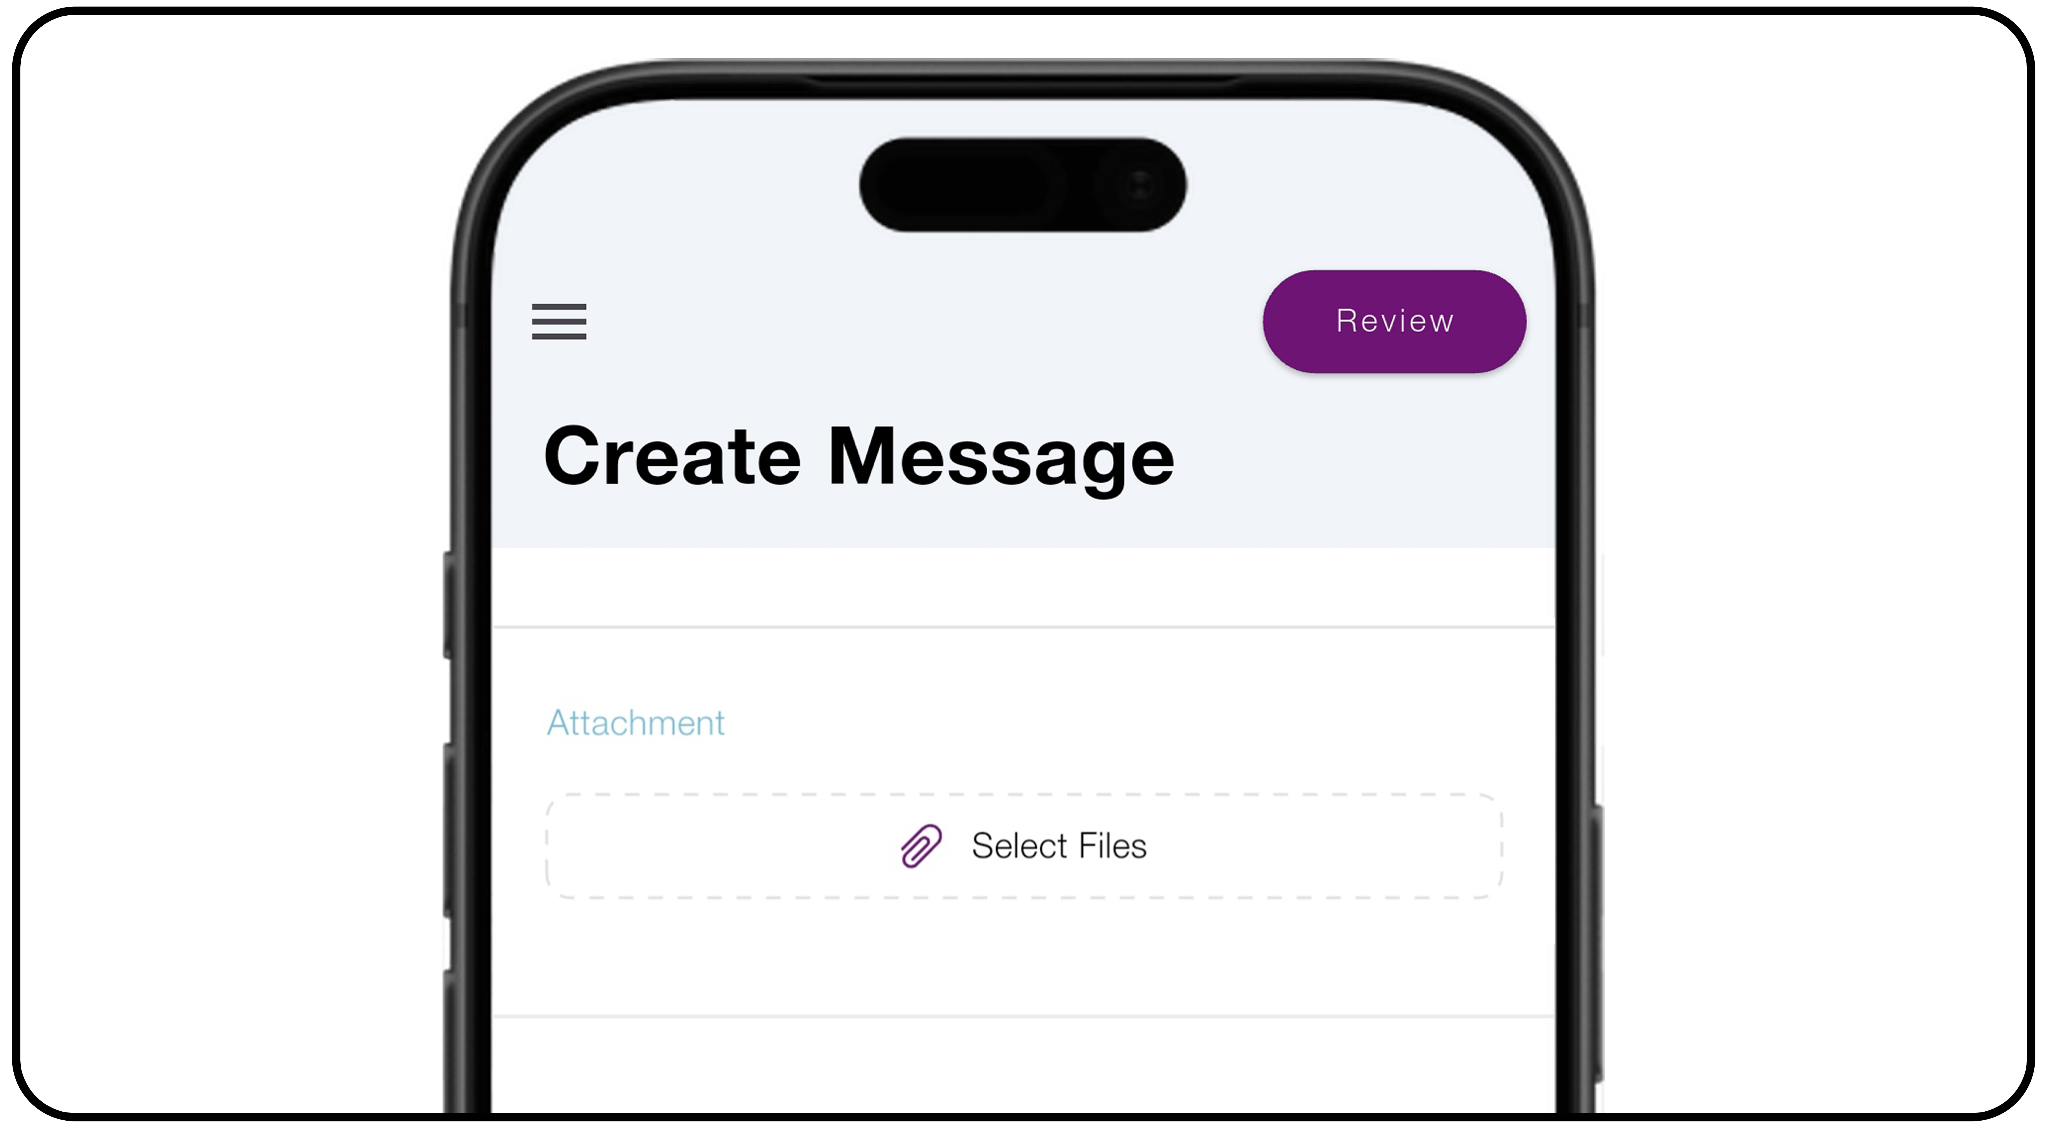
5. Add an Attachment:
- You can also include an attachment with your message.
- Select Add Attachment, then choose the file or material you want to include.
- Attachments can provide additional information to support the message
you're sharing.
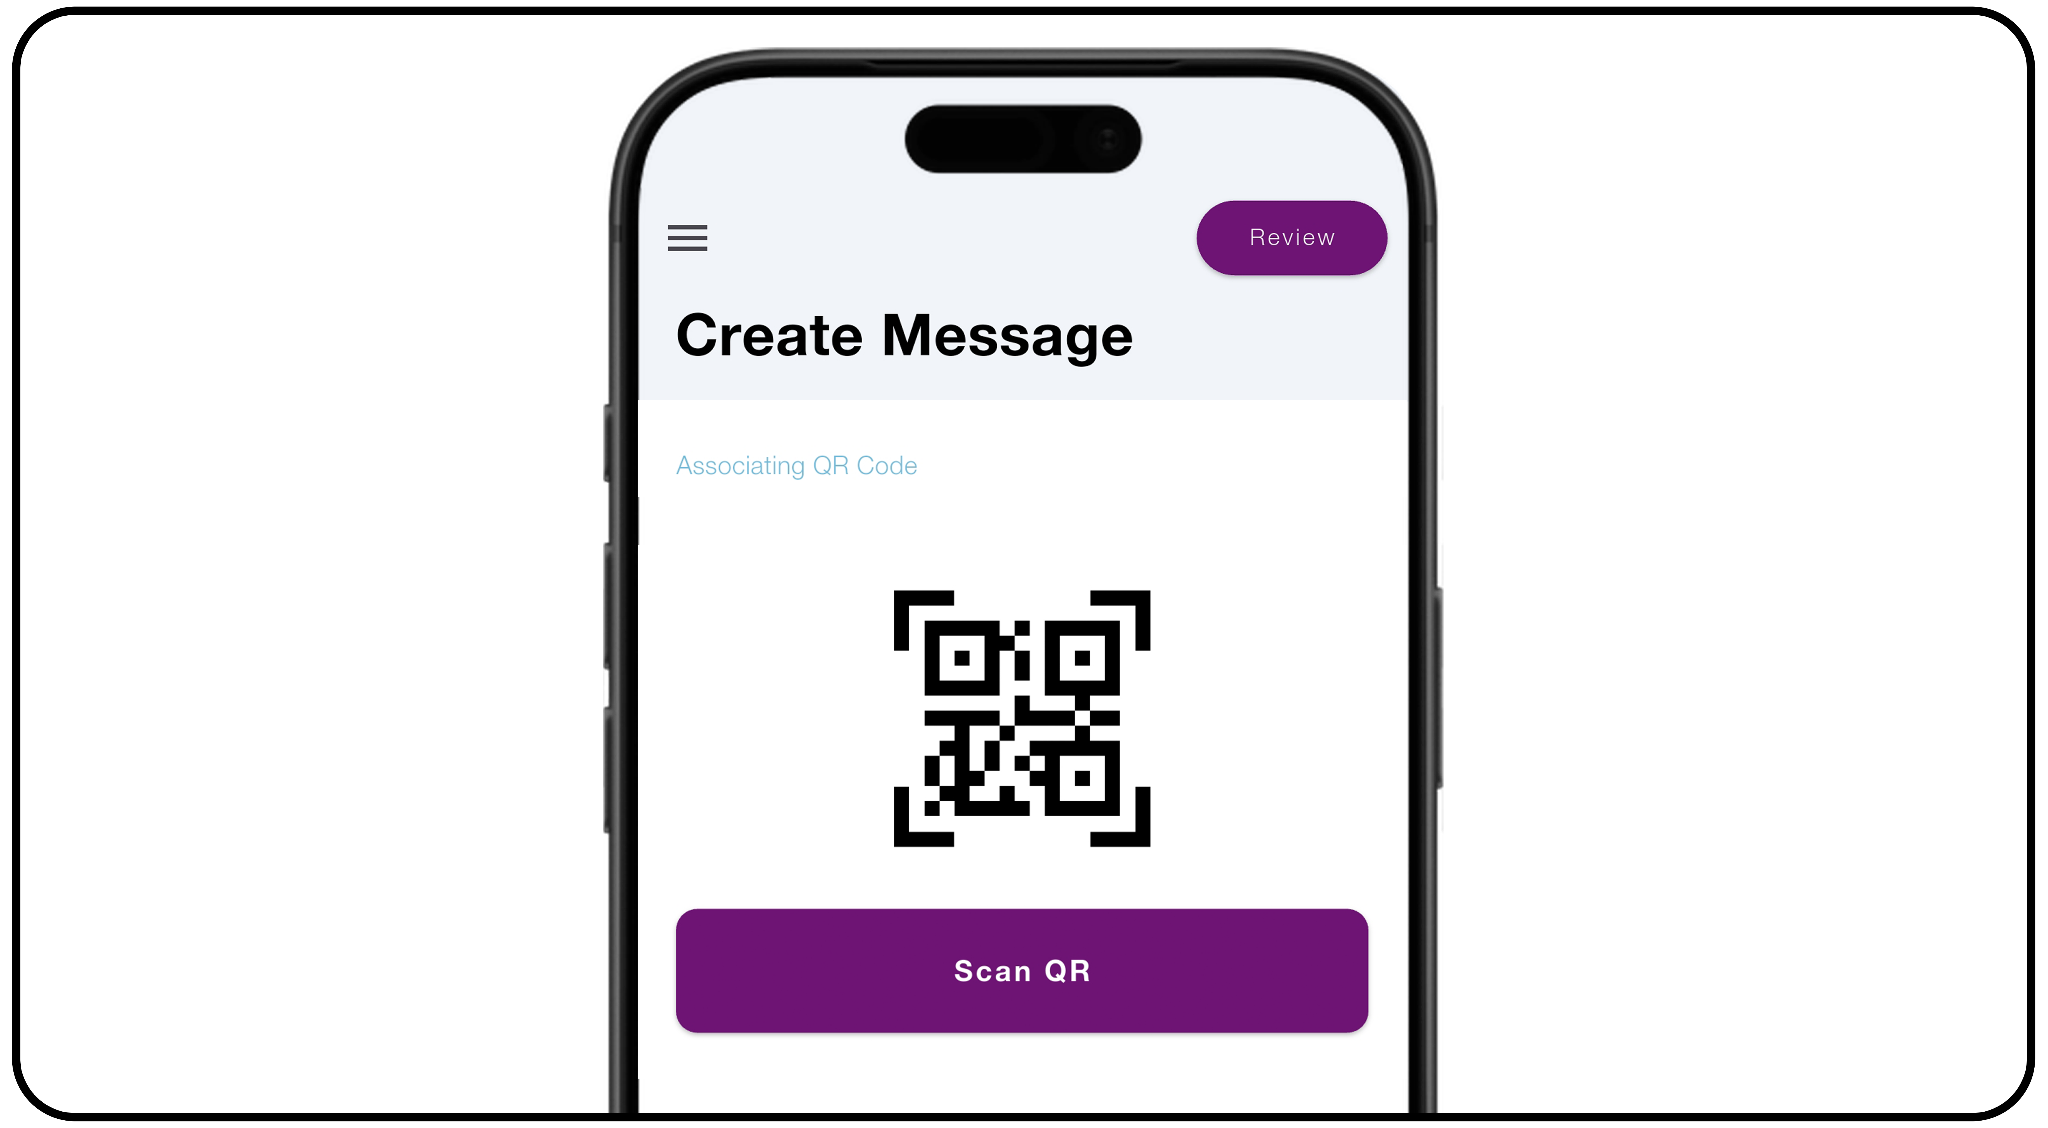
5. Activate Response: if you wish to provide a way for householder to respond.
6. If the response is active, choose the response type.
7. Open: Allow householder to response freely in the space provided in the Portal.
8. Custom: Create a list of multiple choice responses the householder will be limited to
select as their response. To create custom responses, select +Add New, type your
response, then Save.
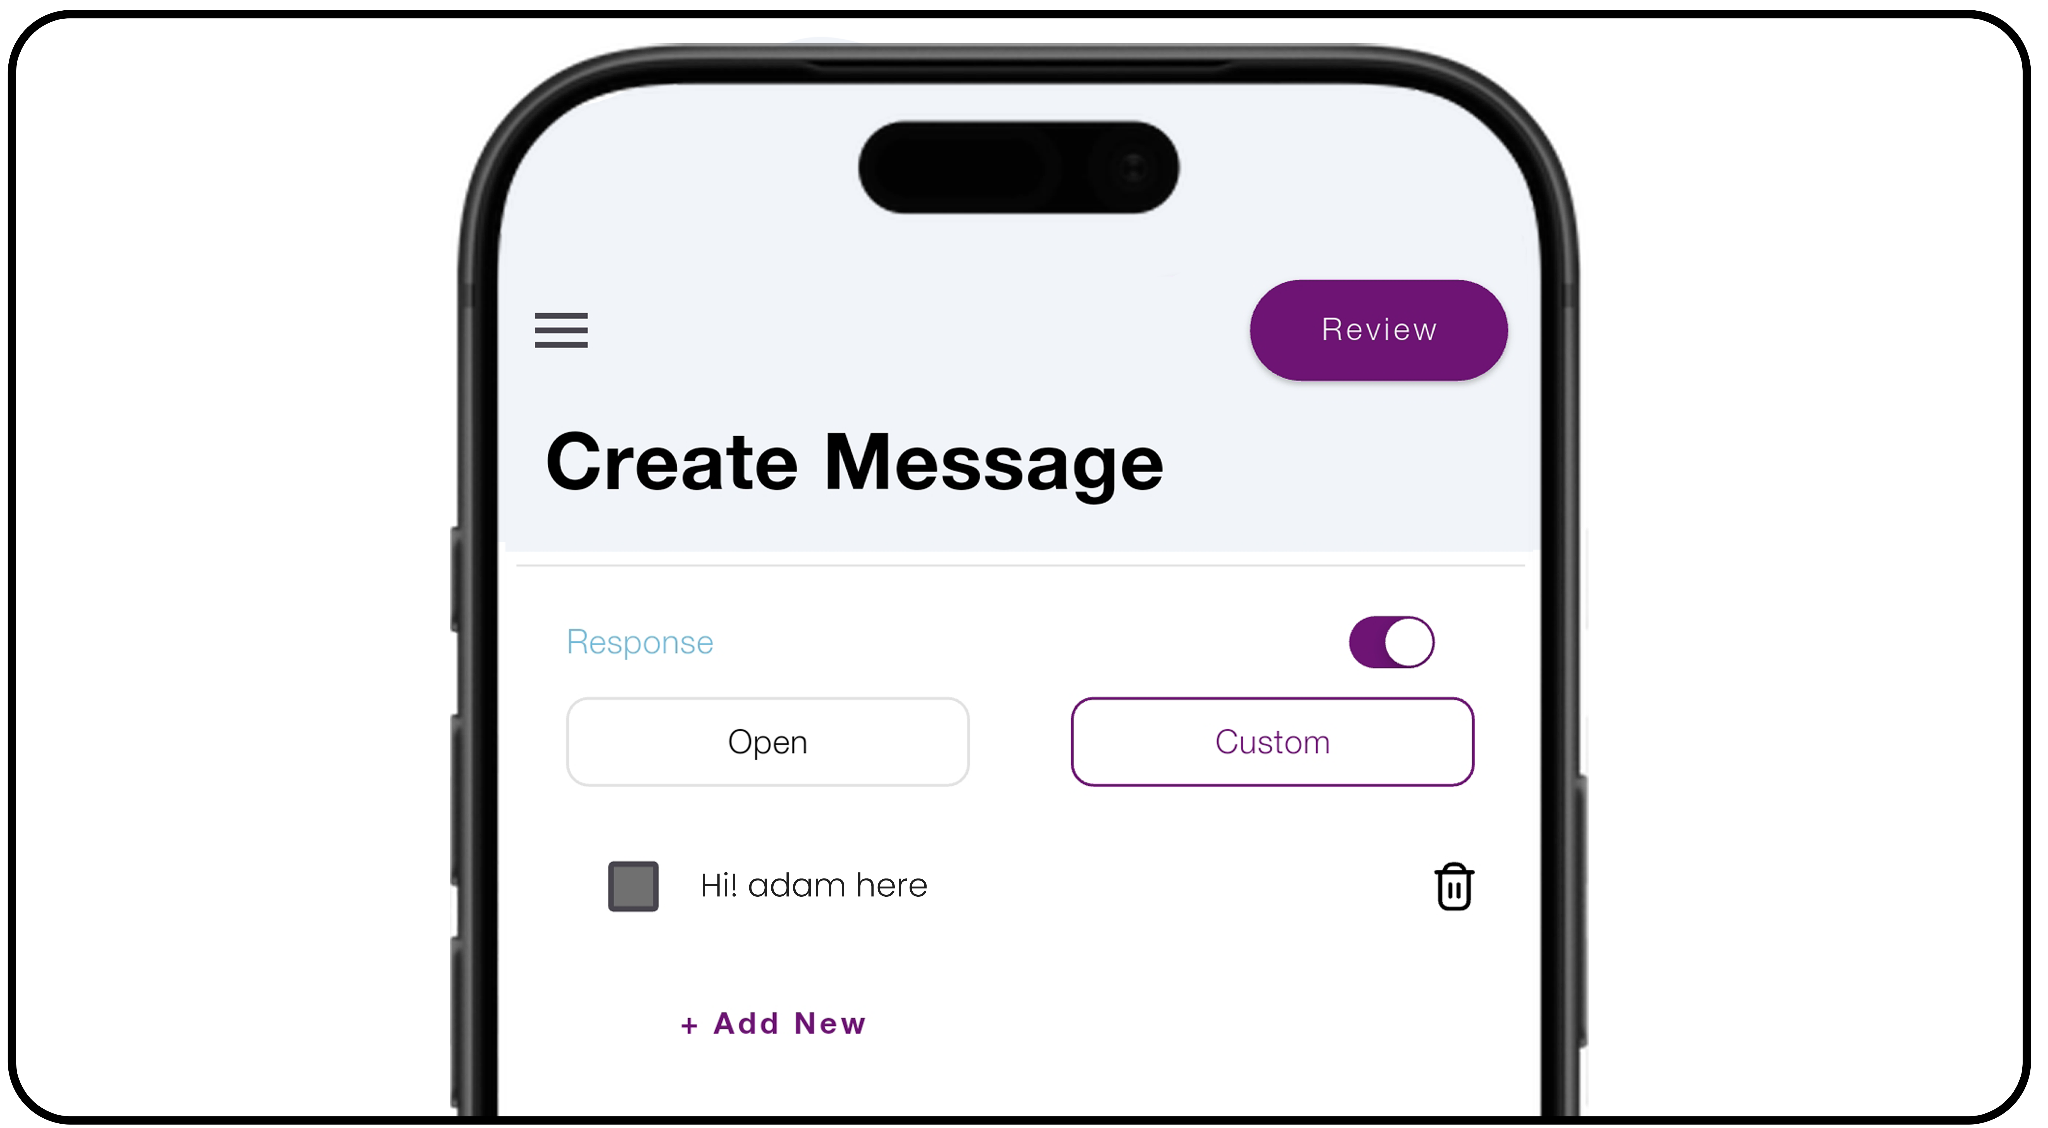
9. Associate Message with a QR:
- Next, associate your message with a new unused QR code.
- Using an unused QR Code, scan and confirm.
- Note, once scanned using the phone camera feature - QR code will direct
the householder to a secure portal where the associated message may be
read, heard, or viewed.
10. QR Label may be applied to the door, or material or literature left.
11. Save Your Message:
- Review your address, message type, recording, attachments, and QR code.
- When everything is correct, select Save.
- Your message is now created and associated with the selected location and
QR code. - Note, If the householder wishes to continue communicating with you, the
QR Code can also be rescanned once the householder downloads the
D2D Ministry App and add you as a contact to begin chatting.
Managing Return Visits
Create and Manage Return Visits. See how you can use the Return Visits feature in the D2D Ministry App to effectively manage your return visits and keep your ministry records organized. Document important conversation details, review your return visit history, and keep track of follow-ups so each visit can build naturally on previous conversations.
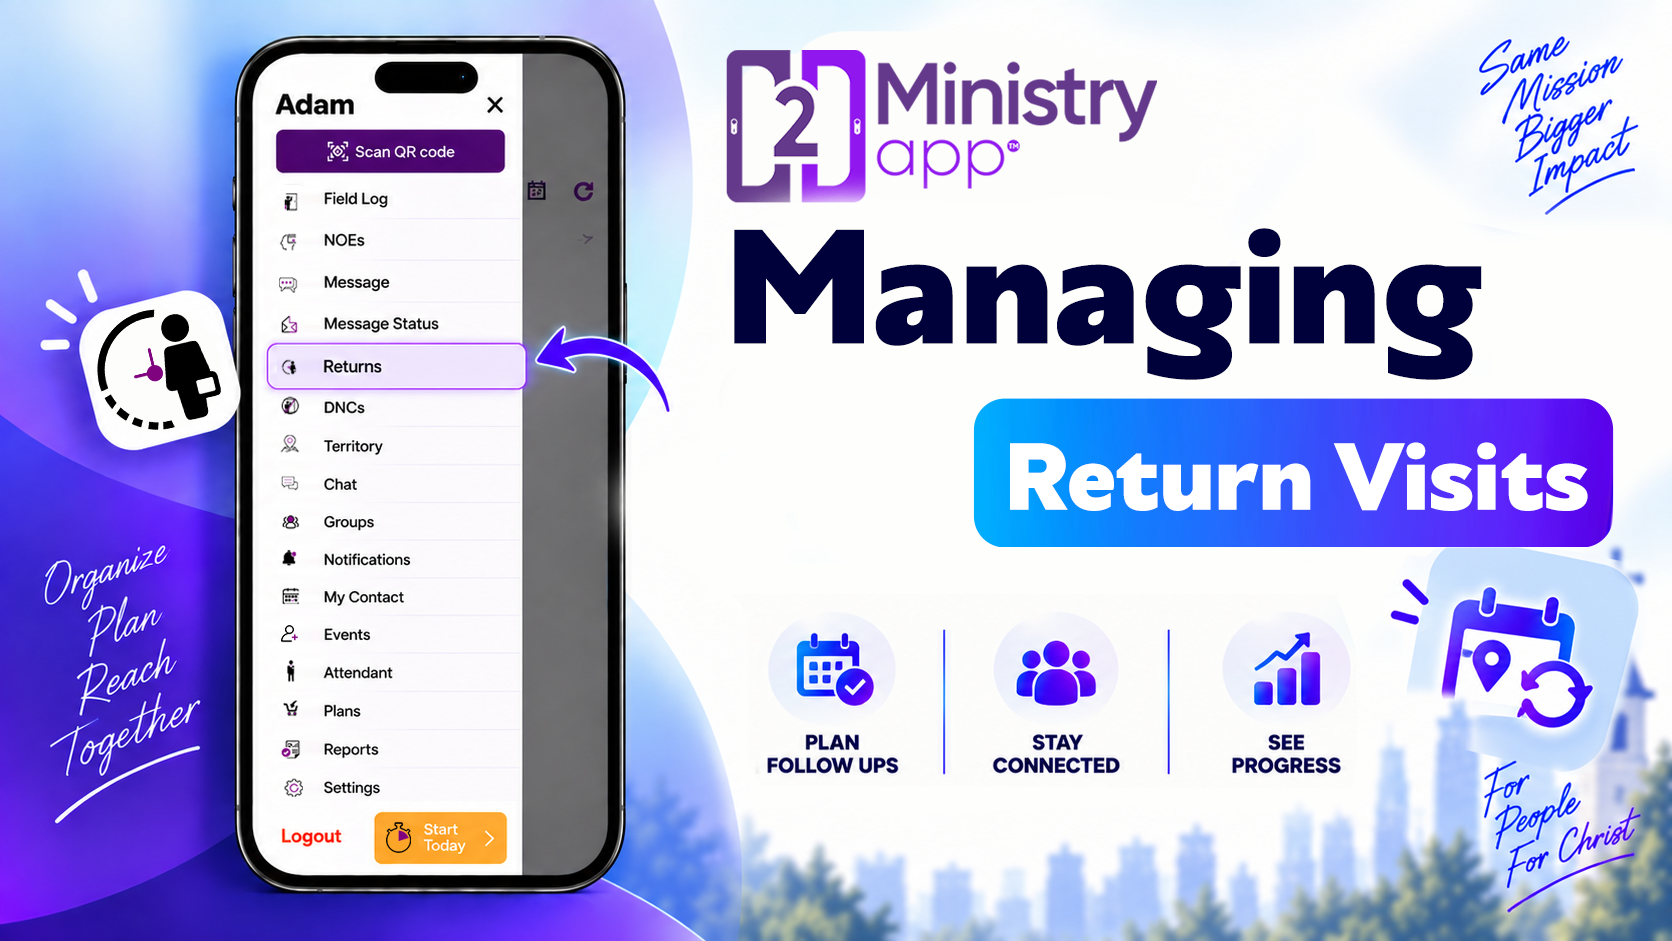
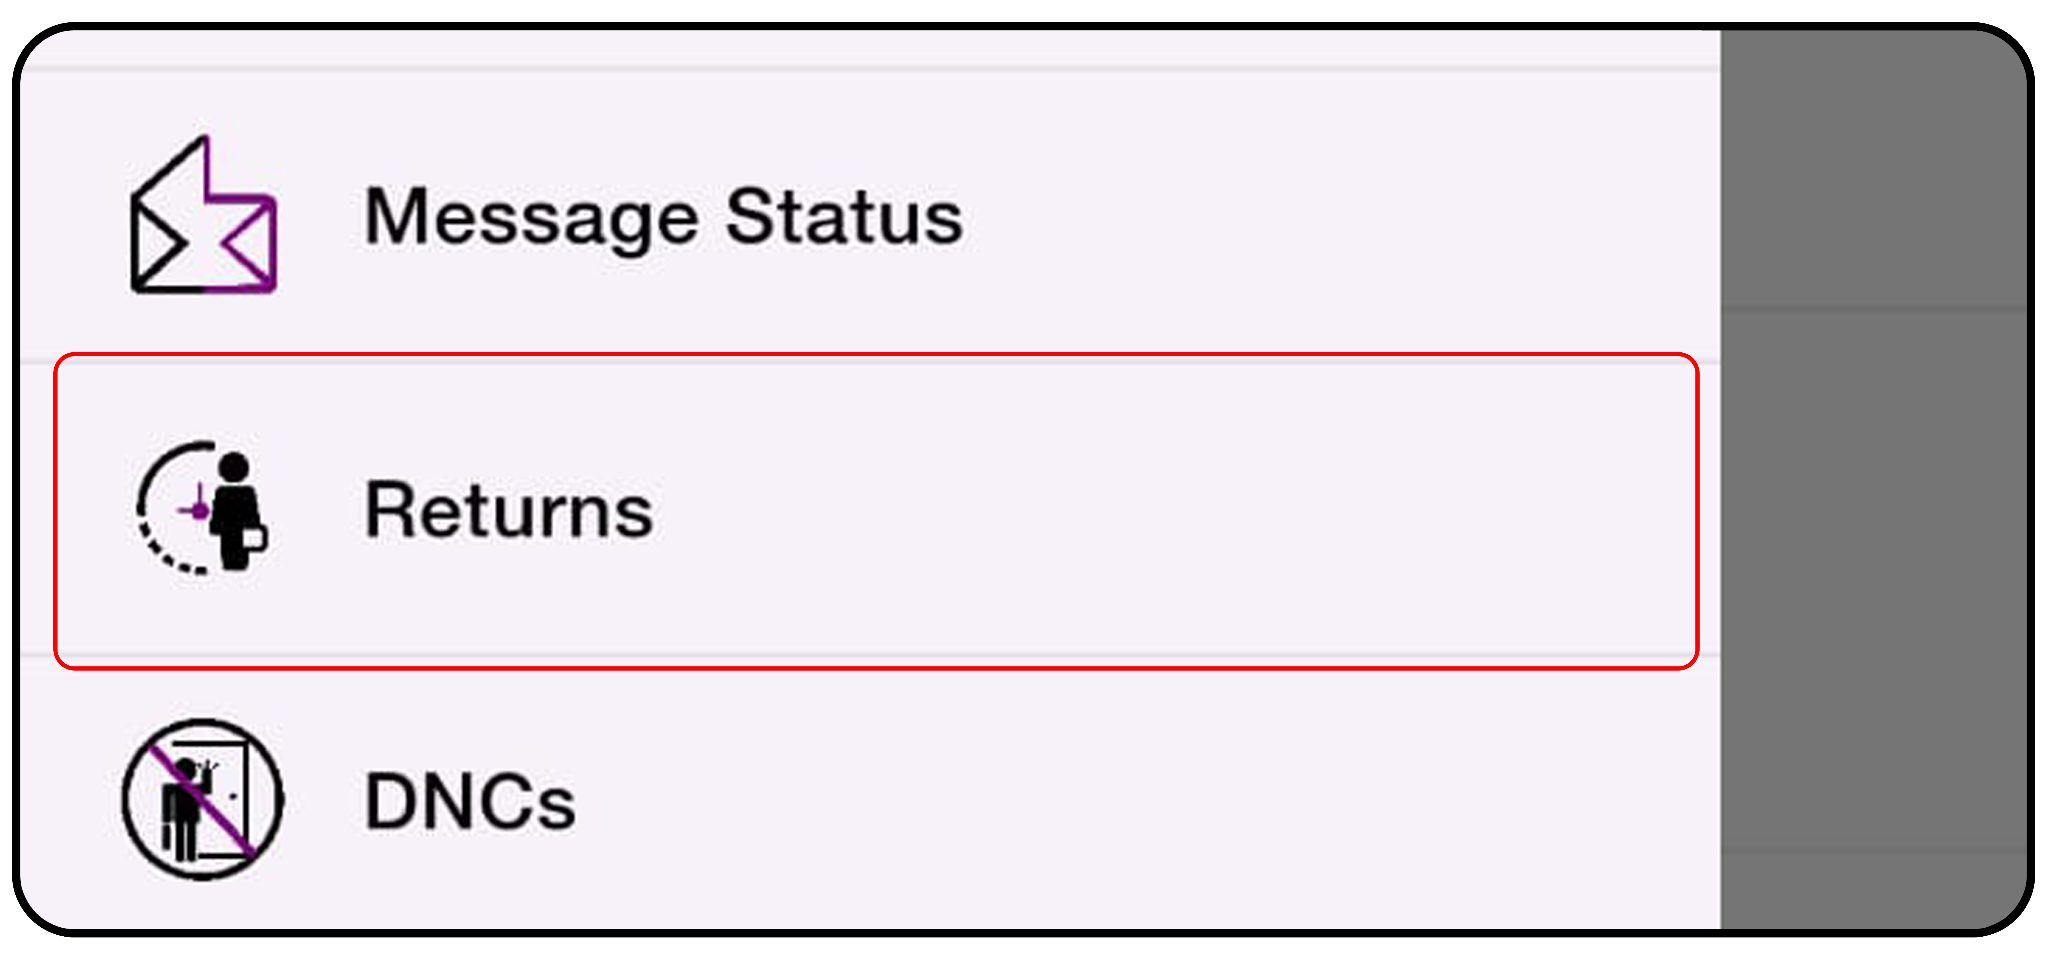
1. Open Return Visits: From the Main Menu, select Returns to access your
return visits.
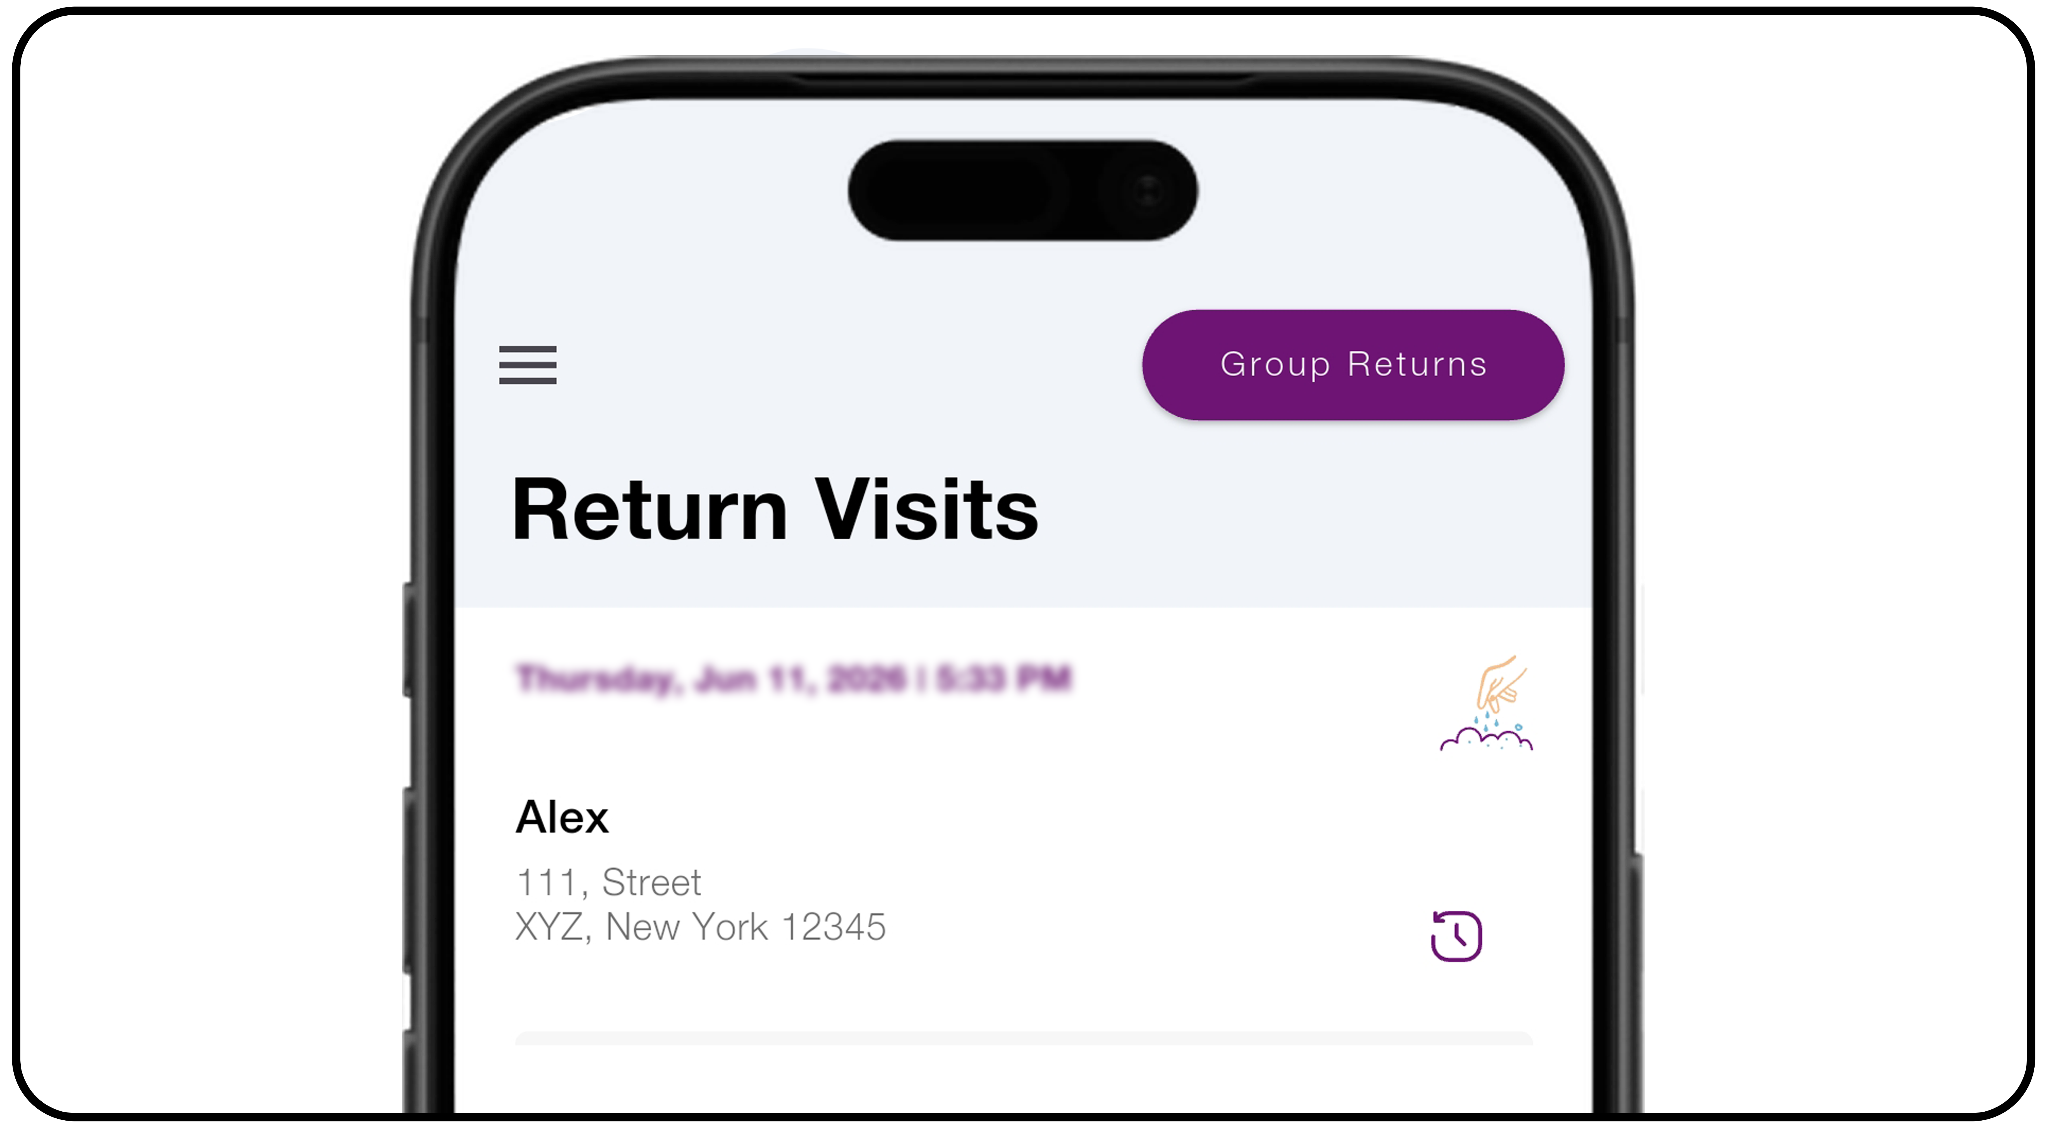
2. Access Your Return Visits: Access your active & incomplete return visits here
all in one place.
Tap on any return visit to access it & display the available details.
3. Complete a Return Visit: Choose from two options- Complete Return or
Schedule another Return.
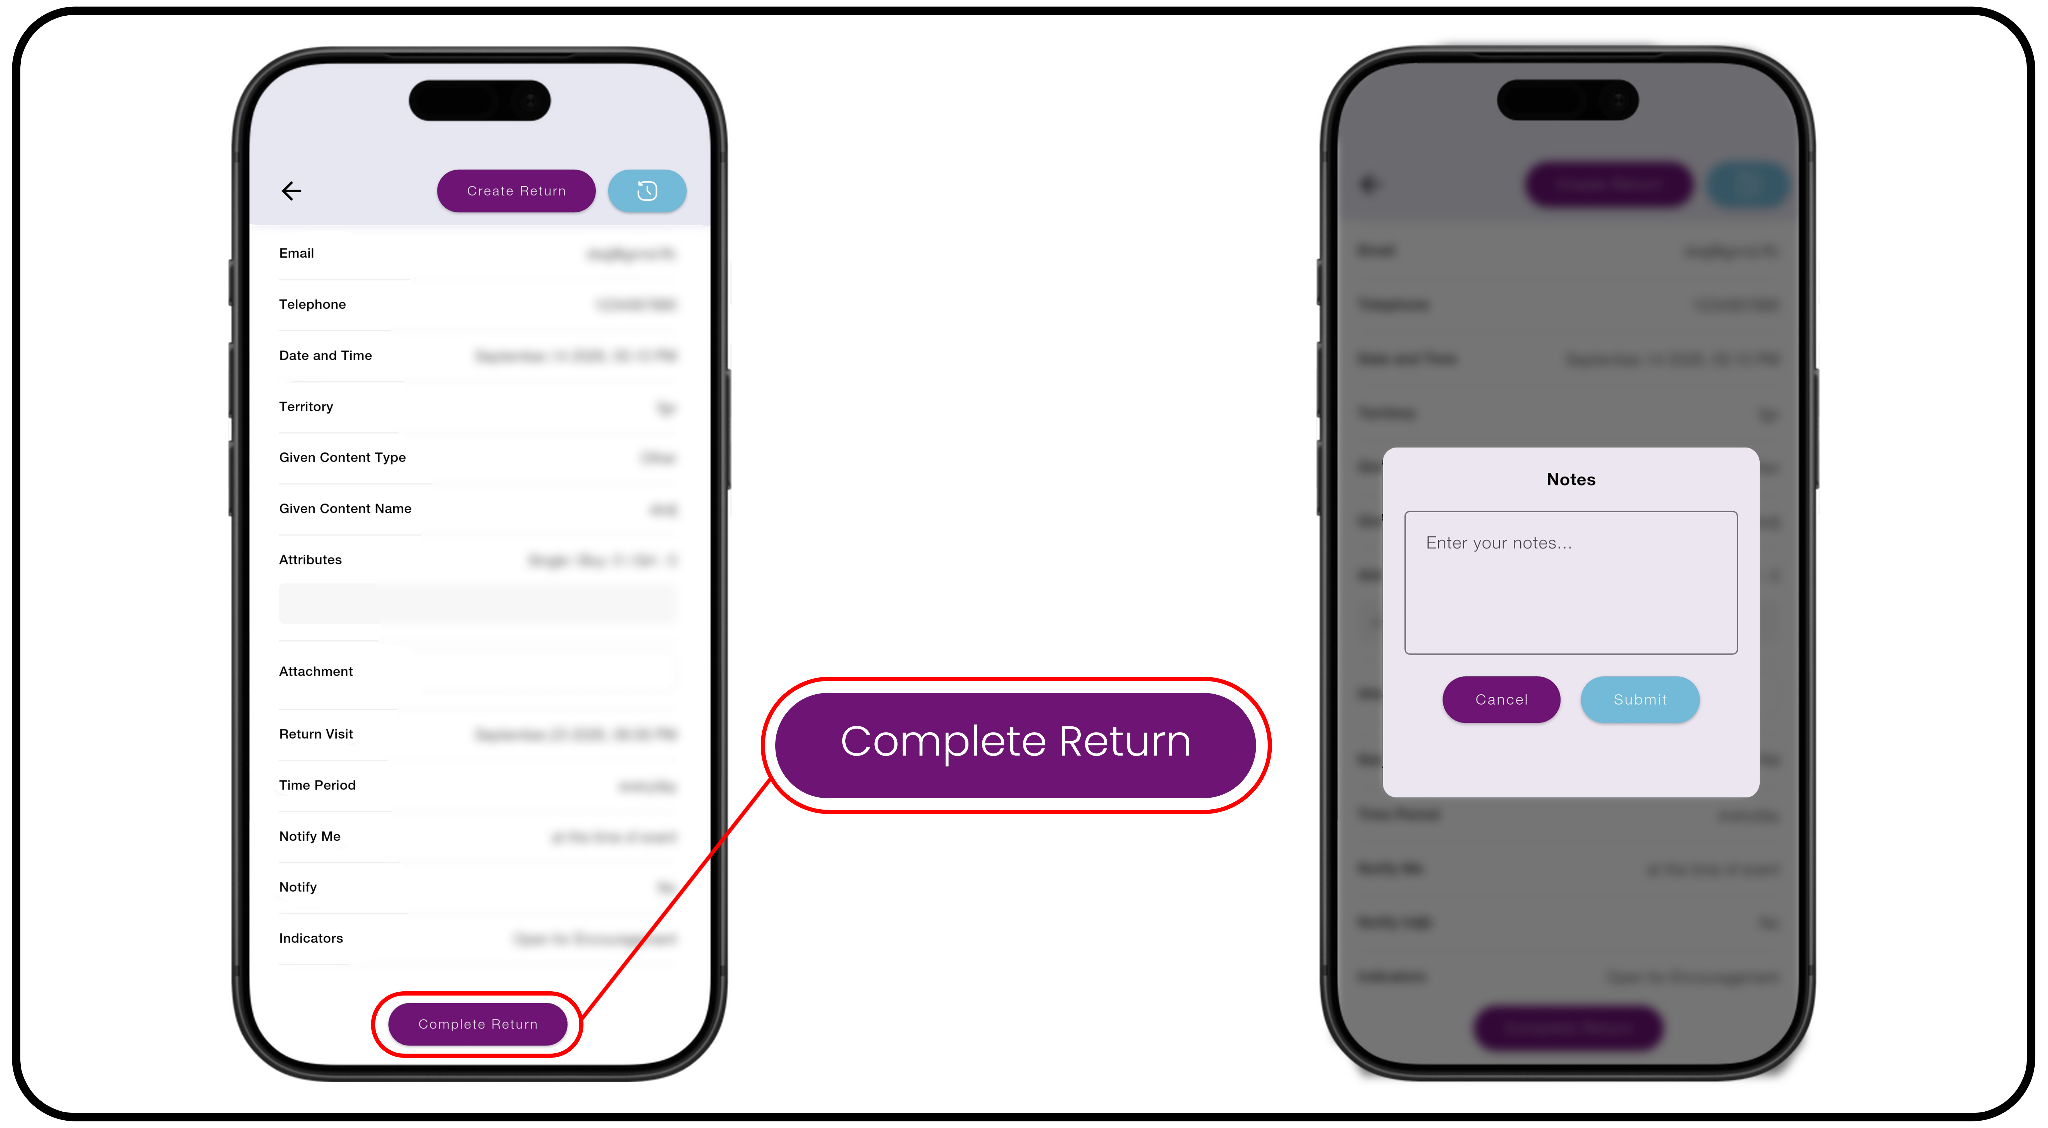
a) Tap Complete Return at the bottom of the page.
b) Add Note to document details from your visit.
c) Tap Submit to save
It can be reviewed later in the Return History.
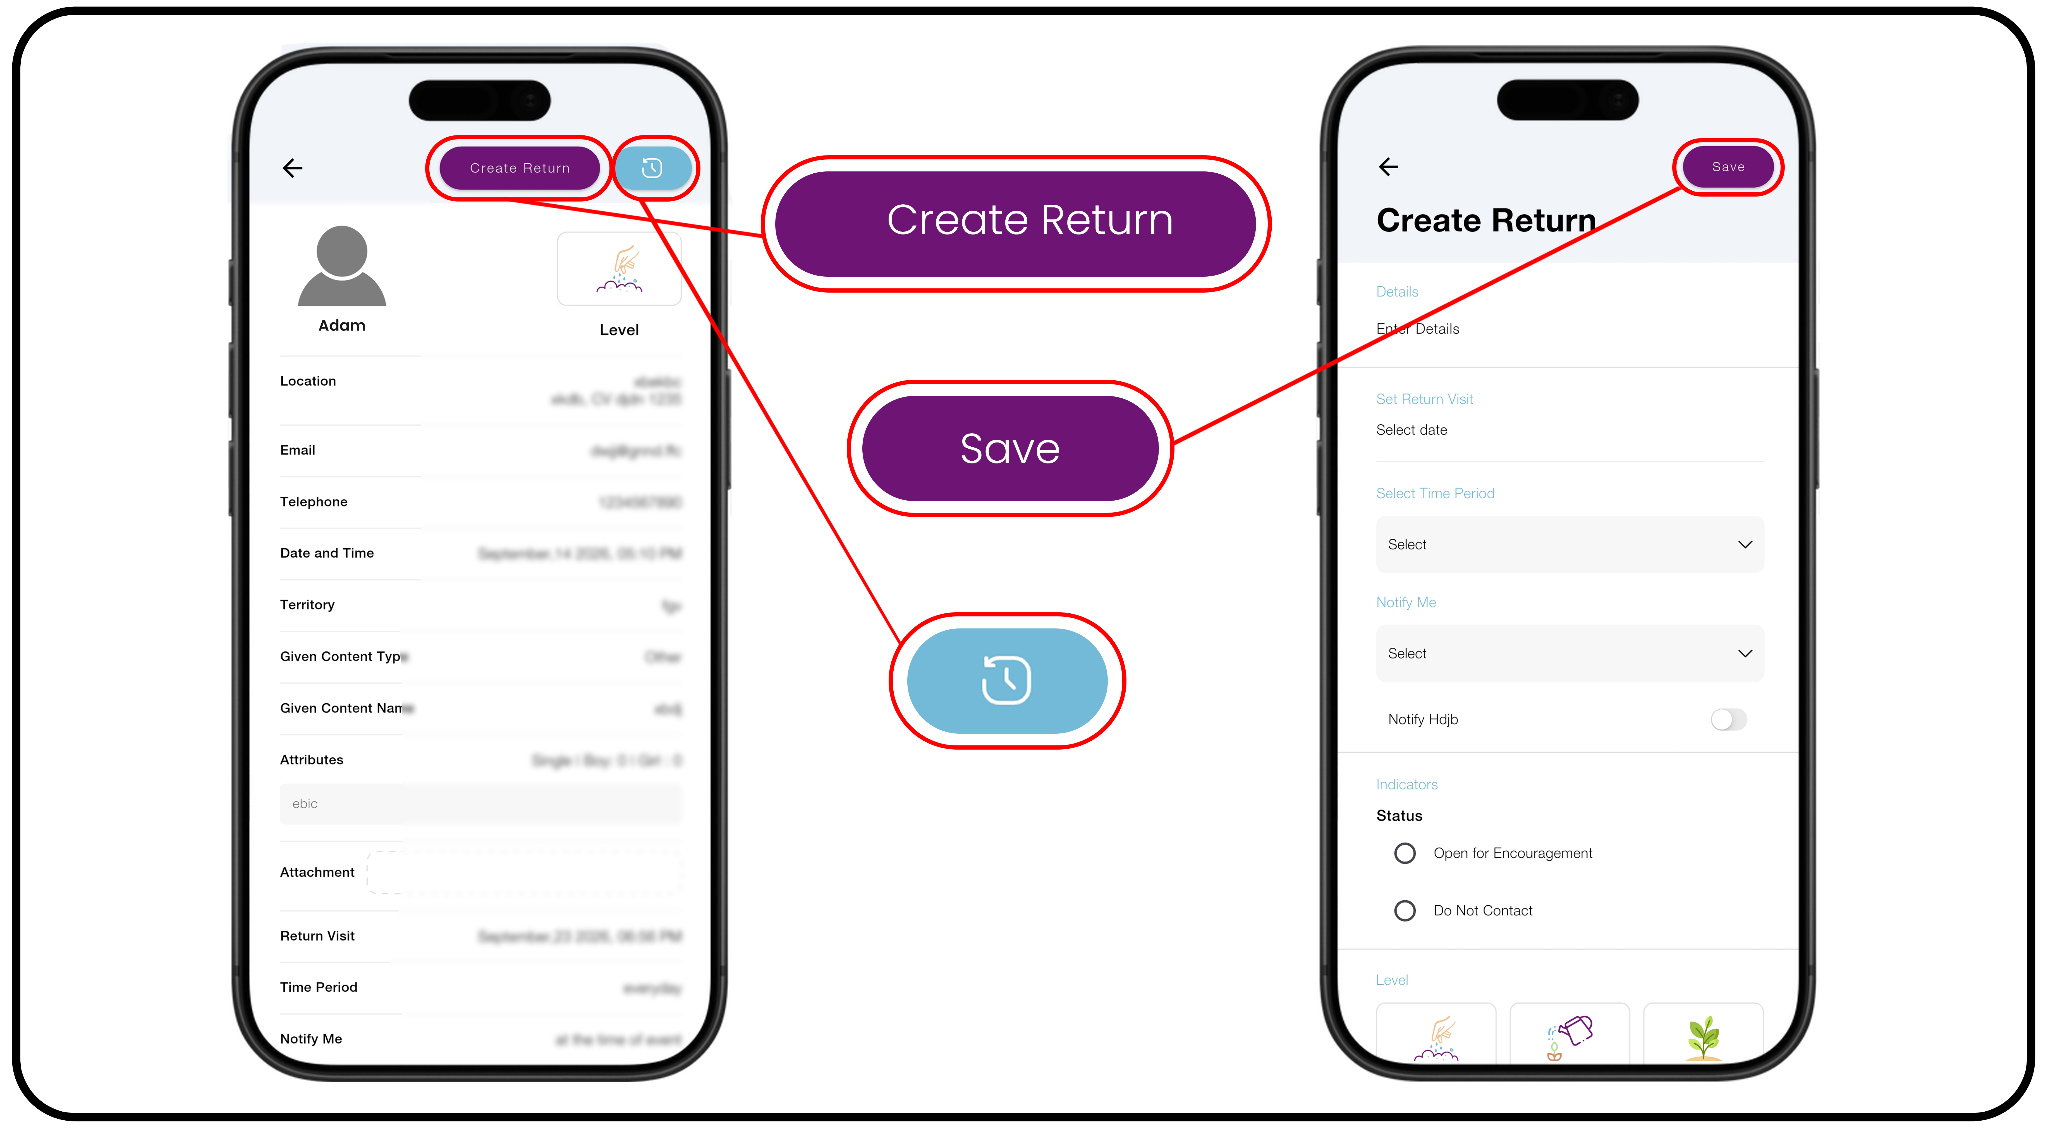
4. Creating Another Return Visit:
a) Tap Create Return at the top of the page.
b) Select Enter Details, and then select New Return Visit.
c) Enter the appropriate information & schedule the next return visit.
This allows you to maintain a continuous history of your visits with the
householder.
5. Viewing Return Visit History: Tap the Blue Clock tab at the top of the page to
review the history of your visits with that particular stakeholder.
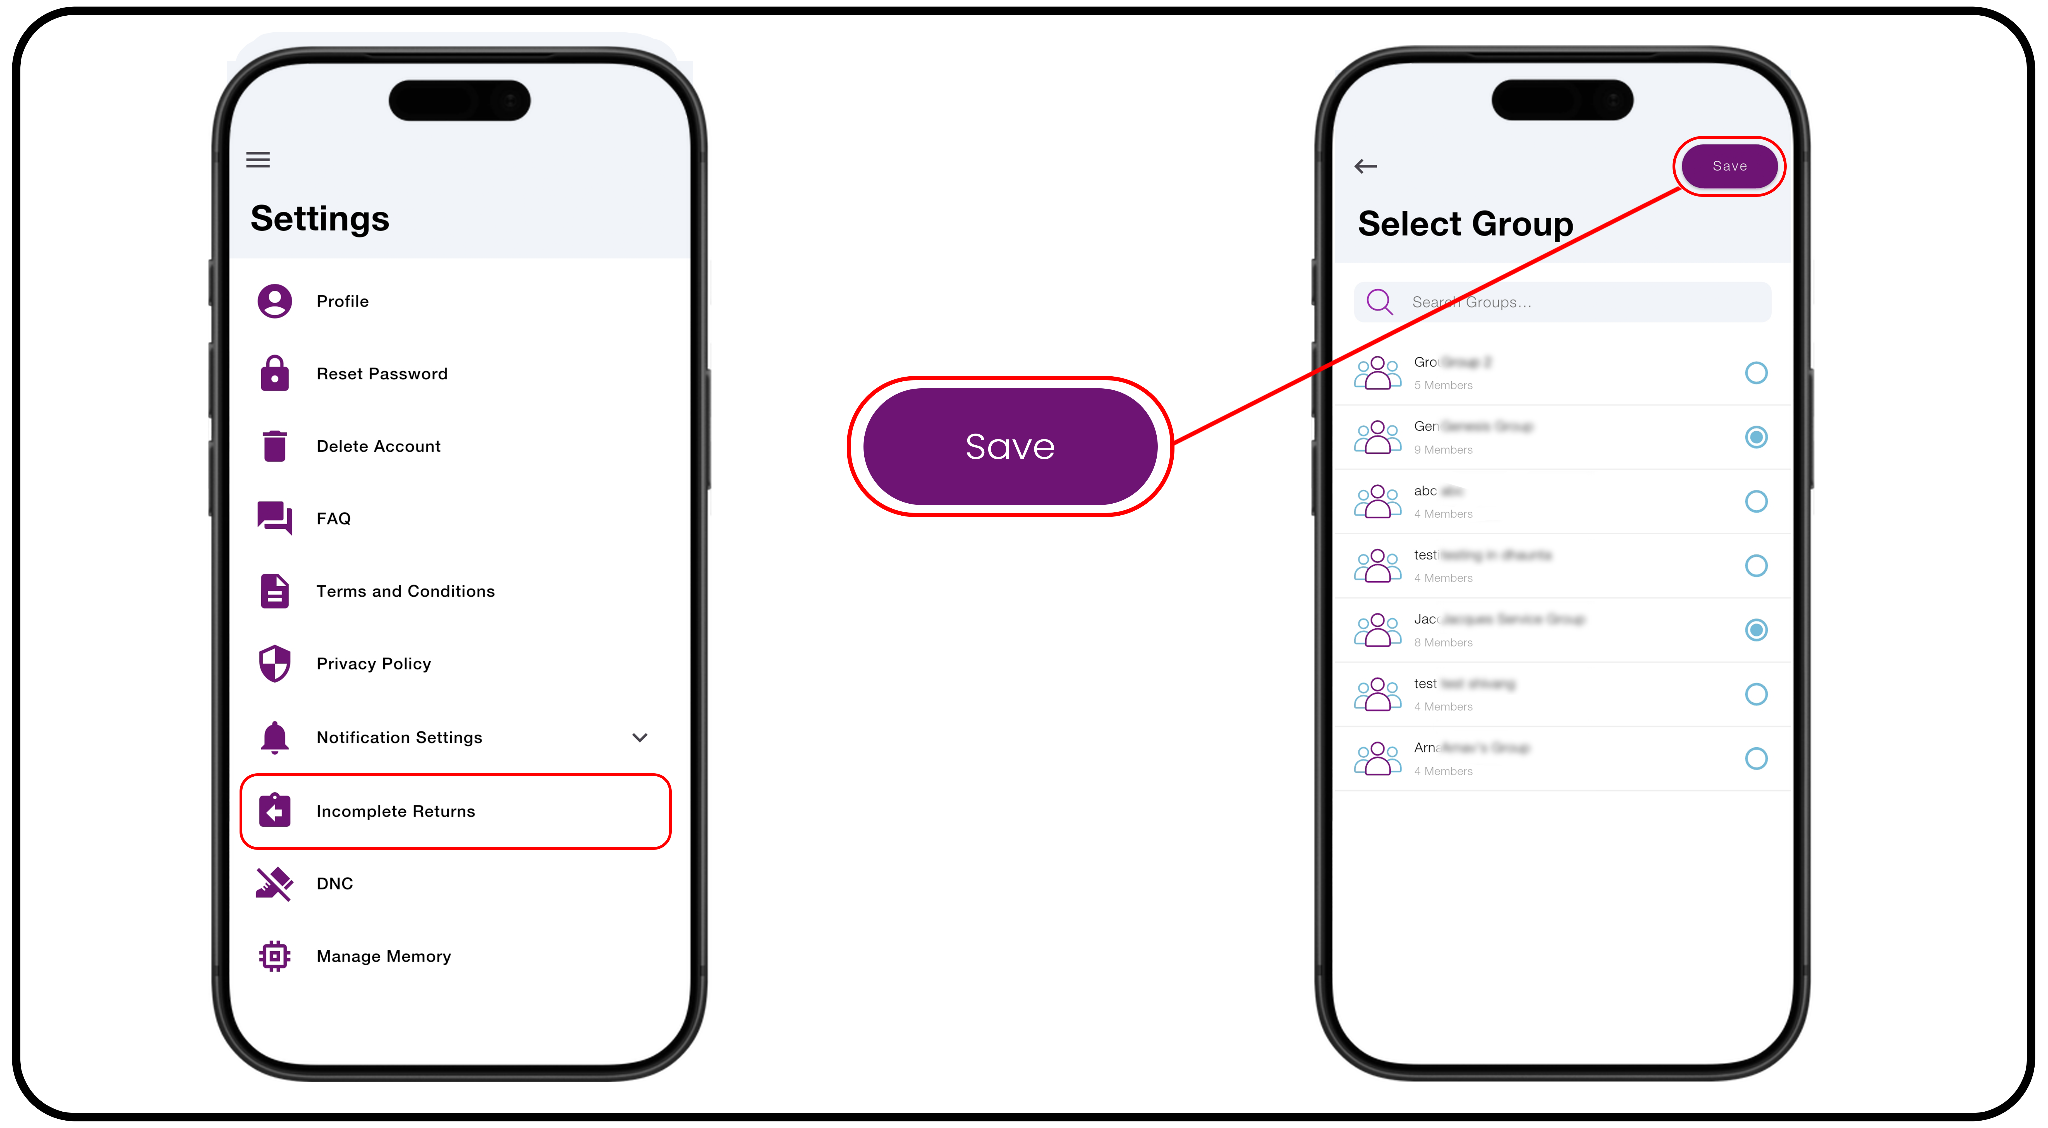
6. Managing Incomplete Return Visits: To configure who receives your incomplete Returns-
- Go to Settings from the main menu, then select Incomplete Returns.
- Select the appropriate Service Group, or the group that includes Pioneers.
- Tap Save to save the changes.
The D2D Return Visit feature makes it easy to manage your return visits from
start to finish. You can active & incomplete returns, document each visit,
create new return visits, review your return histroy & share incomplete returns
with the appropriate service group. With just a few taps. D2D helps you keep
your return visits organized & makes it easier to follow & continue the conversation.
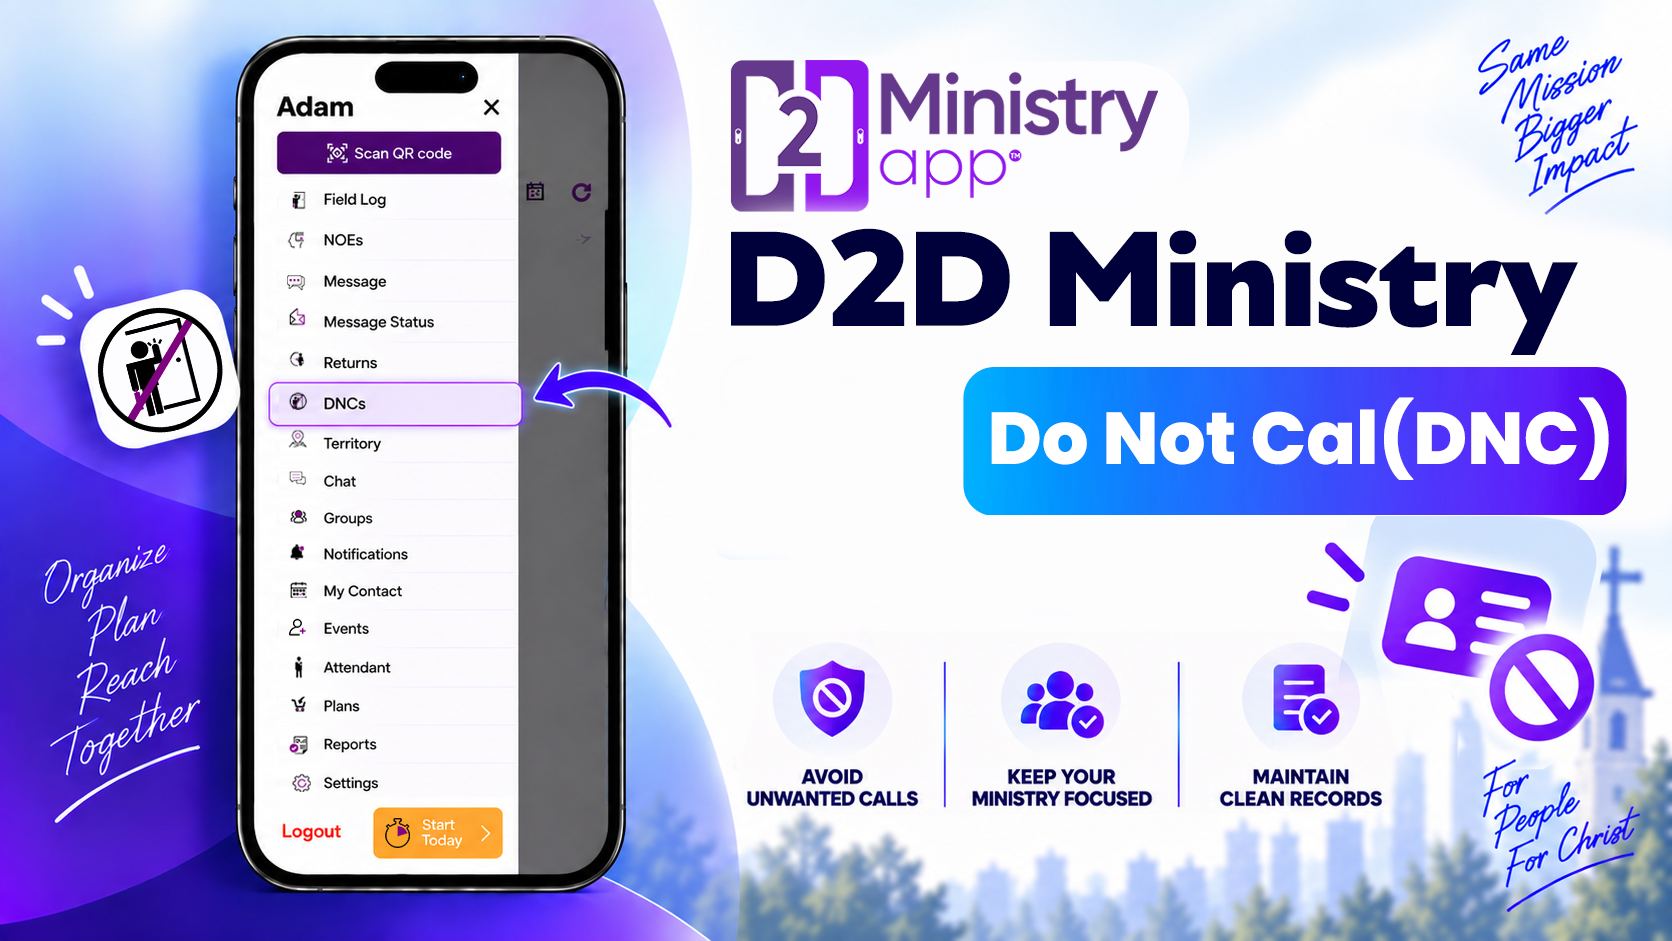
D2D Ministry- Do Not Call(DNC)
No more guessing at the door if it should be worked. With D2D Ministry App, all DNCs are at your fingertips. This important feature helps ensure these requests are respected and helps prevent publishers from unintentionally contacting an address that has been removed from the call list. See how we can effortlessly submit new Do-Not-Calls directly to the Congregation Service Overseer and instantly share the details with the rest of the Publishers.
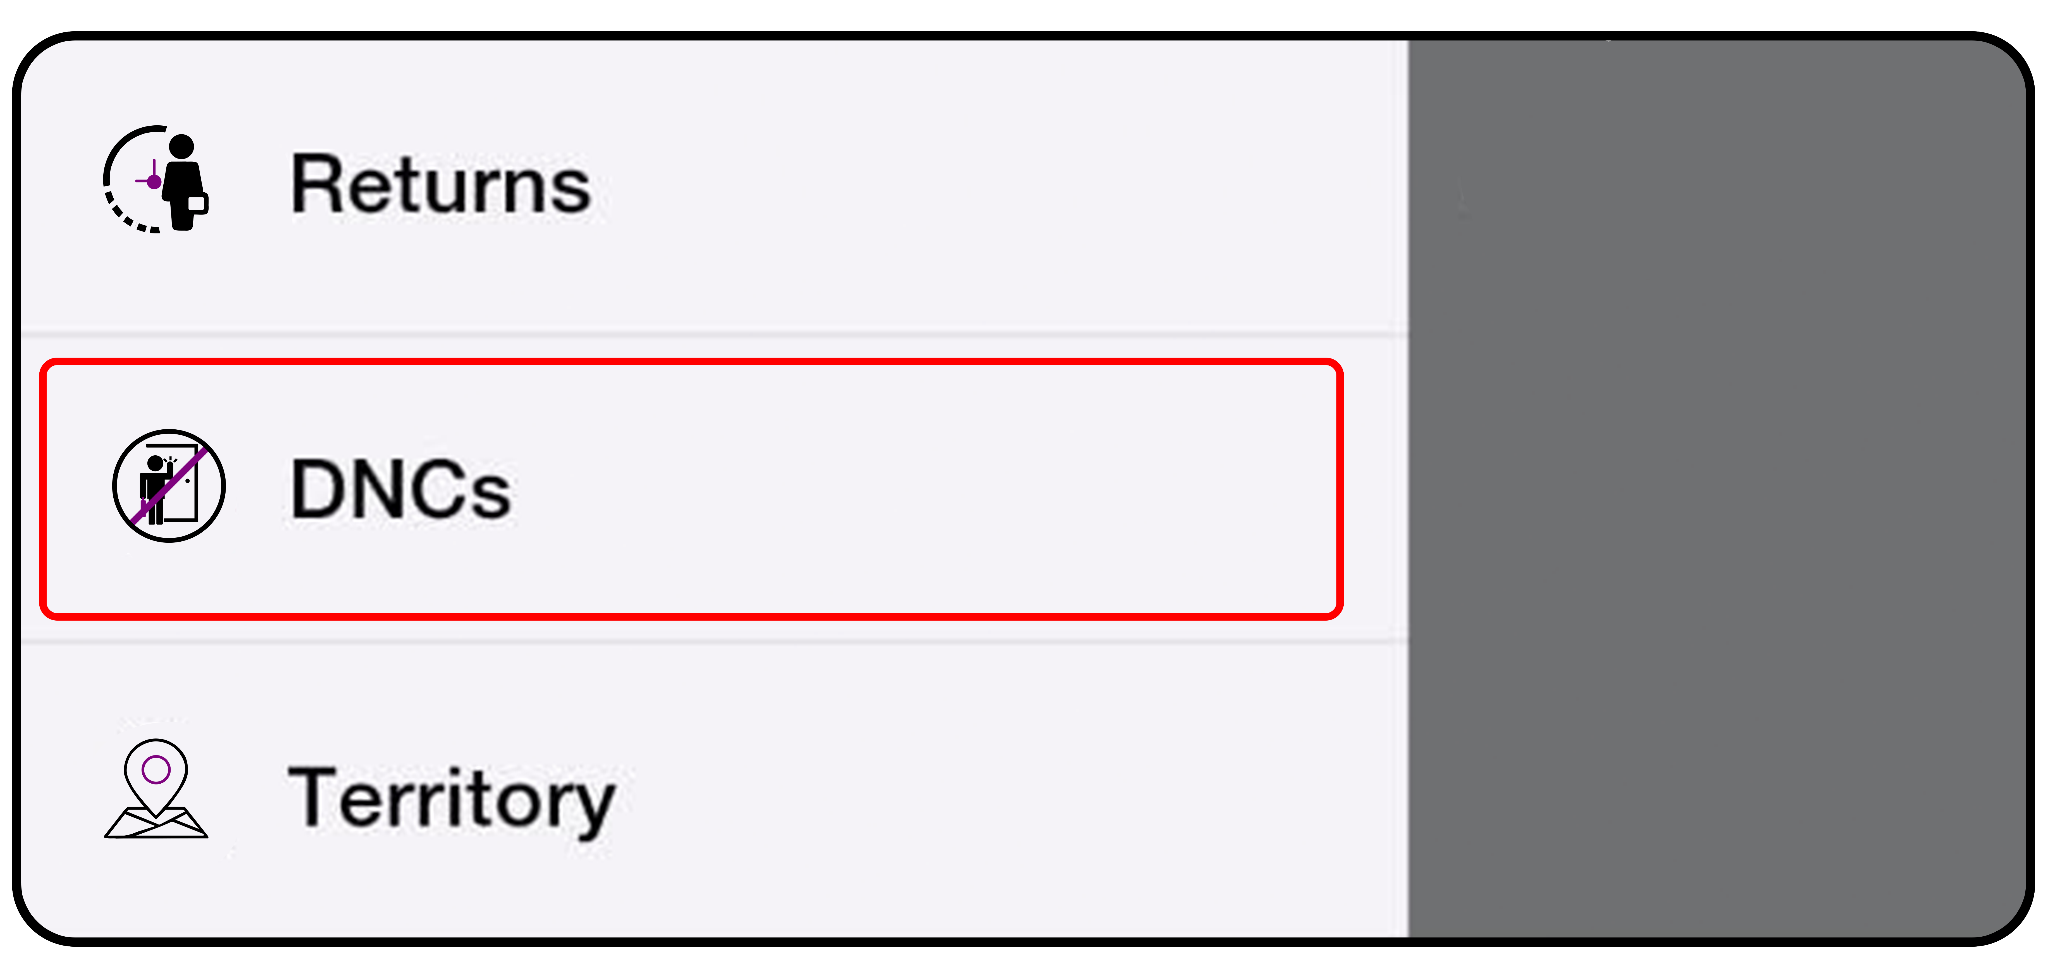
1. Open the Do Not Call Feature: Open the D2D Ministry App and navigate to the
Do Not Call feature.
2. Review/Access Existing Do Not Call Records: All Do Not Call records from all
territories will be added by the Service Coordinator.
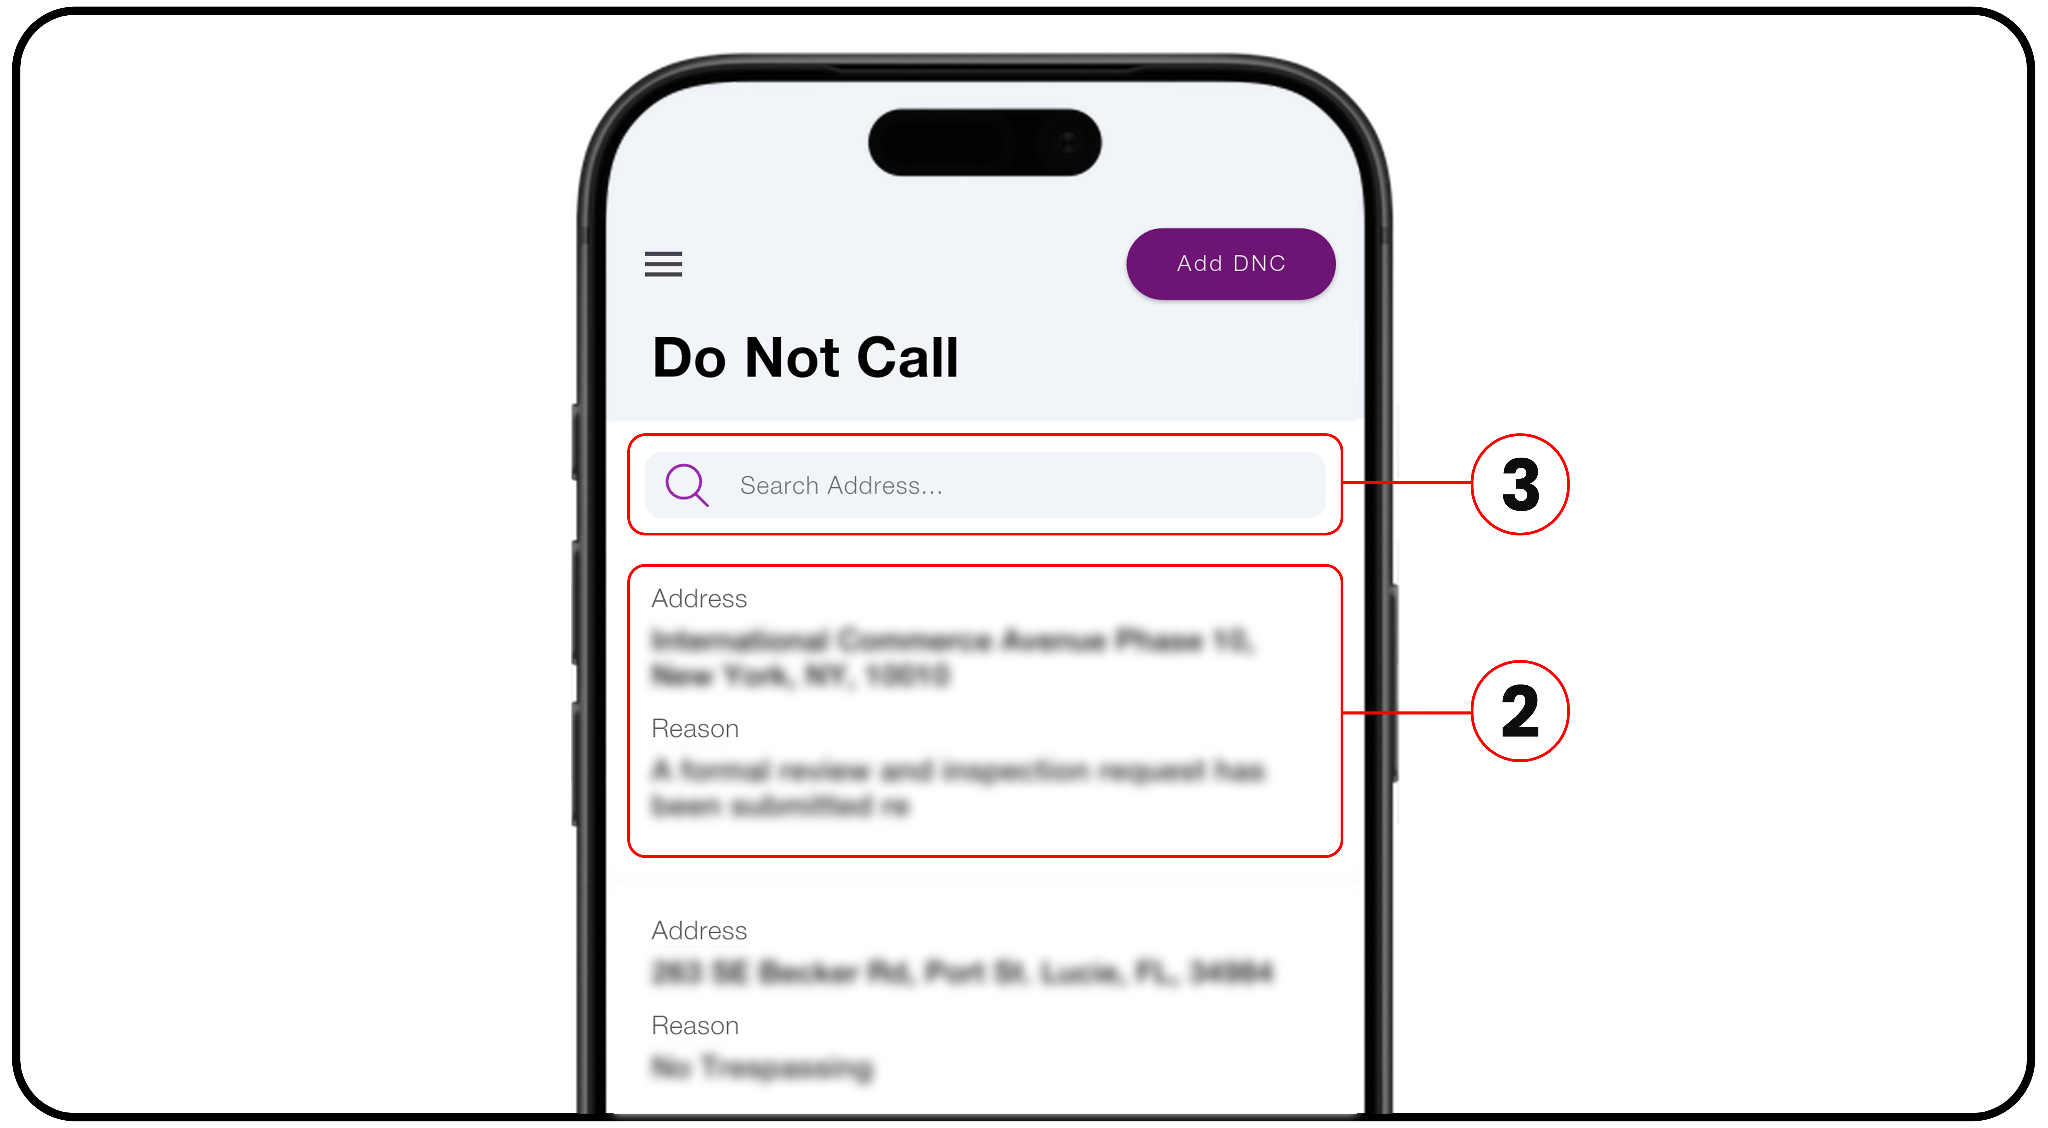
Once a Do Not Call has been entered, the record will be available to all active
publishers using the D2D Ministry App.
3. Search for a Do Not Call: Tap the search field & search for existing Do Not Call
records.
4. Add a new Do Not Call: If a householder requests that their address be placed
on the Do Not Call list, tap Add DNC at top right corner.
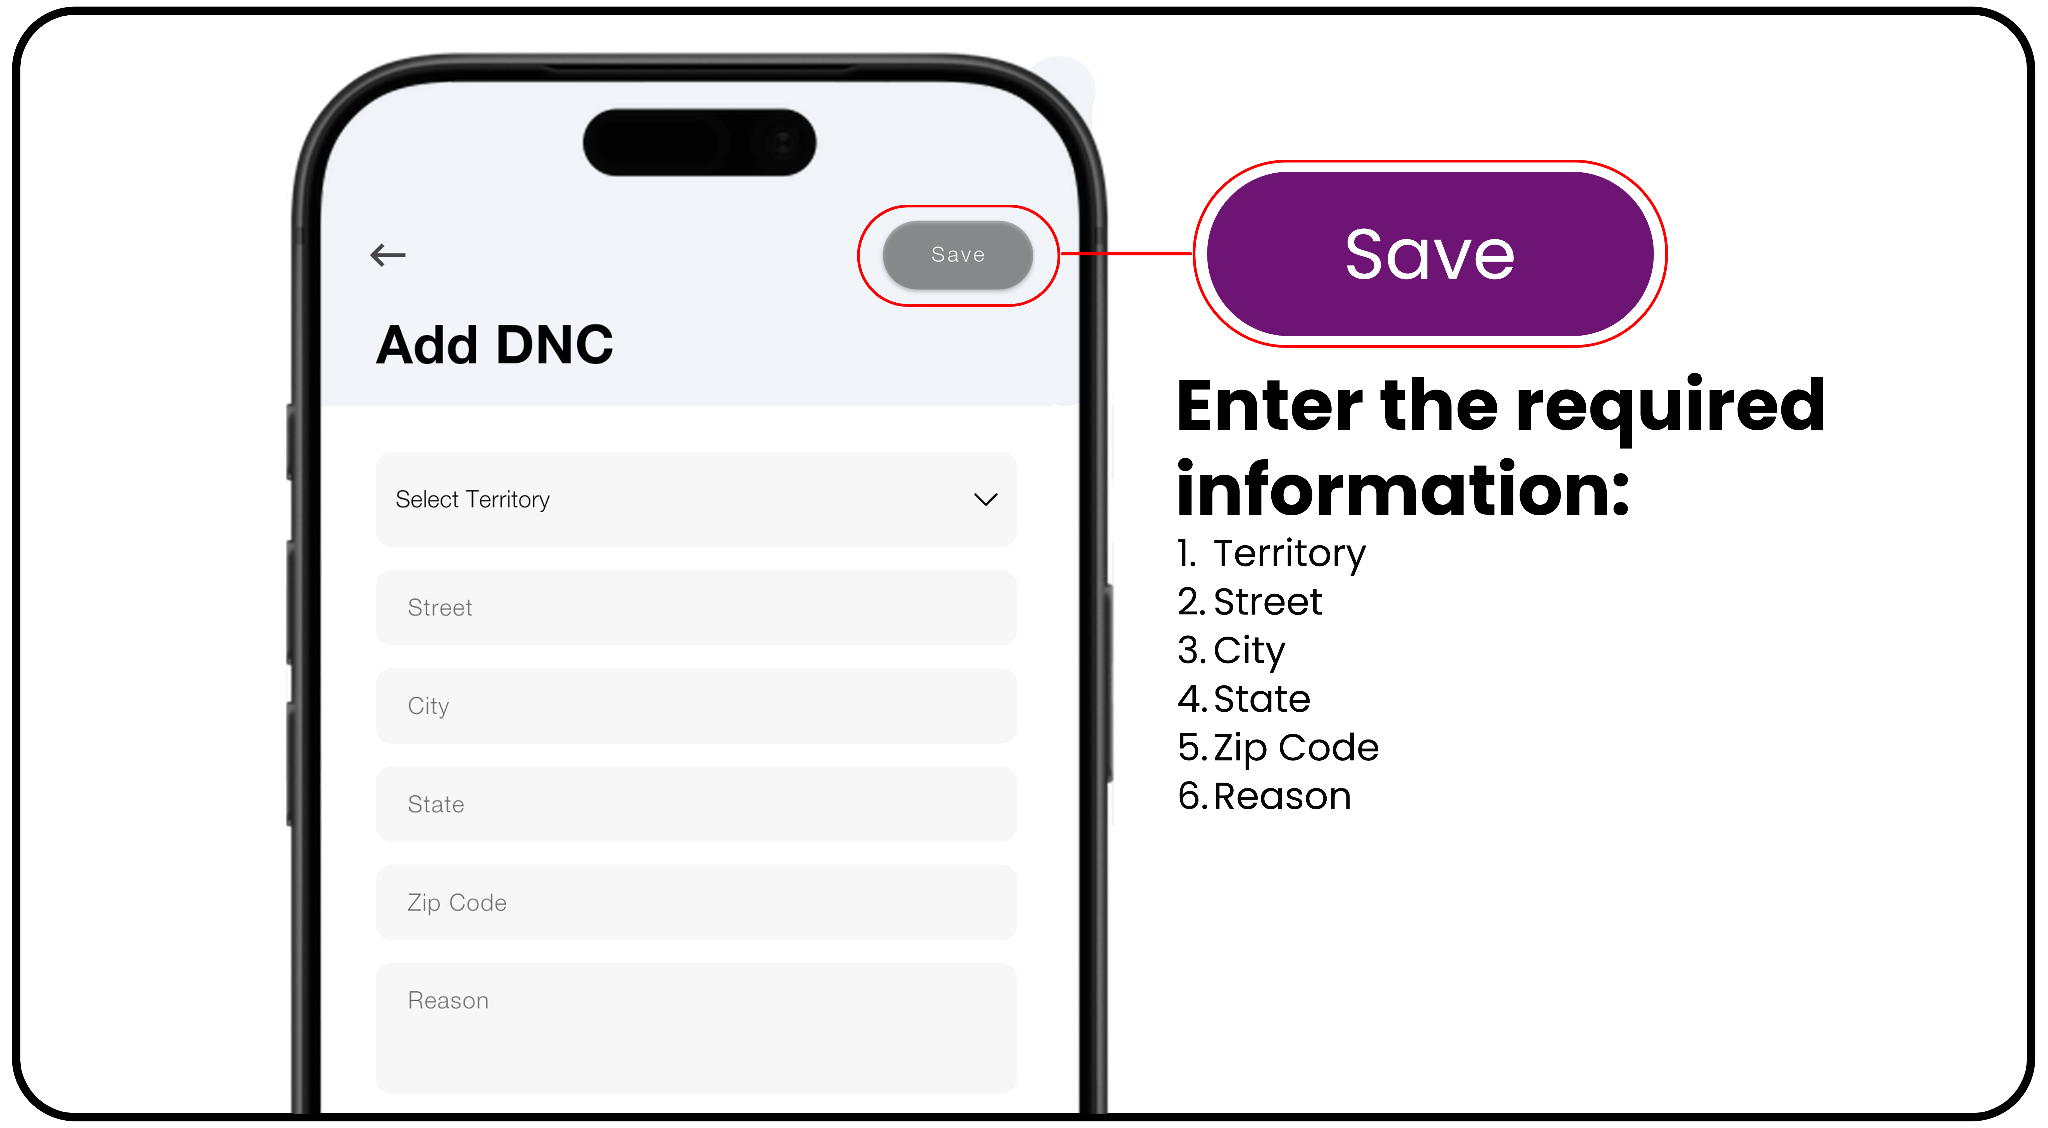
- After entering the information, review & tap Save at the top right corner.
- Remember, the Do Not Call feature is more than just a territory record.
- It helps us respect the wishes of householders, avoid unnecessary repeat visits,
and keep territory information accurate for everyone working in the ministry.
D2D Ministry App — Organized territory information for respectful and effective
ministry.
Managing Chats
Encrypted and Private Communications - The Chat feature in the D2D Ministry App helps publishers stay connected and communicate with ease. Chat with individuals, connect with your phone contacts, communicate with your Service Groups, and participate in other D2D groups, all from one convenient location.
Chat is divided into four main tabs. Here’s how to use each one.
1. Chat with Active Conversations (Active Chats Tab): The first tab is reserved
for individuals you are actively chatting with.
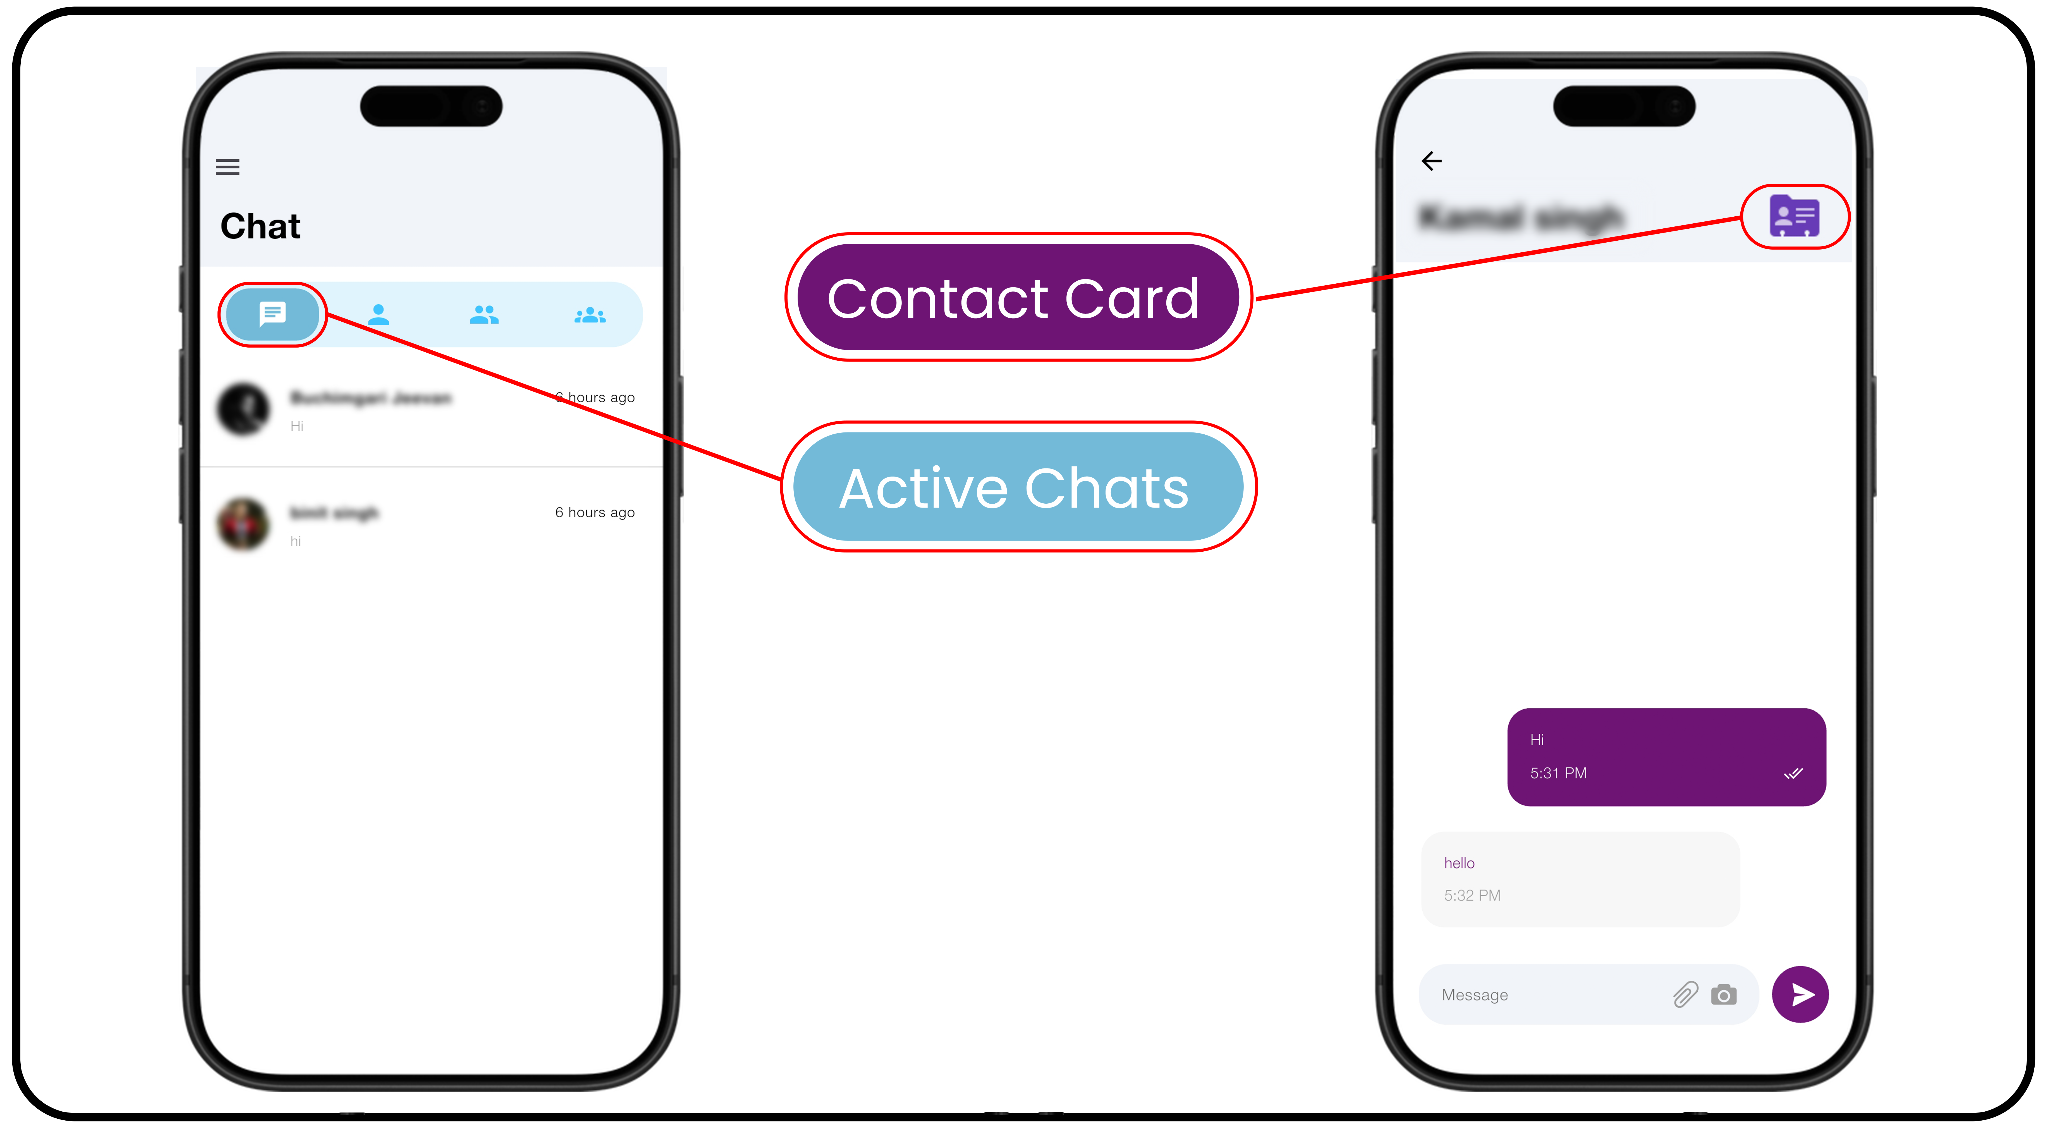
a) Select the individual’s name to open the conversation and start chatting.
b) Select the Contact Card icon in the upper-right corner to access the
person’s contact details or create a return visit.
2. Start a Chat from Your Phone Contacts (Phone Contacts Tab)
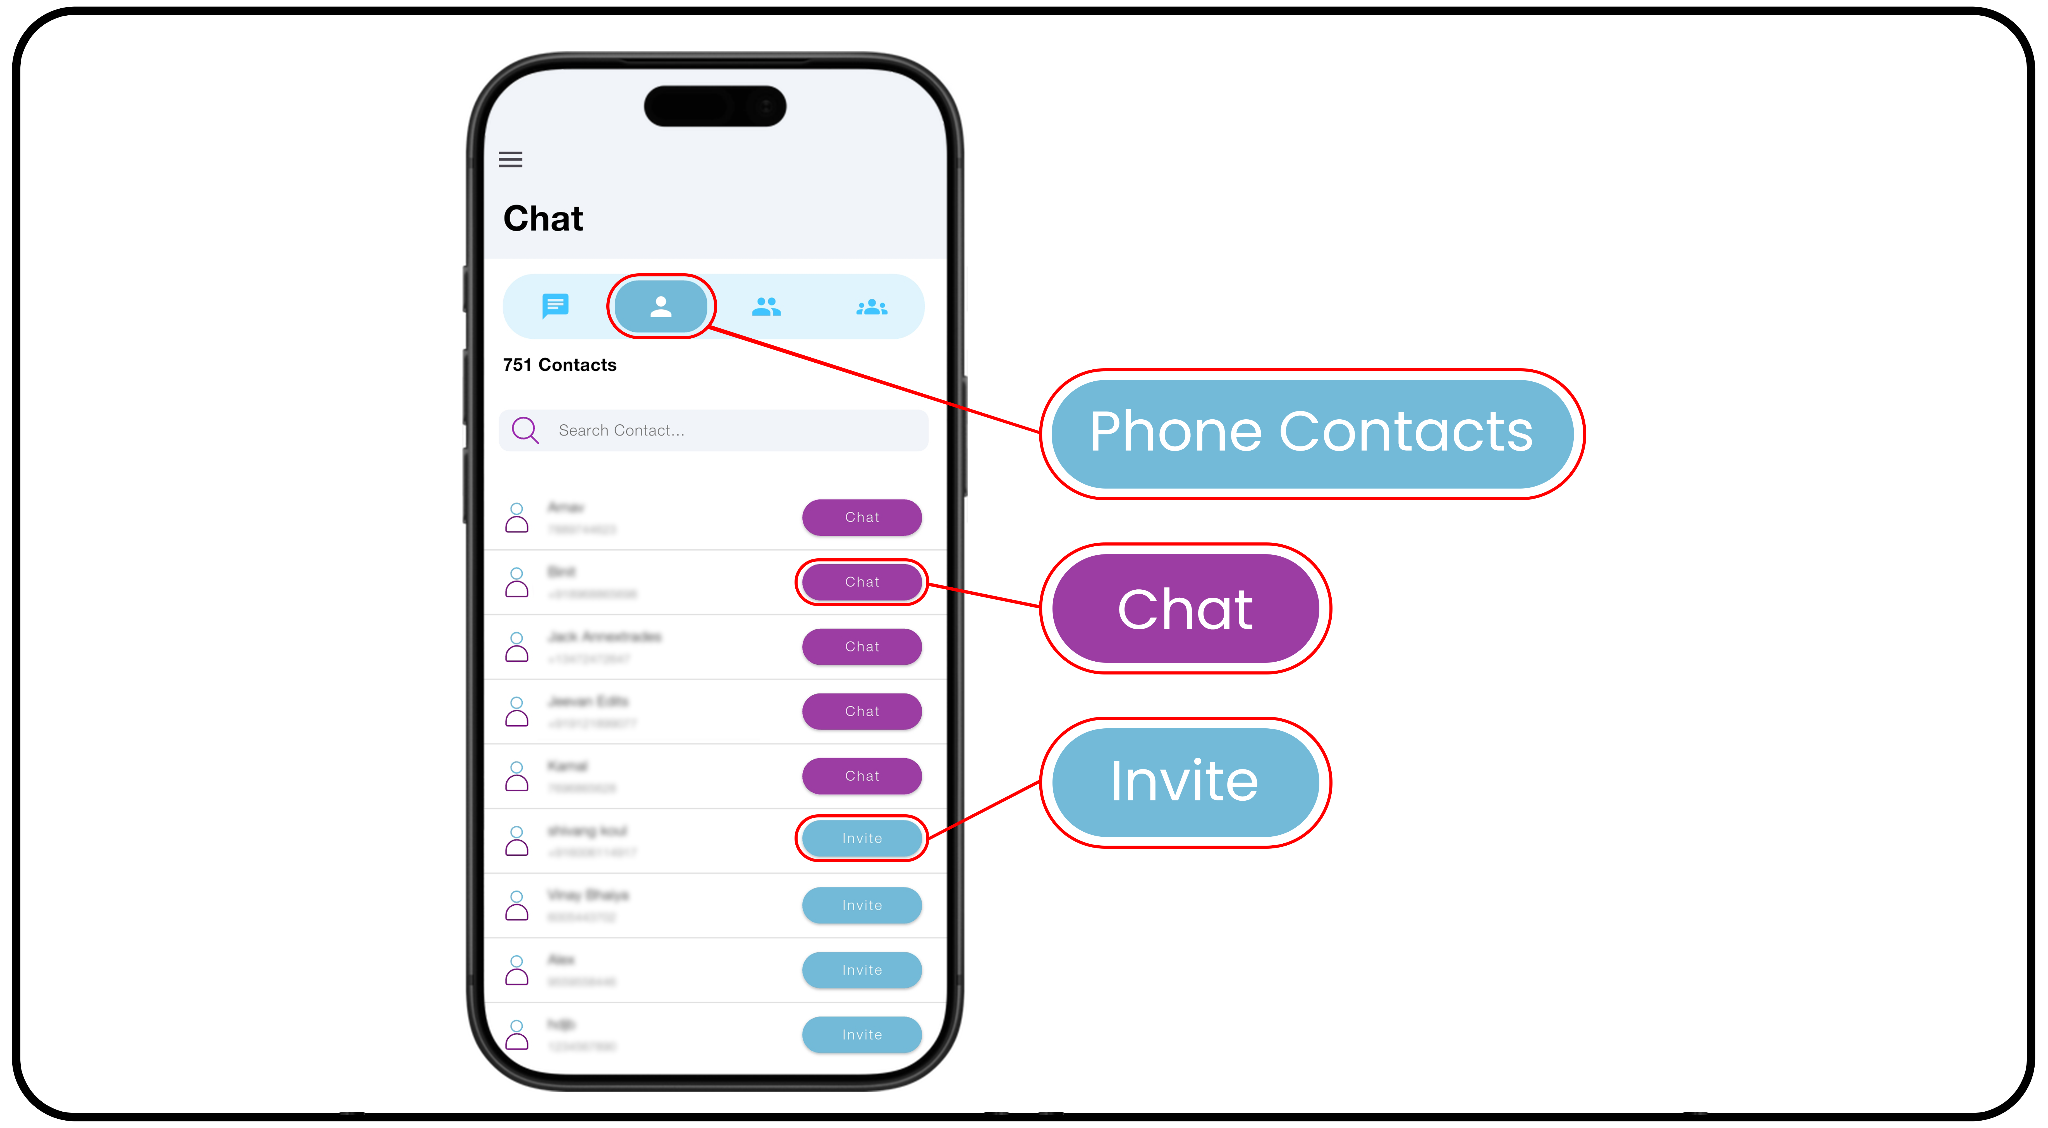
- The second tab gives you access to your phone contacts.
- Contacts who are already using D2D are automatically prioritized at the top
of the list, making it easy to find other D2D users. - You can select a D2D contact to start a chat immediately.
- If a contact is not yet using D2D, you can invite them to download the app and
become a D2D user. Once they become a D2D user, the Chat feature will be available
3. Communicate with Your Service Group (Service Groups Tab):
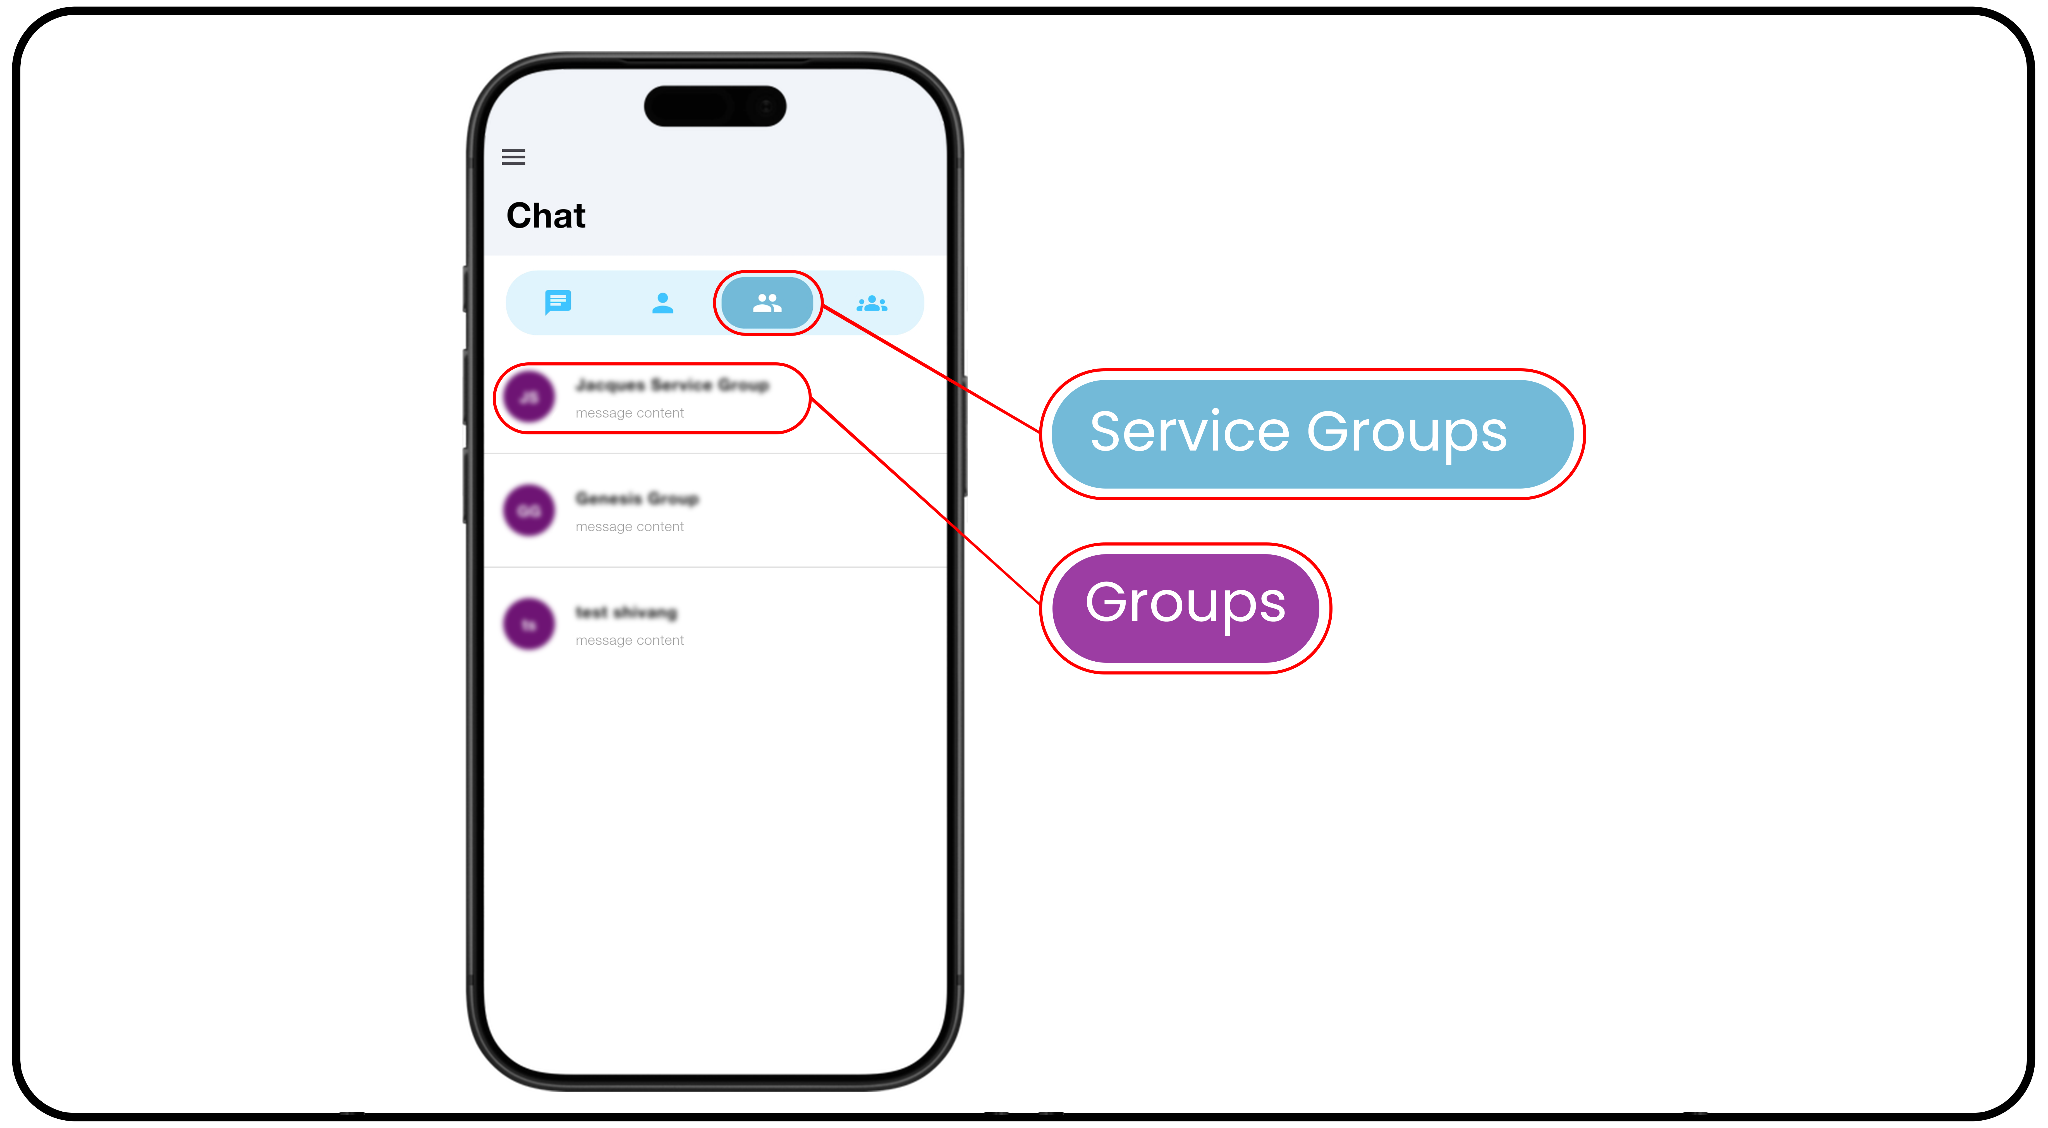
- The third tab is dedicated to your Service Groups.
- Here, you can access the groups you are associated with and communicate
with other members of those groups. - This makes it easier to stay connected and coordinate with your Service Group
directly through D2D
4. Check In the Group(Other Group Tab):
The fourth tab contains groups that you are a member of but are not currently
actively chatting in.
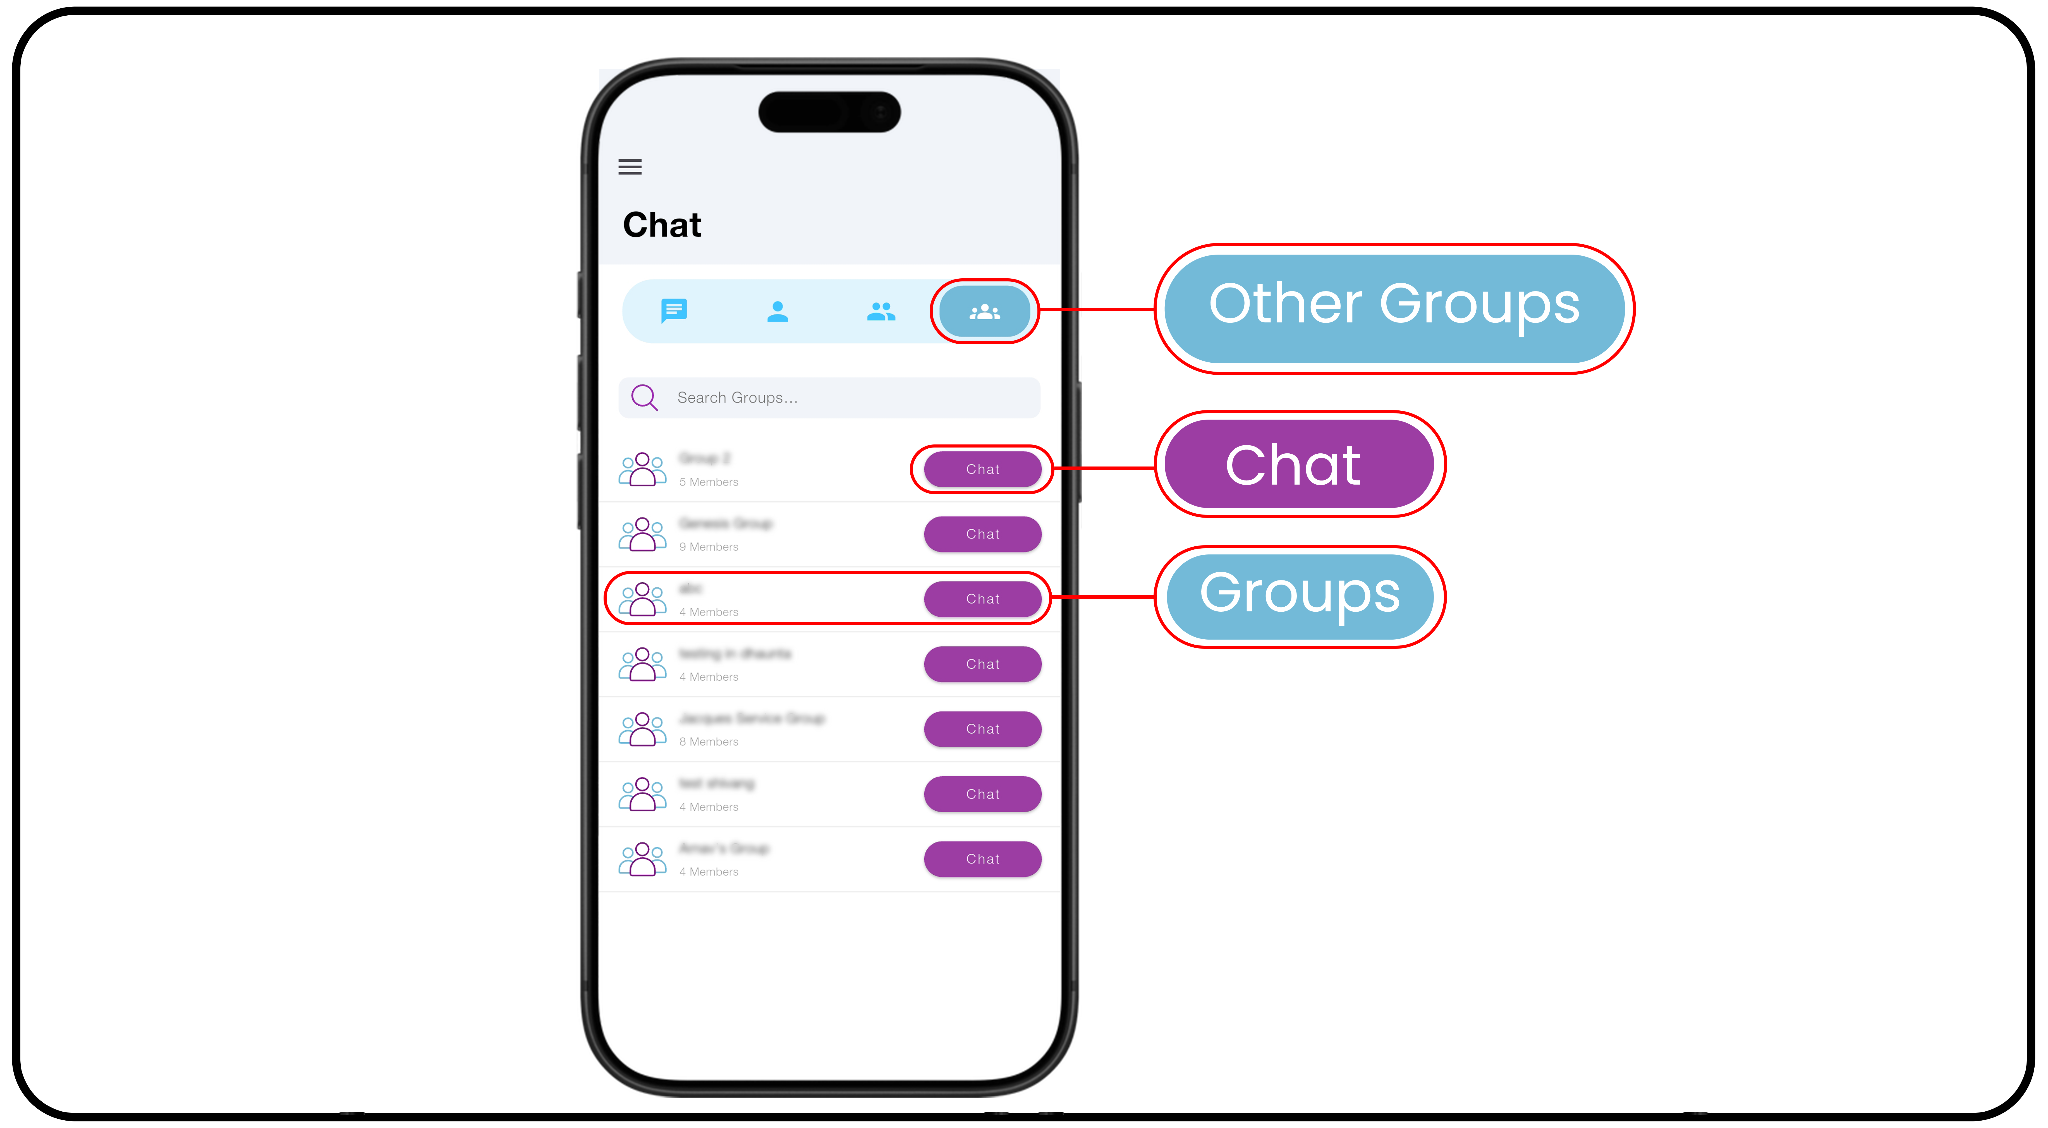
This keeps your active conversations separate while still giving you easy
access to your other group conversations when needed.
Whether you're chatting with an individual or communicating with a group,
D2D keeps your conversations organized and accessible—all in one place.
Notifications
Learn how to stay informed with Notifications and keep up with important activities, updates, and changes across the network. Timely information helps you stay connected and ensures that important updates never get overlooked.
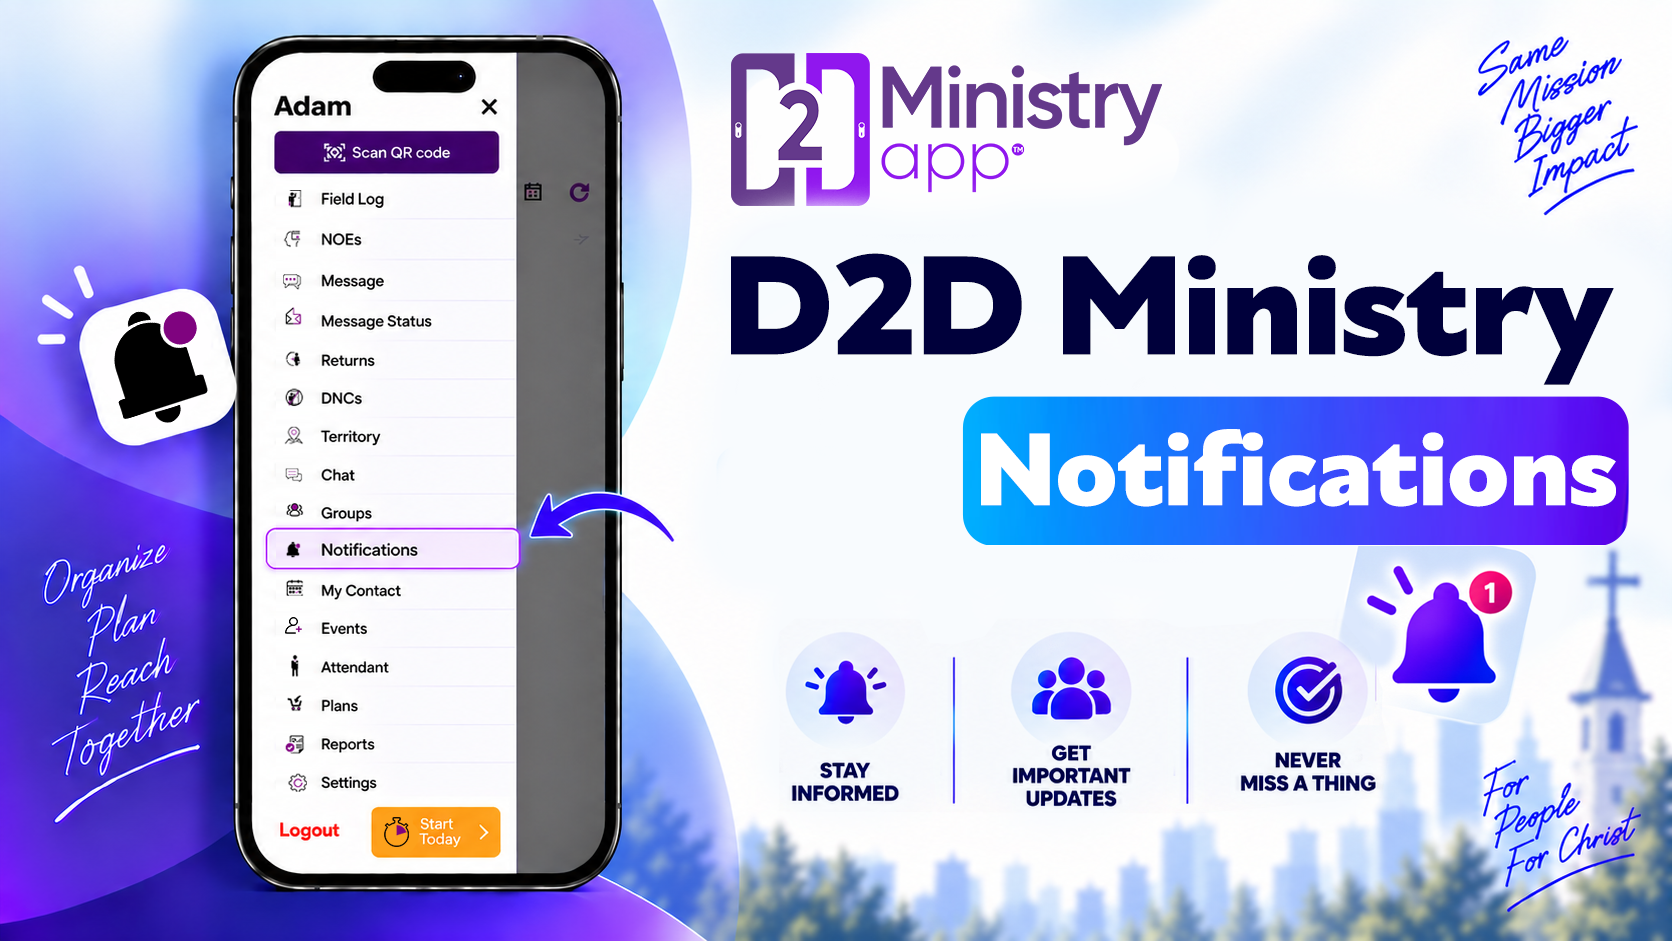
1. Open Notifications: Open the main menu & tap notifications. This opens a
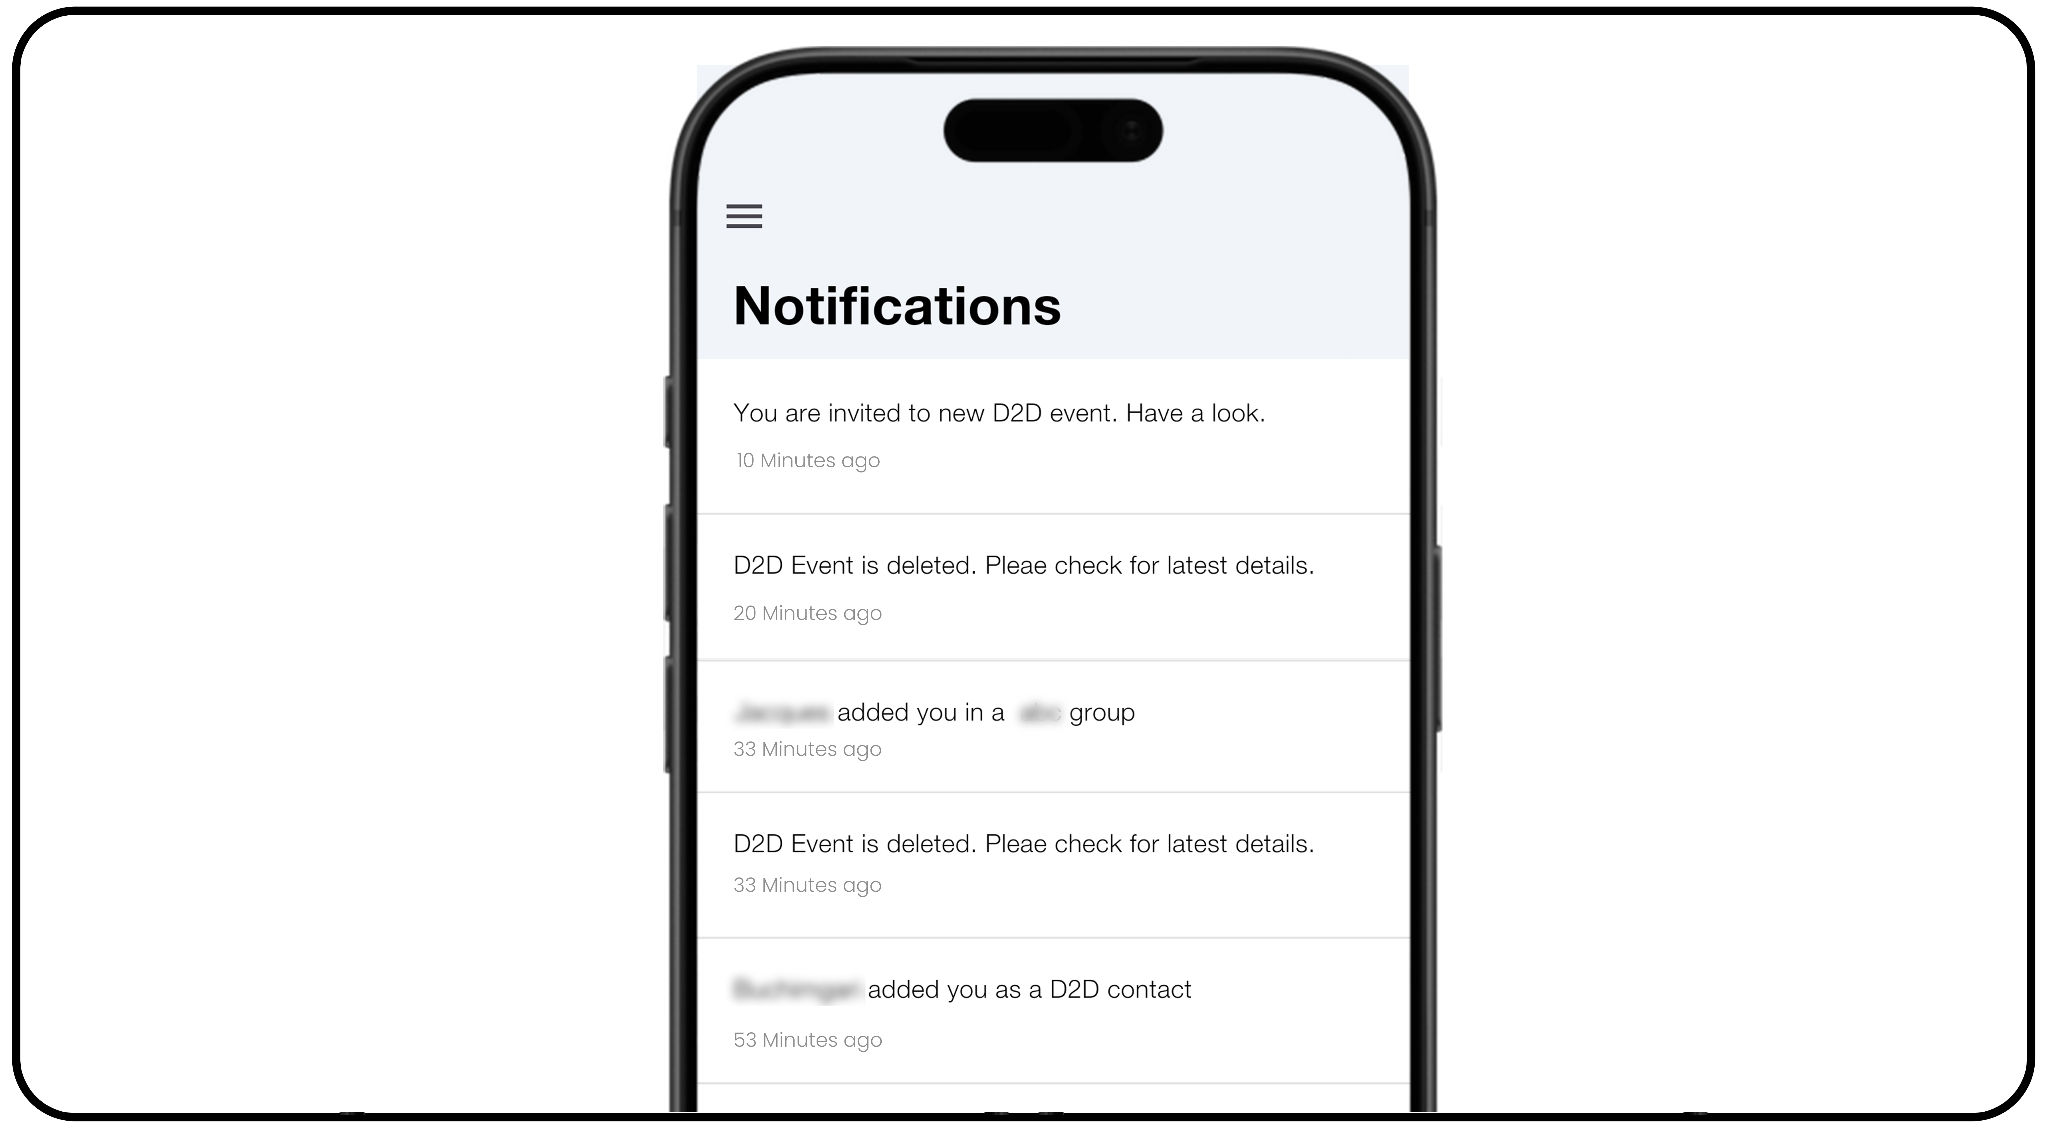
timeline of your recent app activity- simply scroll through the list to see your
alerts.
2. Know What Triggers a Notification: You'll receive a notification when:
a) You receive a new contact connection
b) You're added to a new group
c) You receive a new contact
d) You send or receive a new event invitation
3. Check When an Updated Occured: Each alert includes a timestamp, so you
can easily track when updates occurred.
With D2D Notifications, staying on top of your network activity is simple —
keeping all your important updates organized in one place.
Creating Groups
The D2D Group feature provides a dedicated communication space for each congregation service group, helping publishers stay connected and organized before, during, and after the ministry. It allows group members to communicate easily, coordinate field service arrangements, share meeting locations and times, provide important reminders, and keep everyone informed of ministry plans. The dedicated group chat also creates an opportunity to share encouraging experiences, scriptures, and positive ministry updates, while helping members stay connected between congregation meetings.
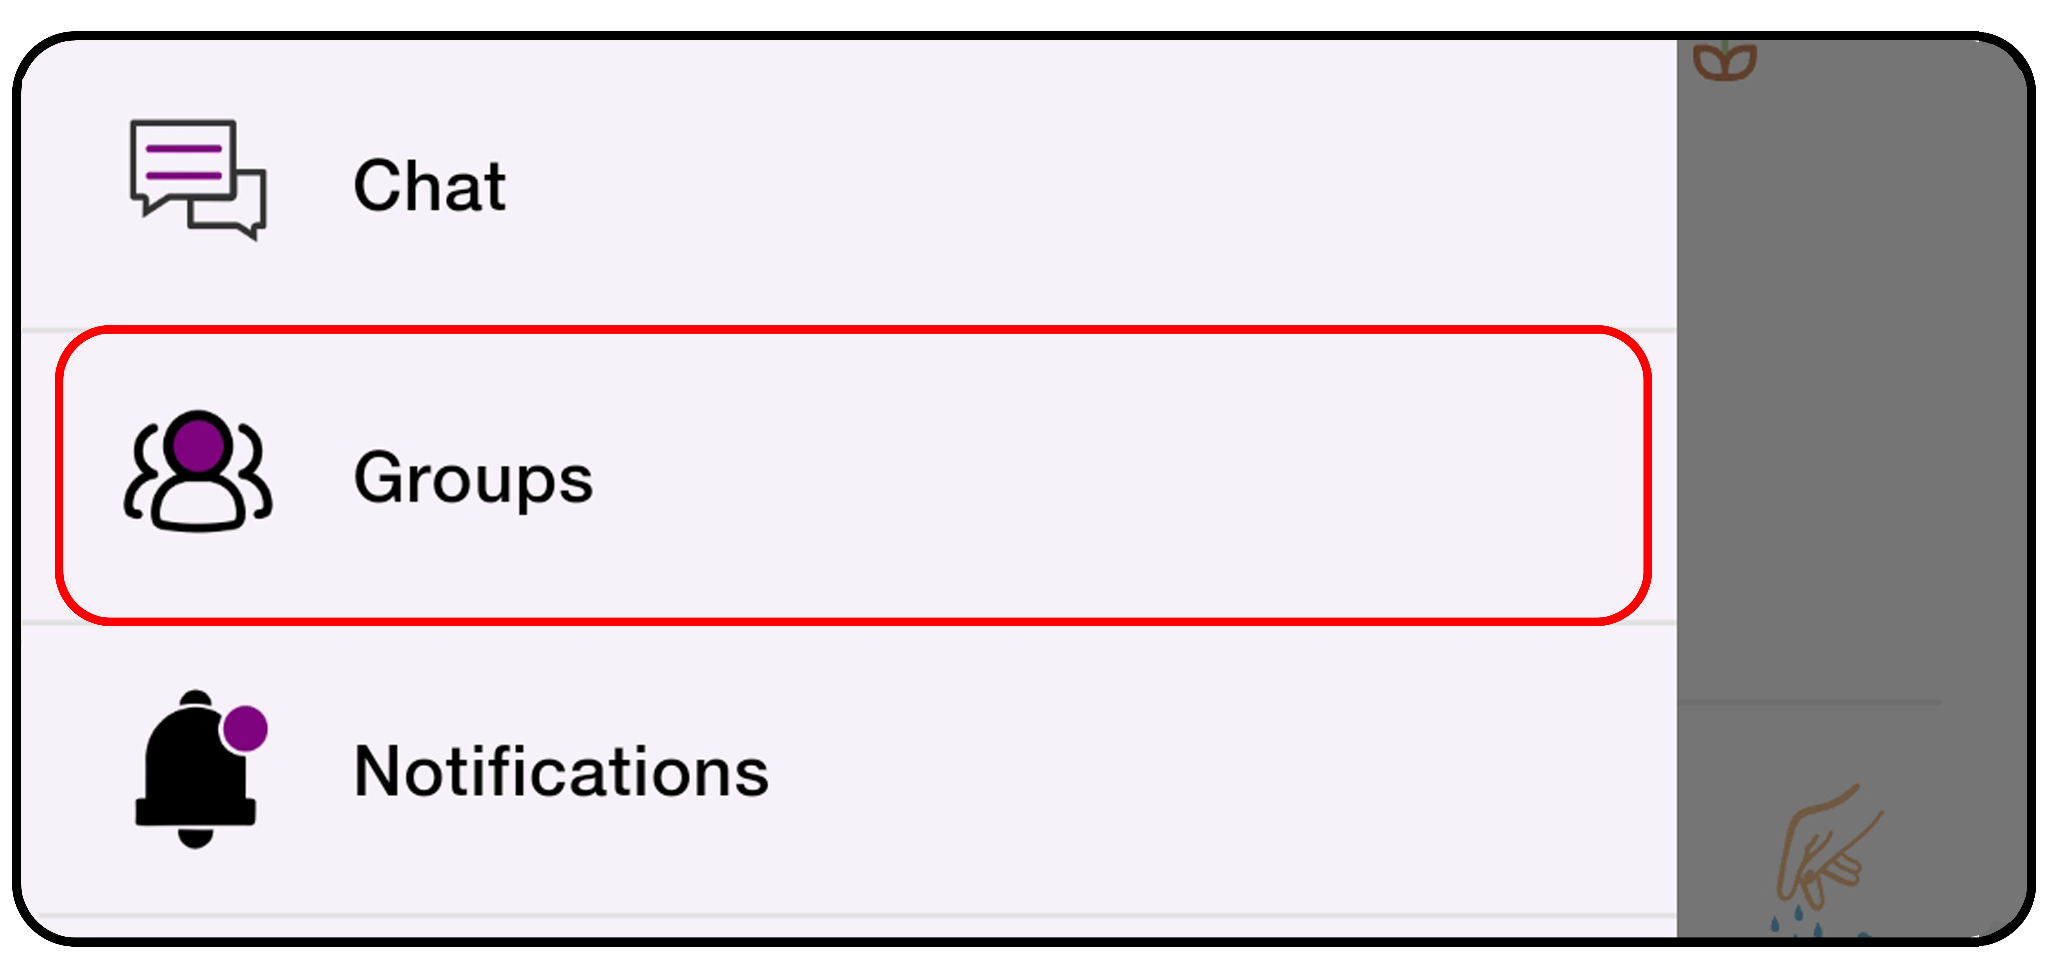
1. Open the Group Section: From the side Menu, select Groups to view your
existing groups.
2. Start a New Group:
a) Tap the Edit Icon to make changes in a group.
b) Delete icon to delete a Group.
c) Tap the Leave Group icon to Leave a group.
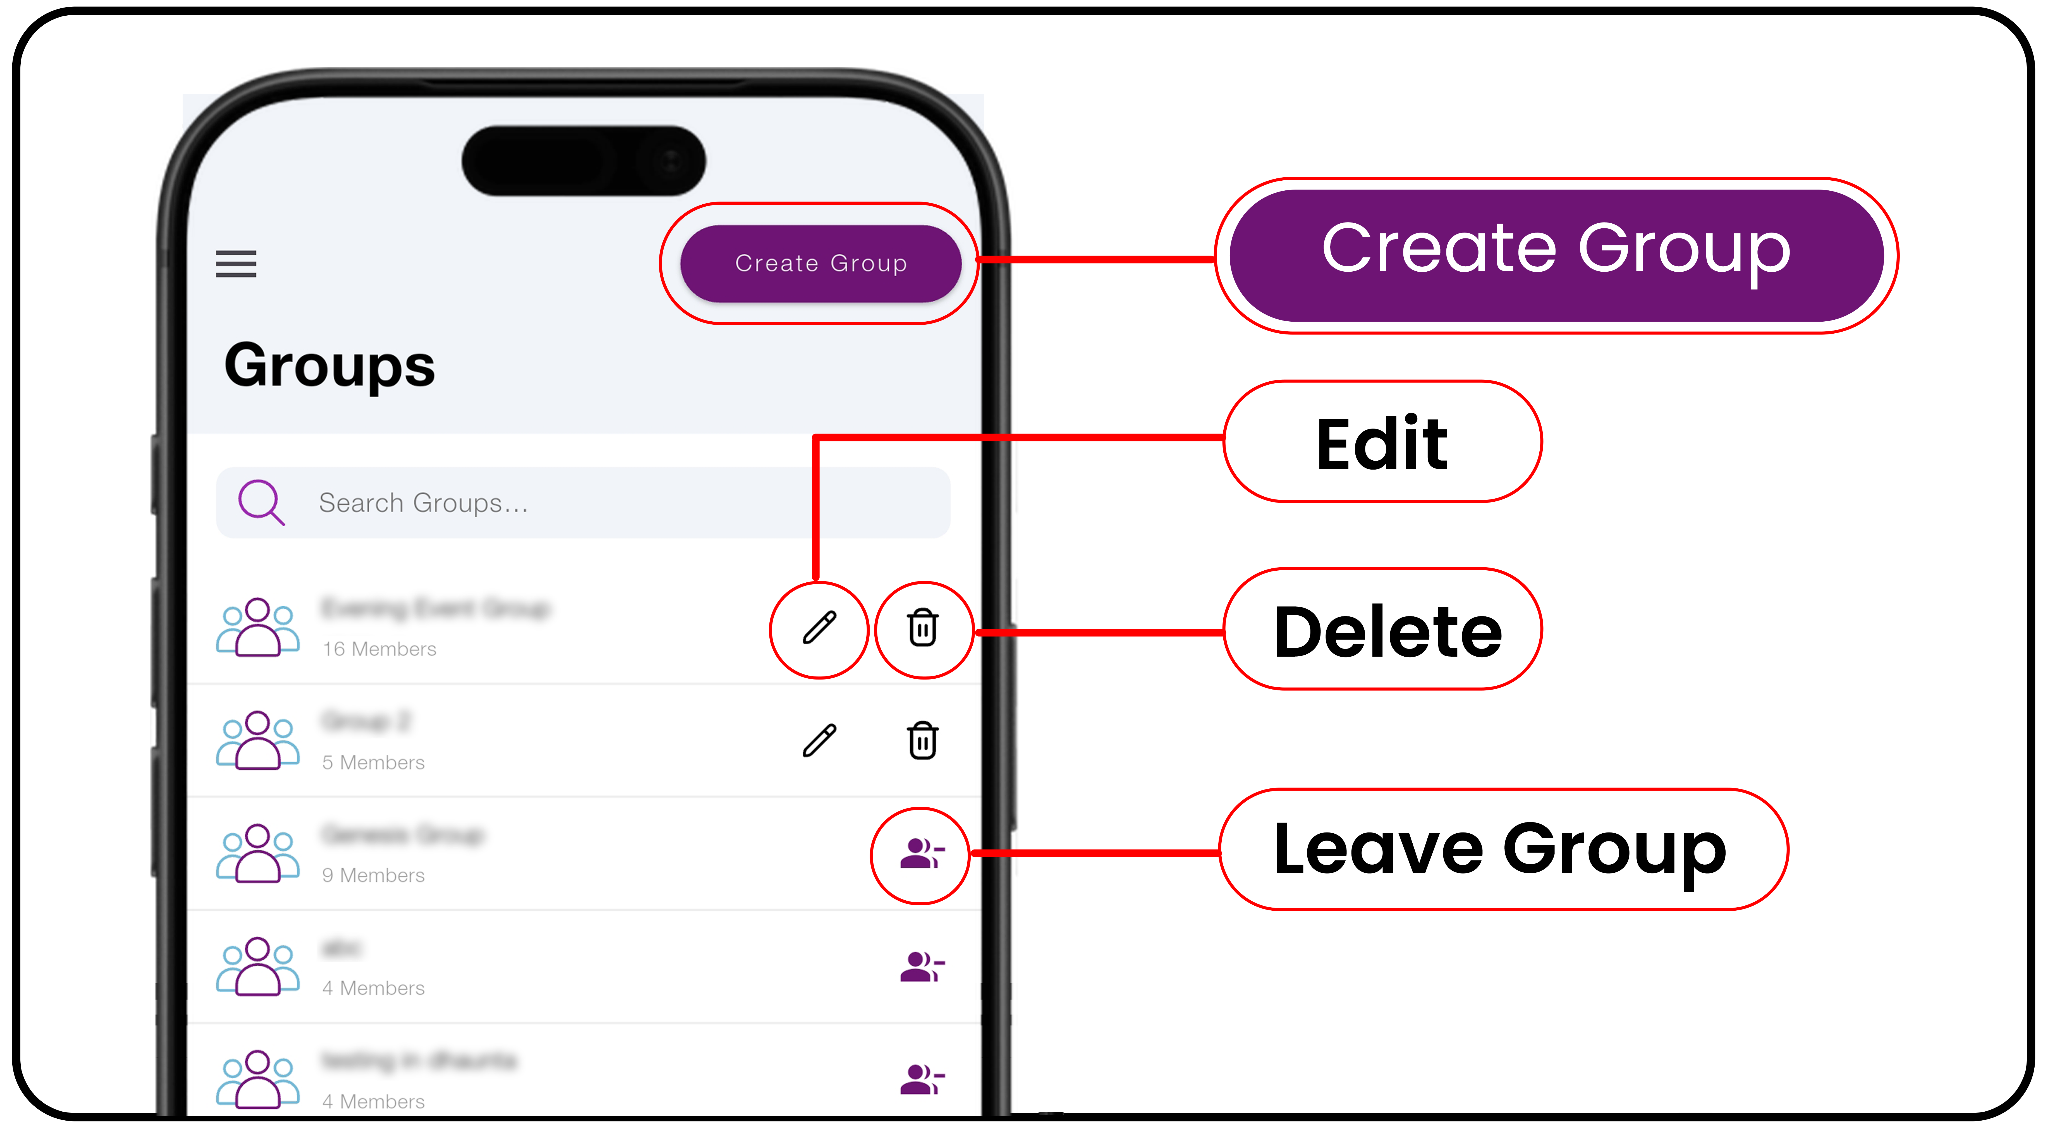
d) Tap Create Group to create a New Group.
3. Add Members:
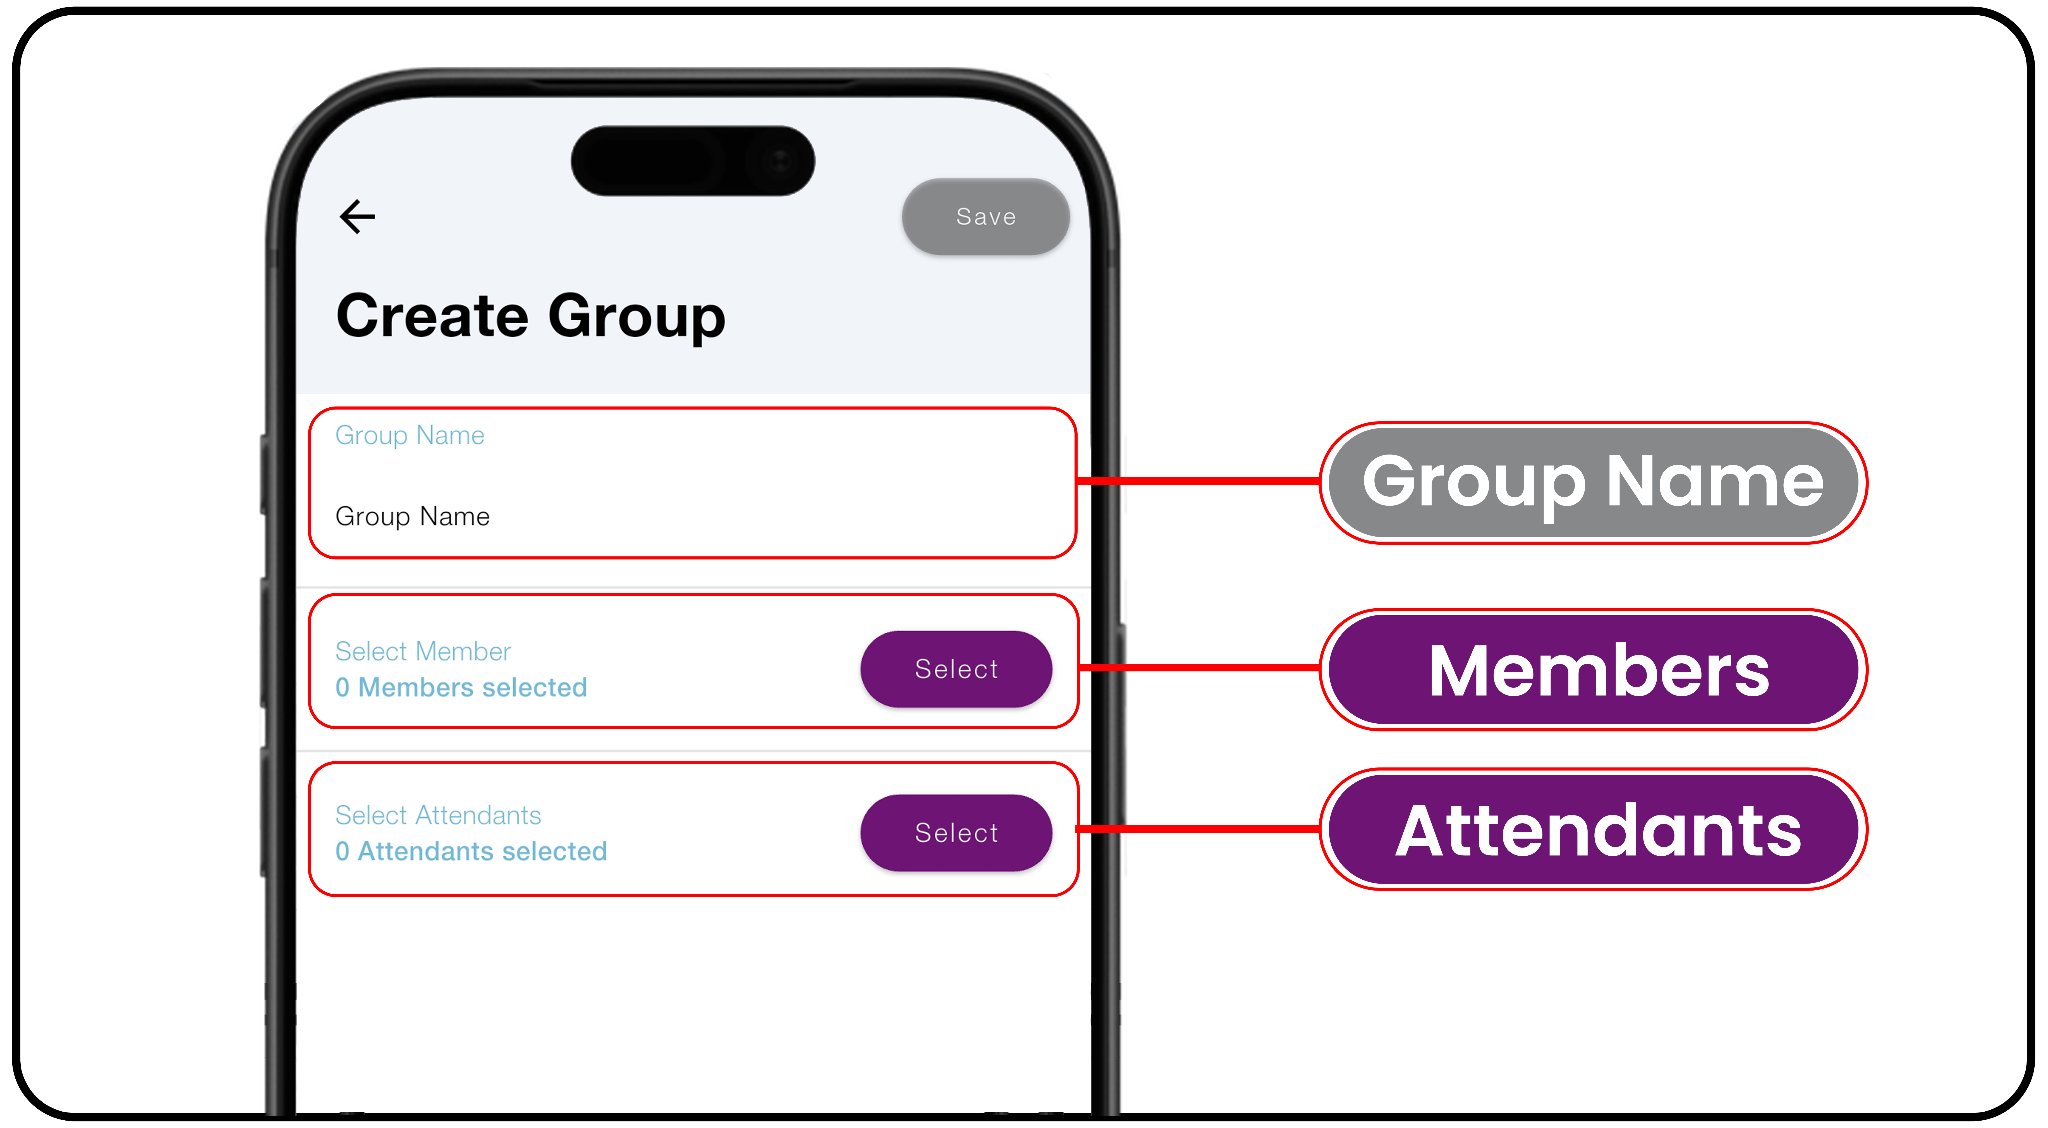
a) Type the Group Name.
b) Tap Select under the Select Member Section to open invite screen. The invitee
screen has three tabs-
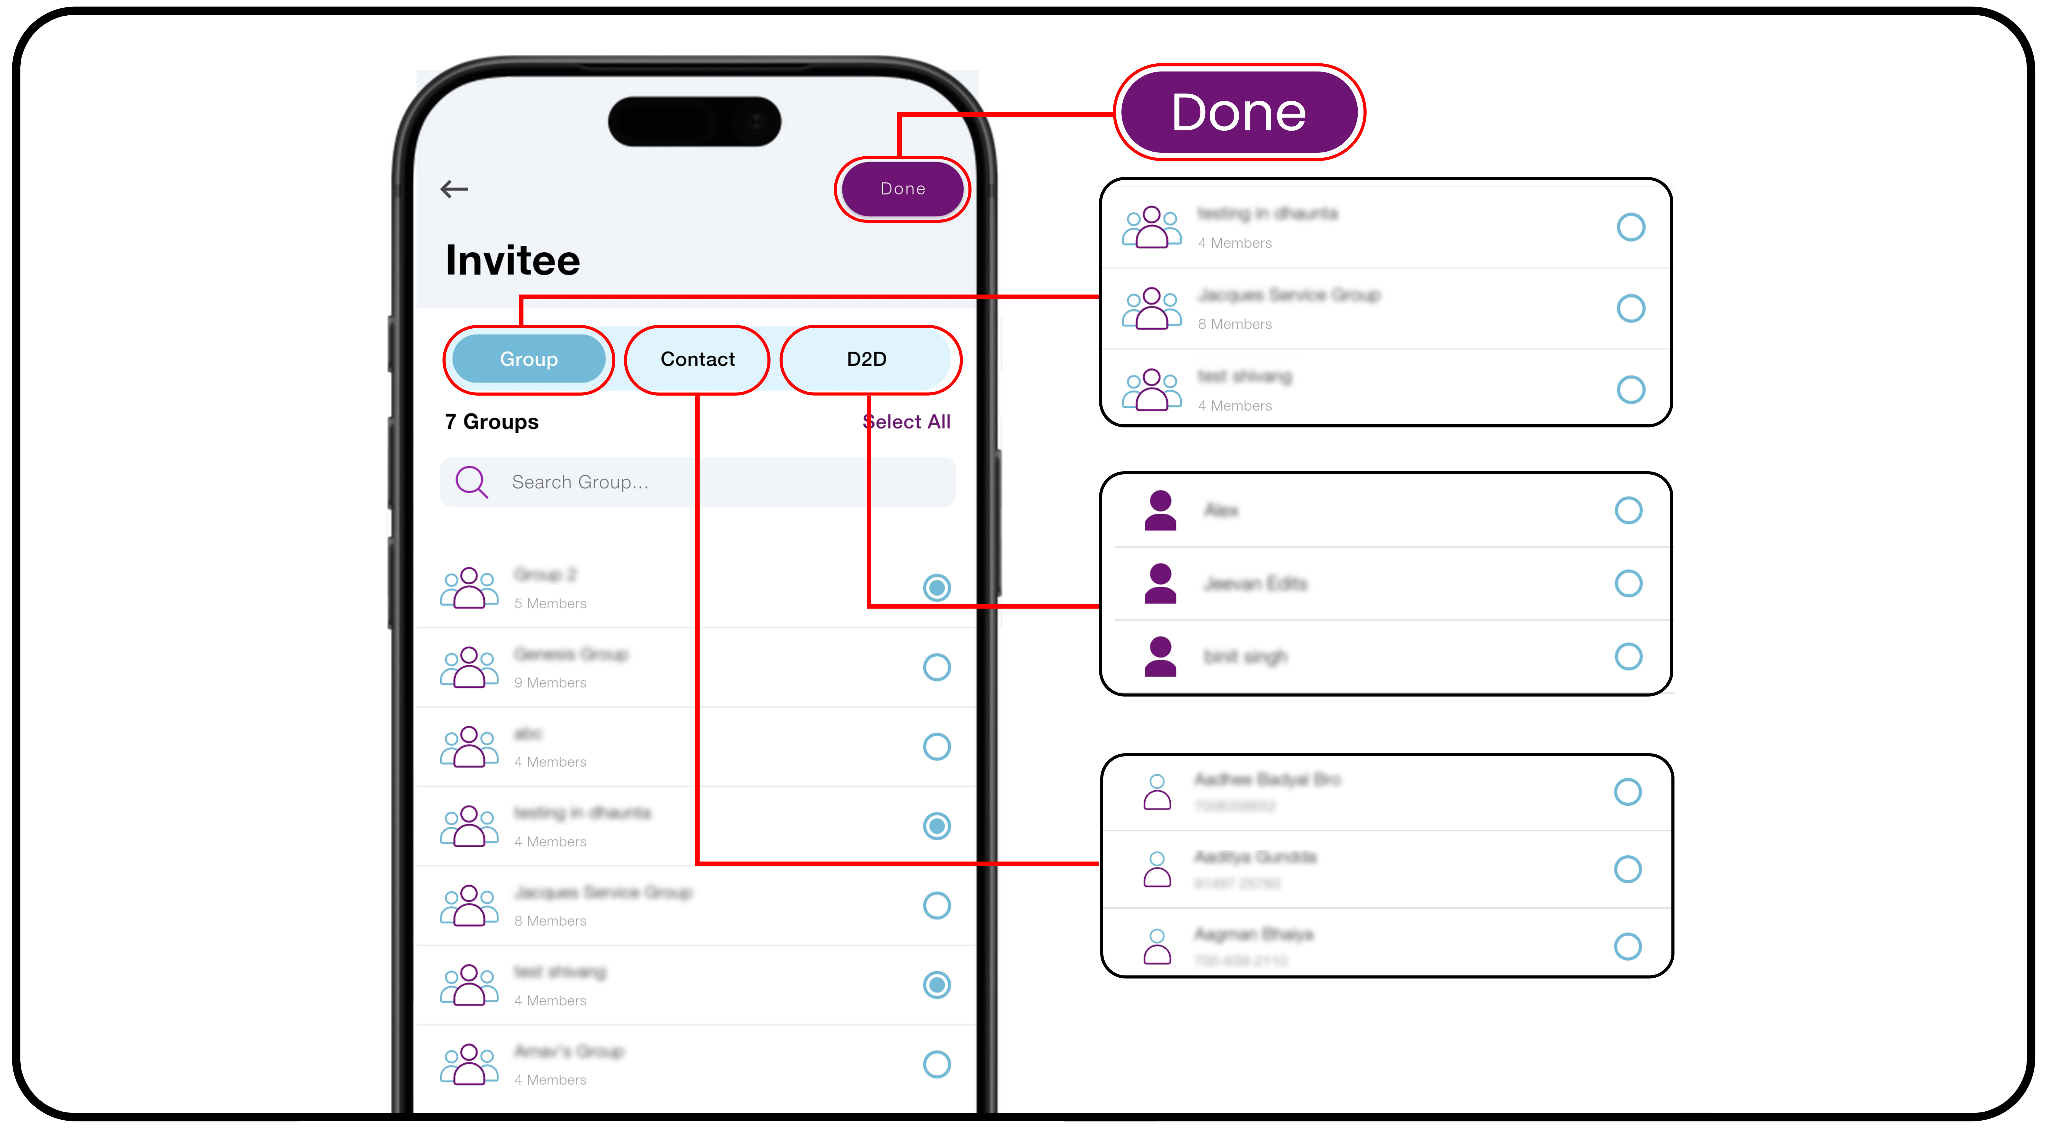
- Group- Select a group to bulk-add their members into your new group.
- Contact- Select/Invite yoour contacts to become members or attendents.
- D2D- Select the D2D members you want to add to goup
Tap Done in the top right corner once you've selected your members.
4. Choose Attendants: Tap Select in Select Attendants section to see the list of
group members.
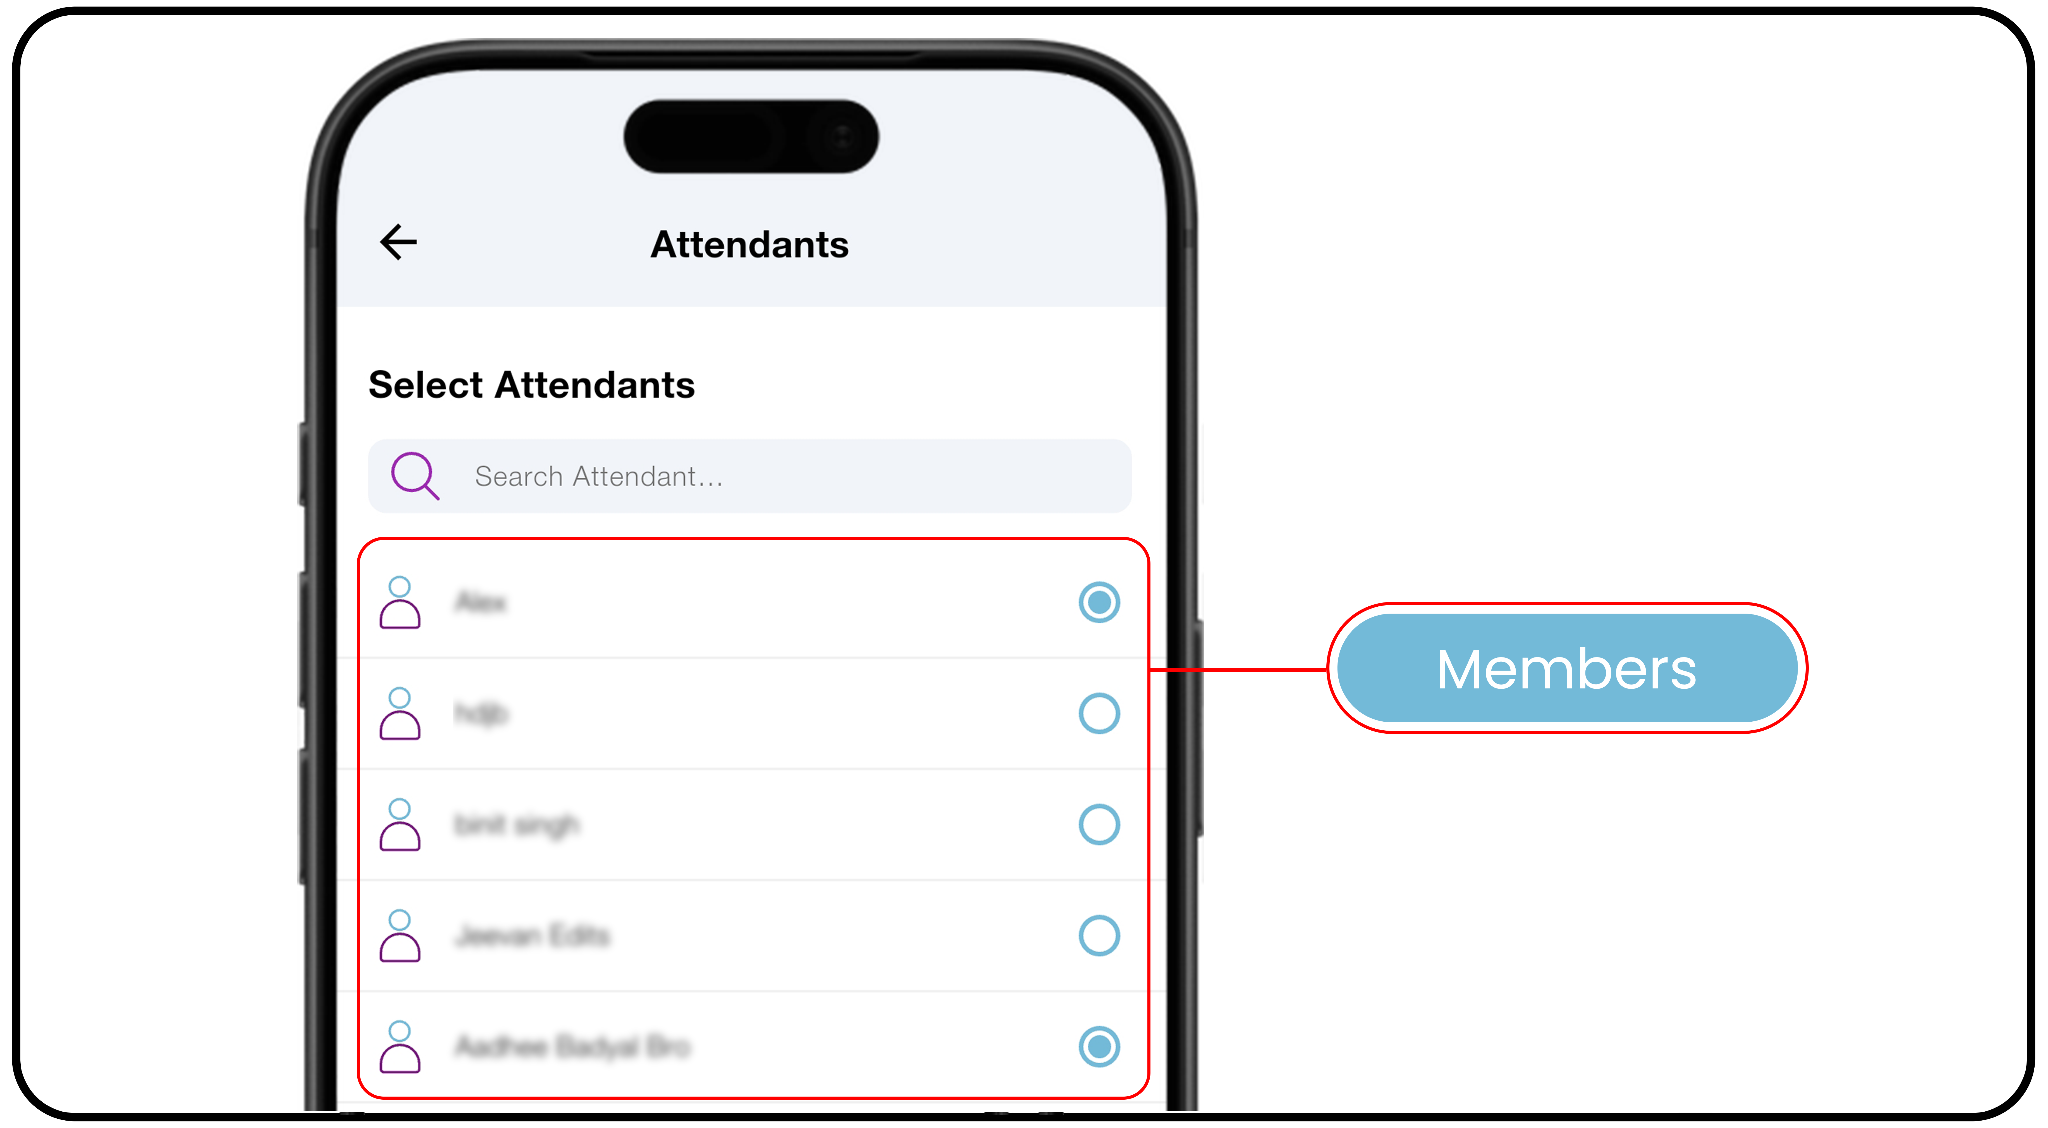
a) Choose one or more from that list to designate as attendants.
b) Tap the Back button to save & return to the Group screen.
5. Save Your Group:
a) Review your group name, members & attendants.
b) Tap Save in the top right corner to create your new group.
Your new group now appears in the Groups list, ready to use for invitations &
communications across the D2D Ministry App.
Managing Attendants
The Attendant features in the D2D Ministry App efficiently manage event entry and keep access organized and secure. Check in invited guests, handle on-site registrations, and manage Restricted Individuals and Watch List entries with ease. Whether scanning a QR code or manually adding a guest, the Attendant feature gives you the tools to manage event access smoothly, all from one convenient location.
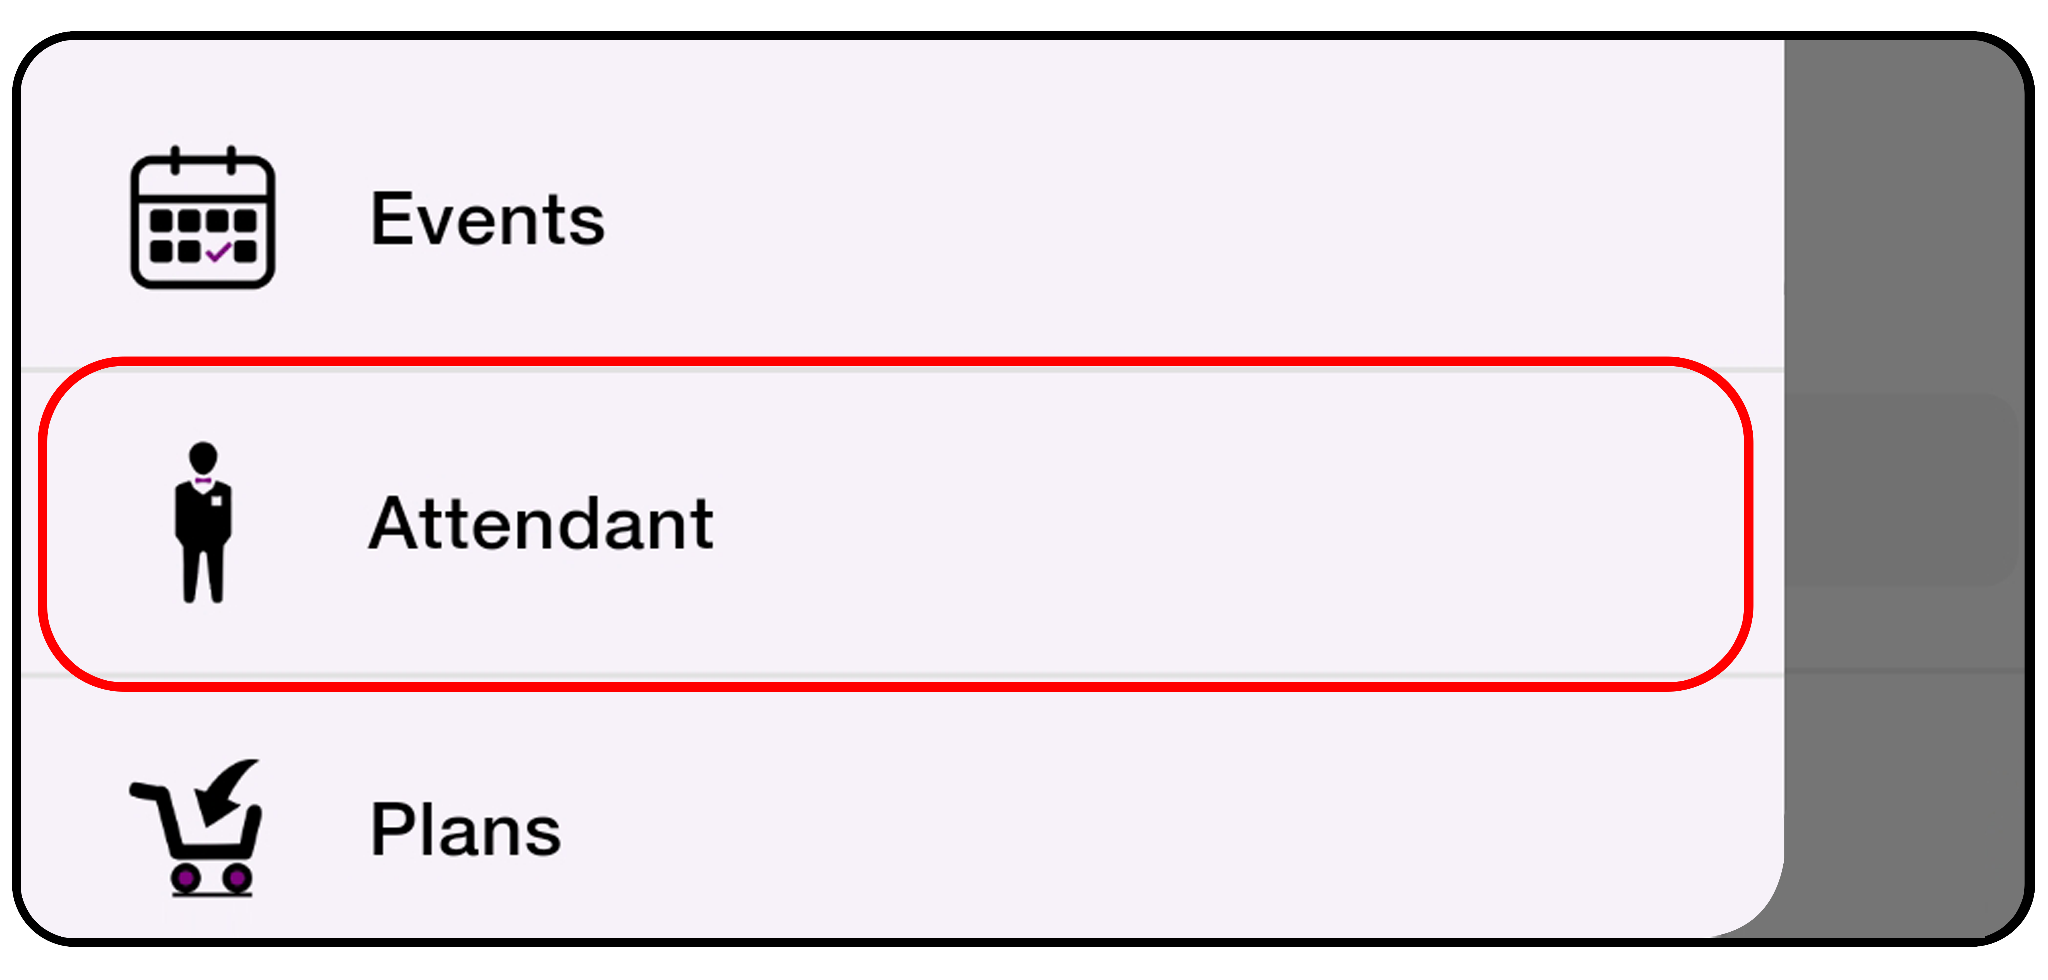
1. Open the Attendant Events: From the main menu, tap the Attendant icon to
view the list of events you've been invited to and asked to serve as an Attendant.
2. Check In Guests with Scan QR Code: Tap Scan QR Code at top right corner to
quickly scan a guest's invitation QR code and check them in.
3. Add a Guest Manually with On-Site Access: If a guest arrives without an
invitation
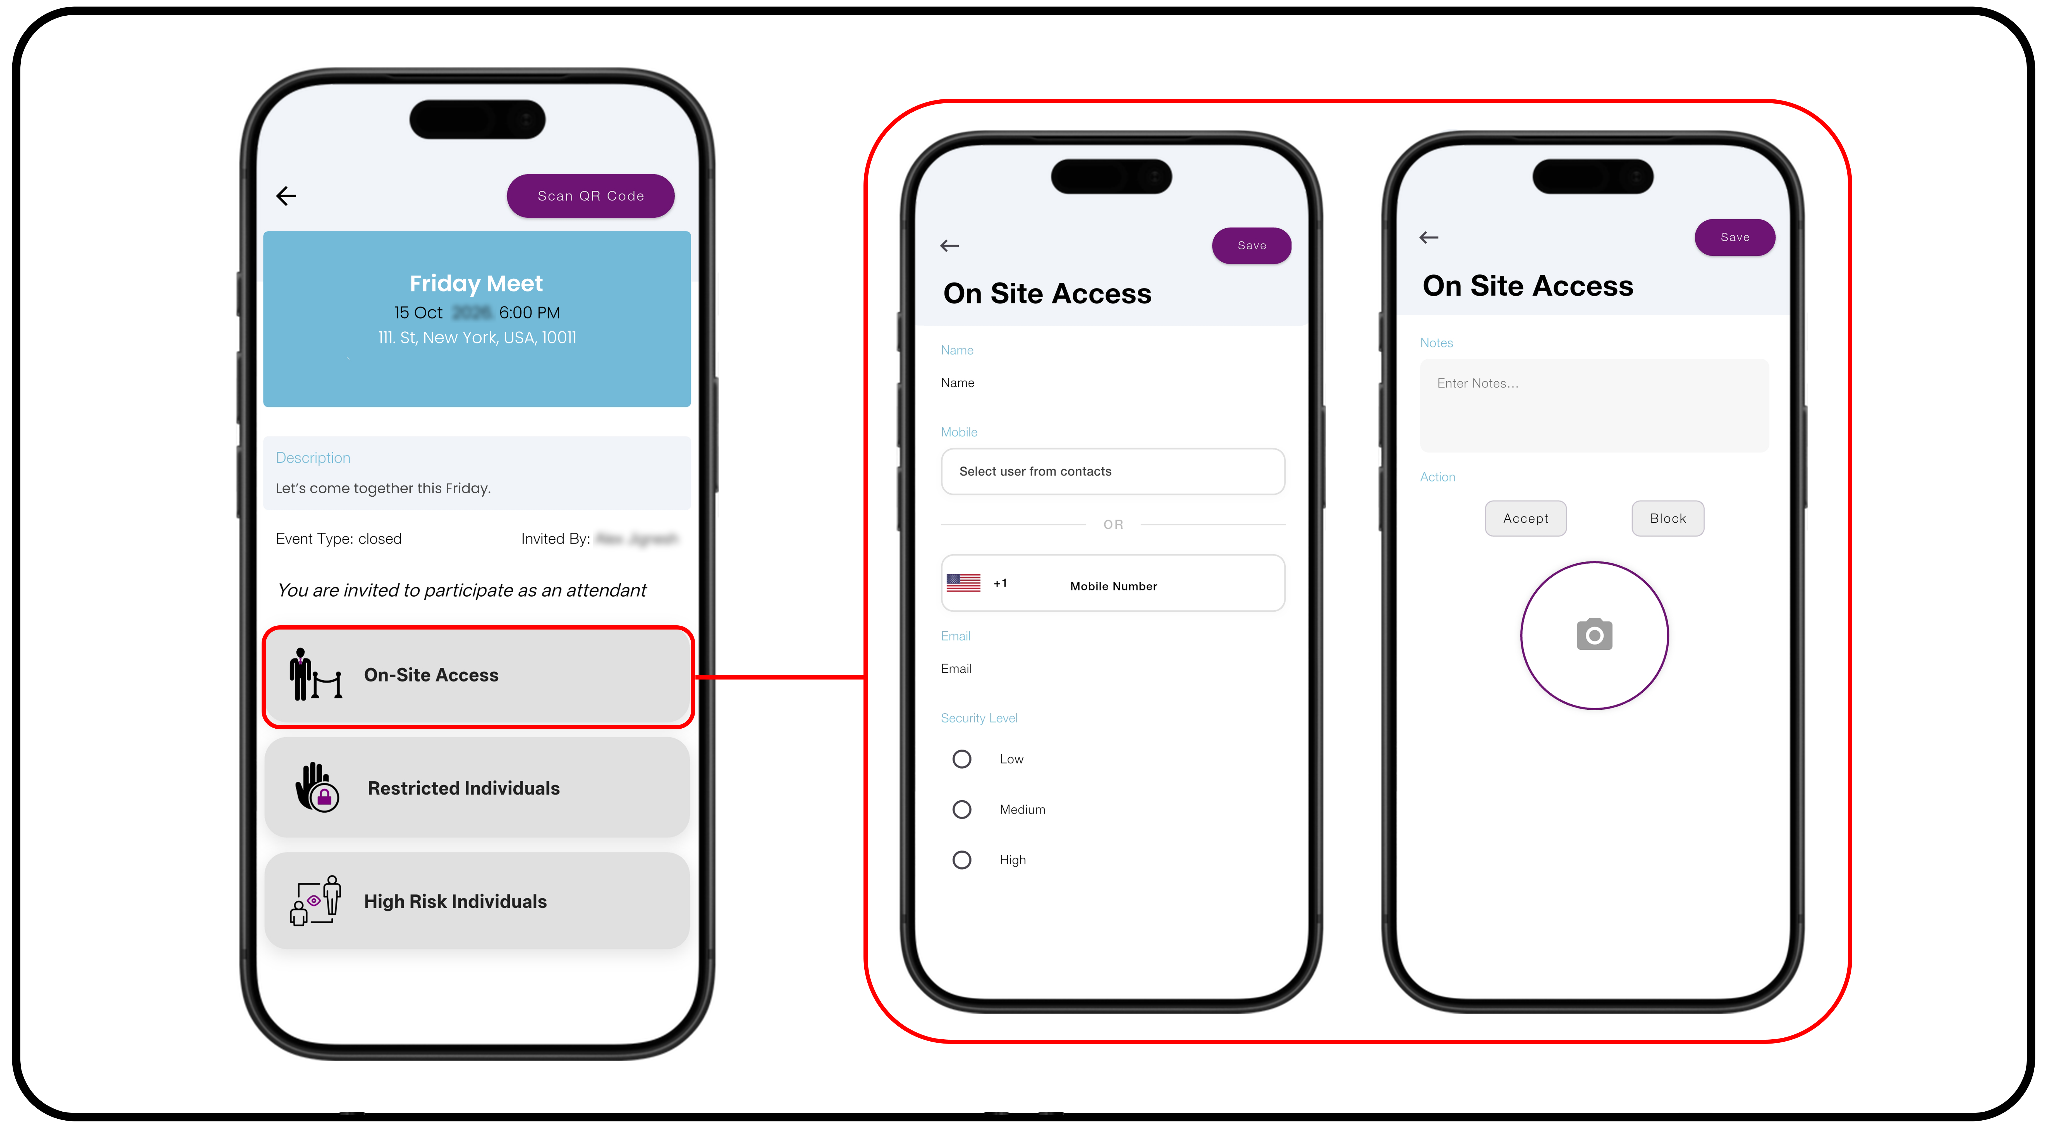
a) Tap On-Site Access to manually enter their information and add them to
the event guest list.
b) Enter the guest's full name, then provide the available contact information:
-
- Select their contact information from your device's contact list; or
- Enter a telephone number, if the guest is willing to provide one; or
- Enter an email address, if the guest is willing to provide one.
Then assign a security level of Low, Medium, or High, based on your pre-event
training and the event's established security criteria.
4. Manage Restricted Individuals: Tap Restricted Individuals tab to view the
Blocked Users list. To restrict a new individual:
a) Go to On-Site Access and enter desired information.
b) Select Block, then tap Save.
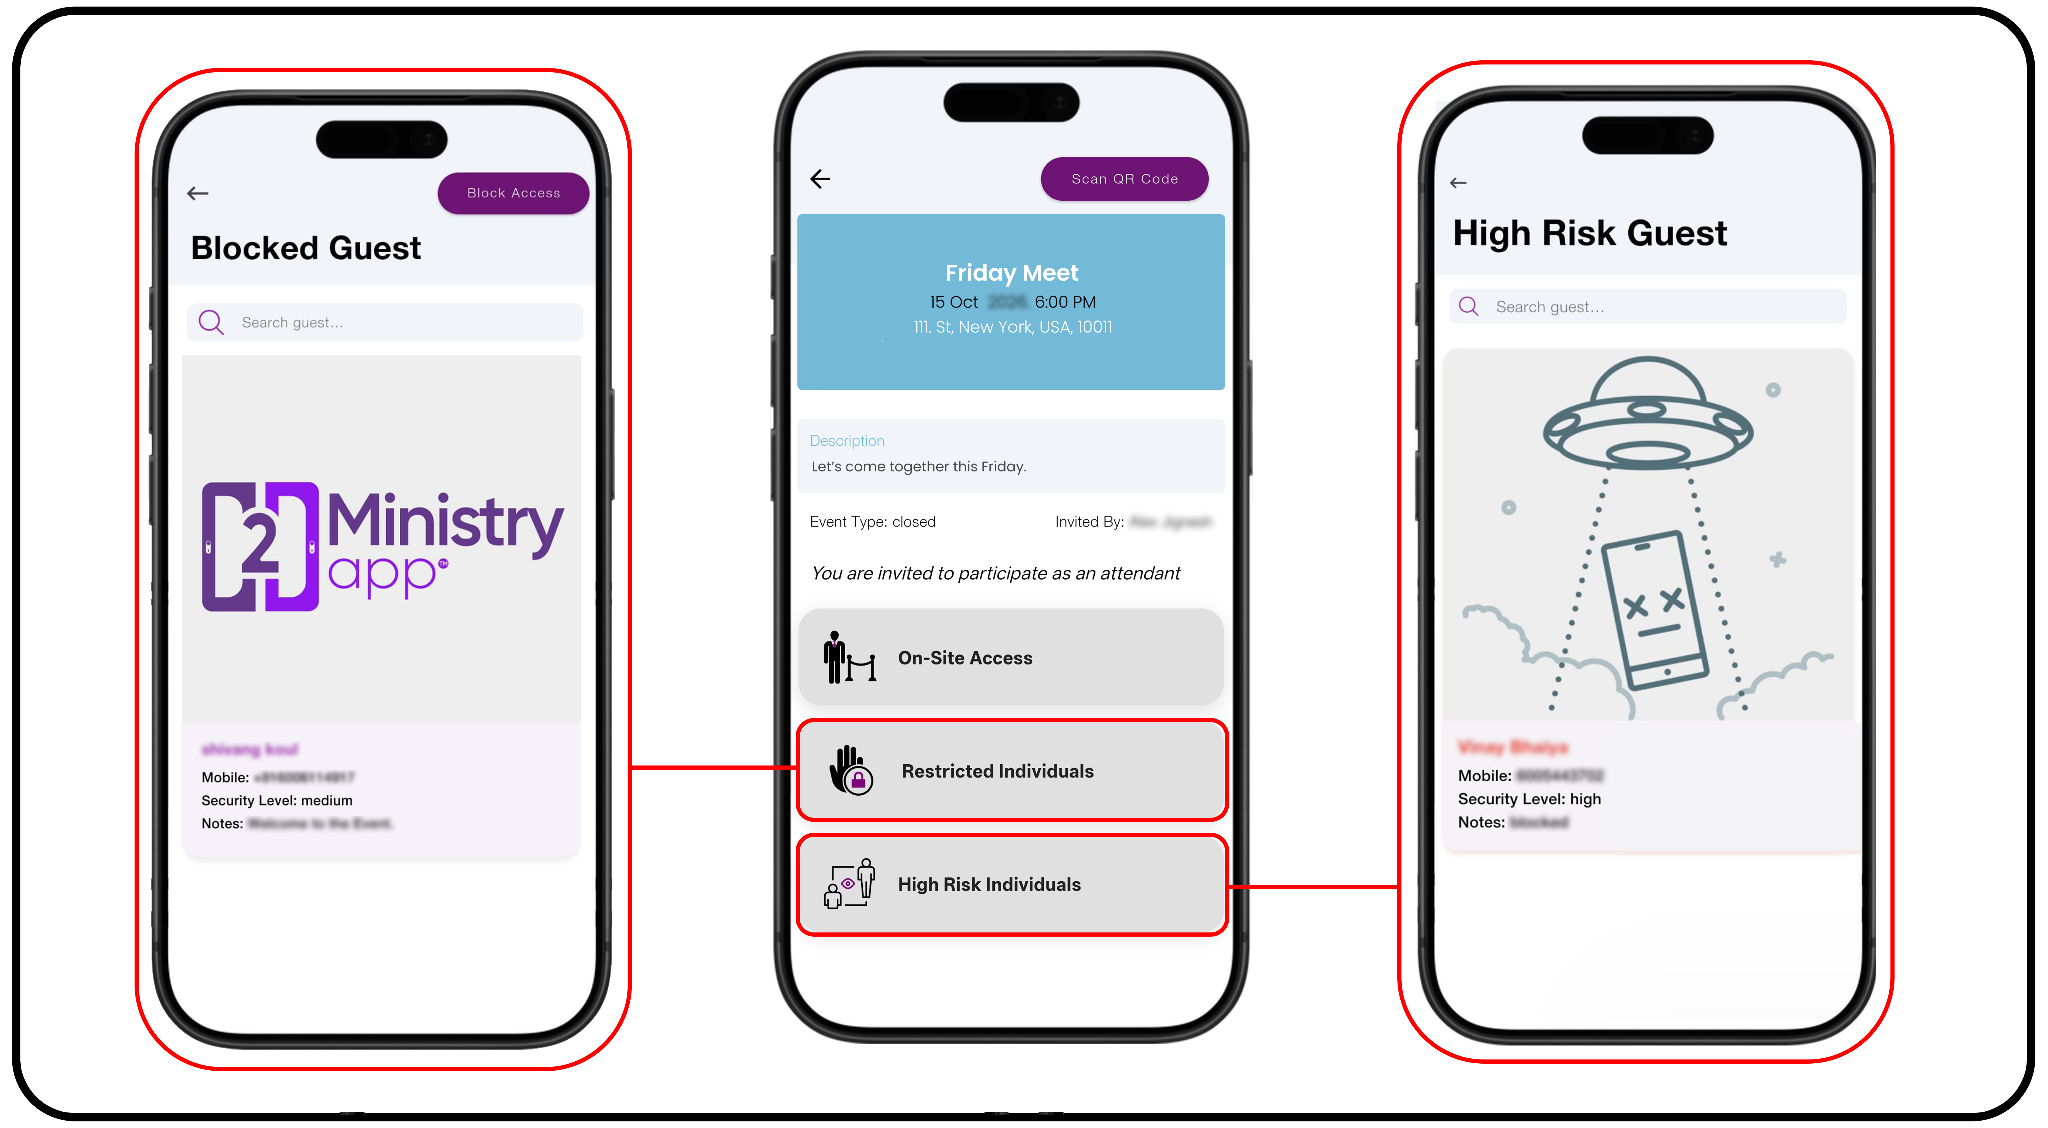
5. Manage Watch List: Tap Watch List tab to view the Watch list. To restrict a new
individual:
a) Go to On-Site Access and enter the individual's name and contact
information, when available, including a photograph when possible.
b) Select Access, then tap Save to add the individual to the Watch List.
With the D2D Attendant feature, you can efficiently manage event entry, check
in invited guests, handle on-site registrations, and manage Restricted
Individuals and Watch List entries. Whether you're scanning a QR code or
manually adding a guest, D2D helps keep event access organized, secure,
and easy to manage — all in one place.
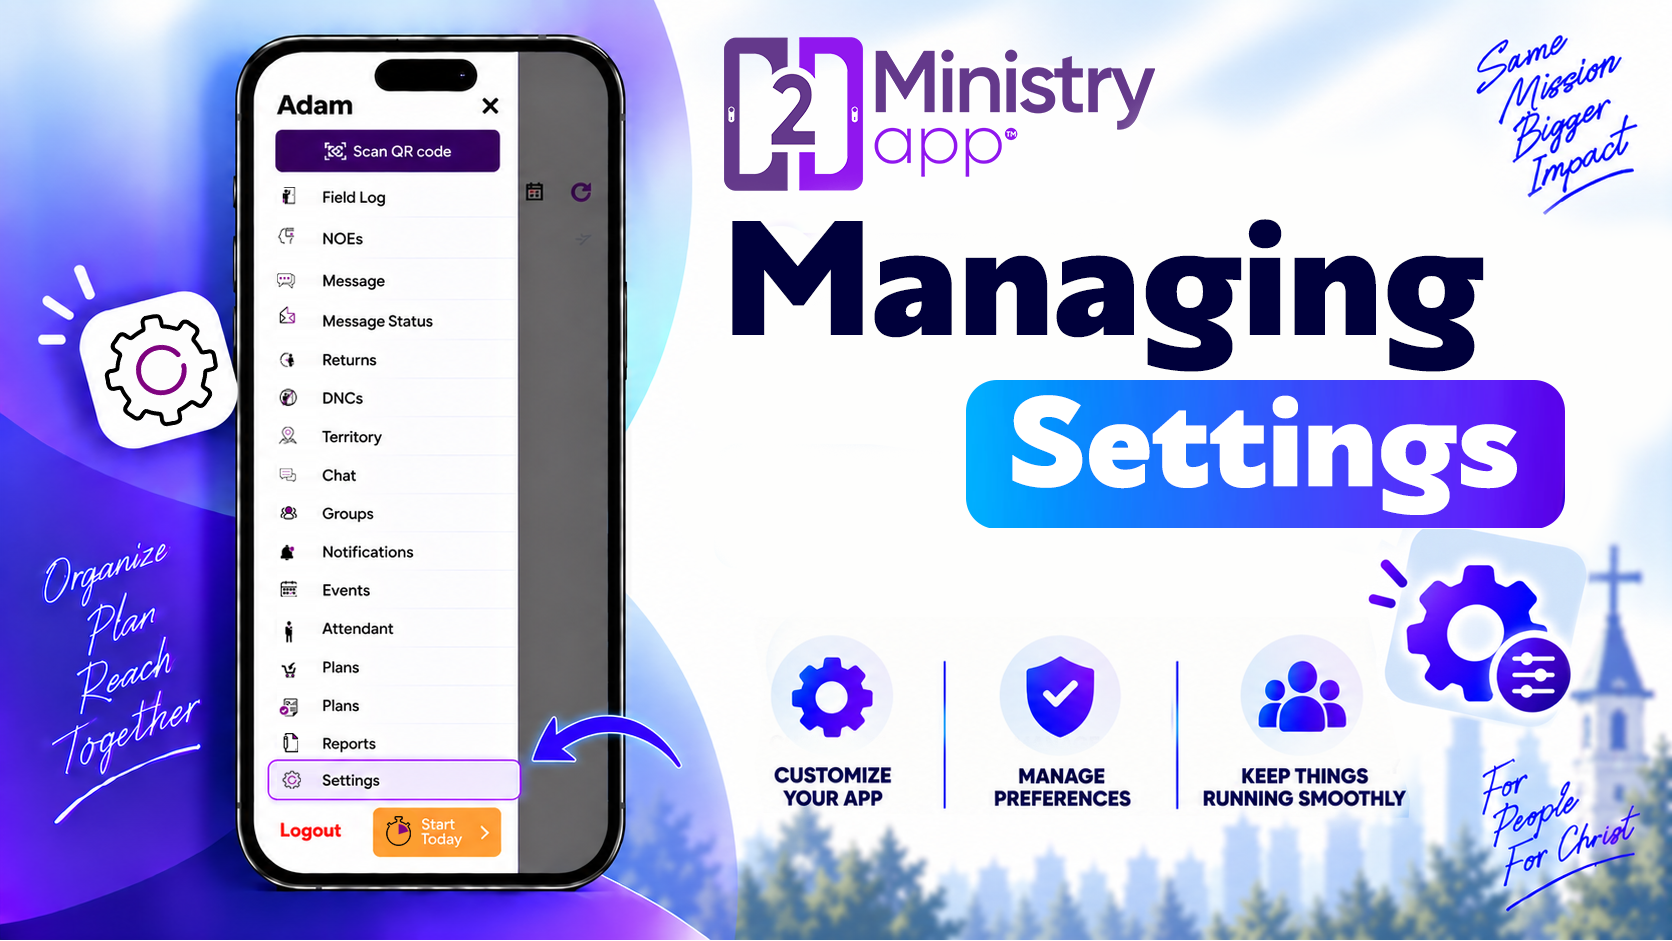
D2D Ministry Settings
Learn how to use the Settings menu in the D2D Ministry App to manage your profile, customize your preferences, and organize essential account and app information with ease. Keep your account settings and app experience tailored to your needs, with everything conveniently managed from one central location.
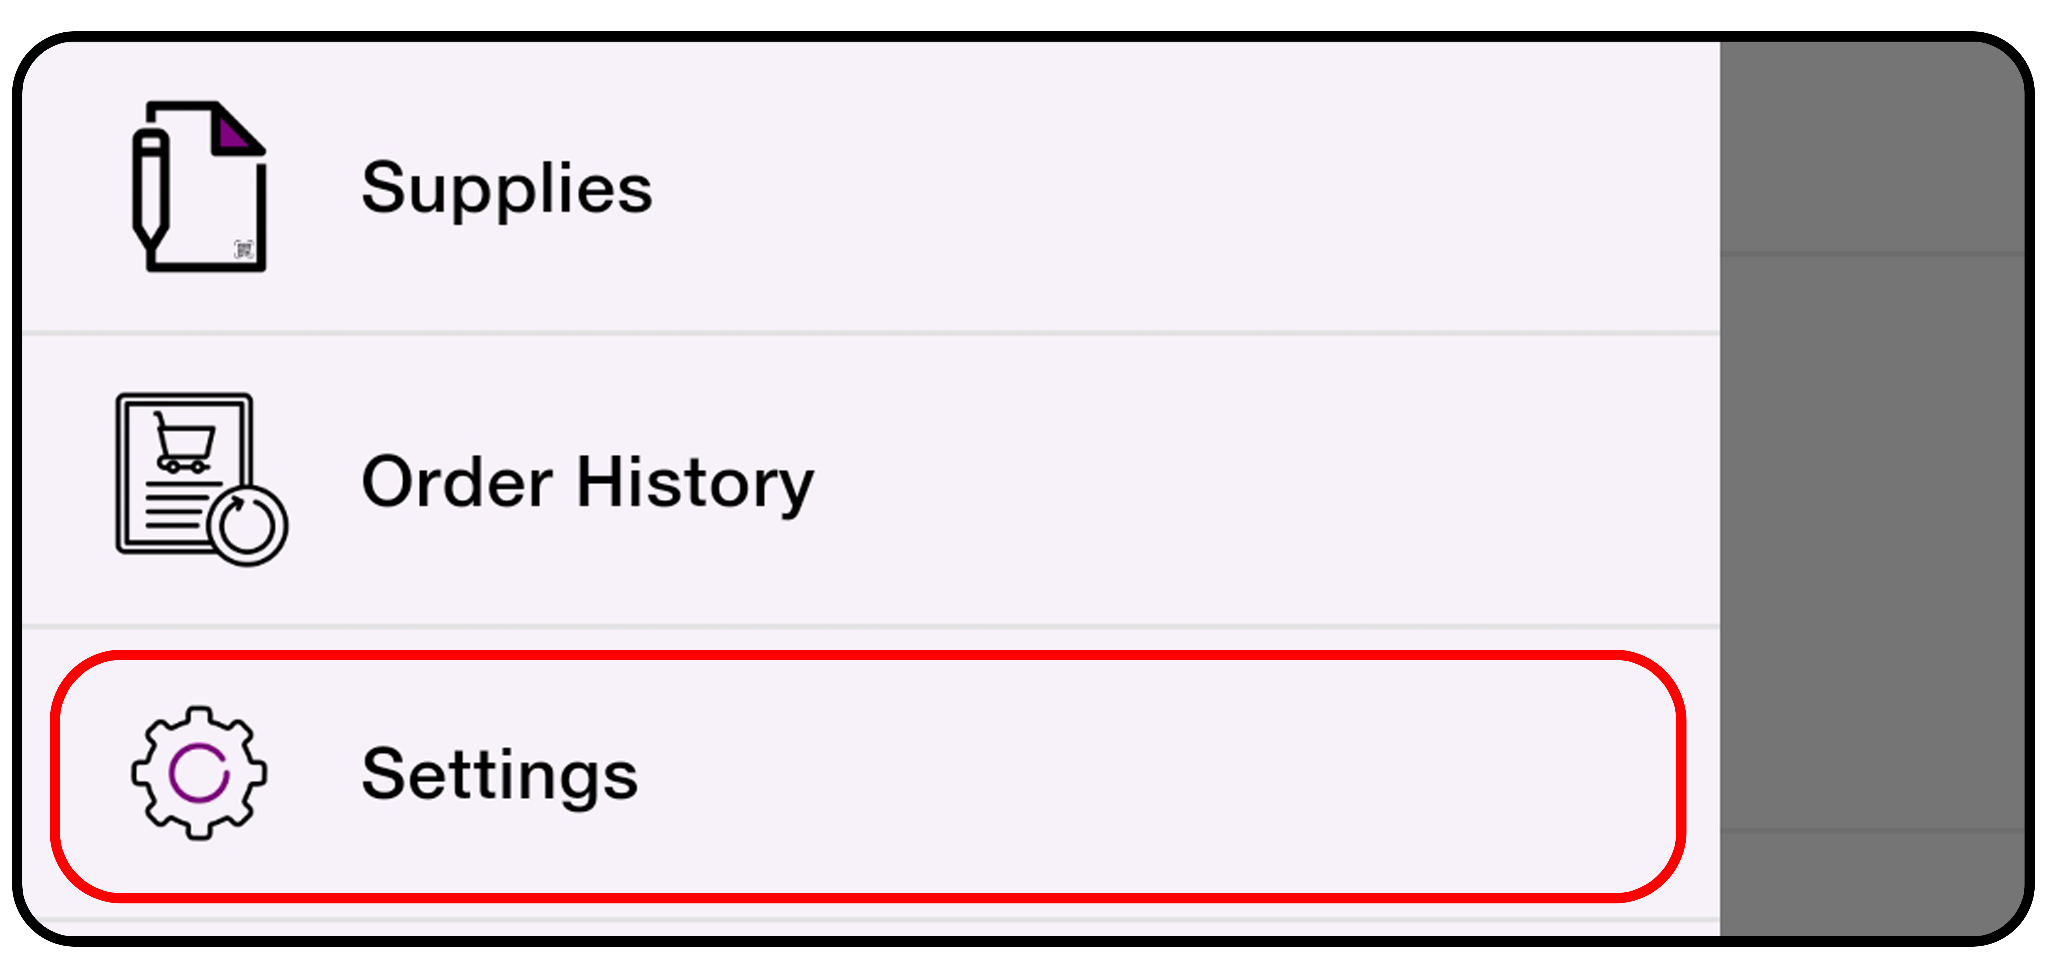
1. Open Settings: From the main menu and select Settings.
2. Update Your Profile:
a) Select Profile to view and update your personal information.
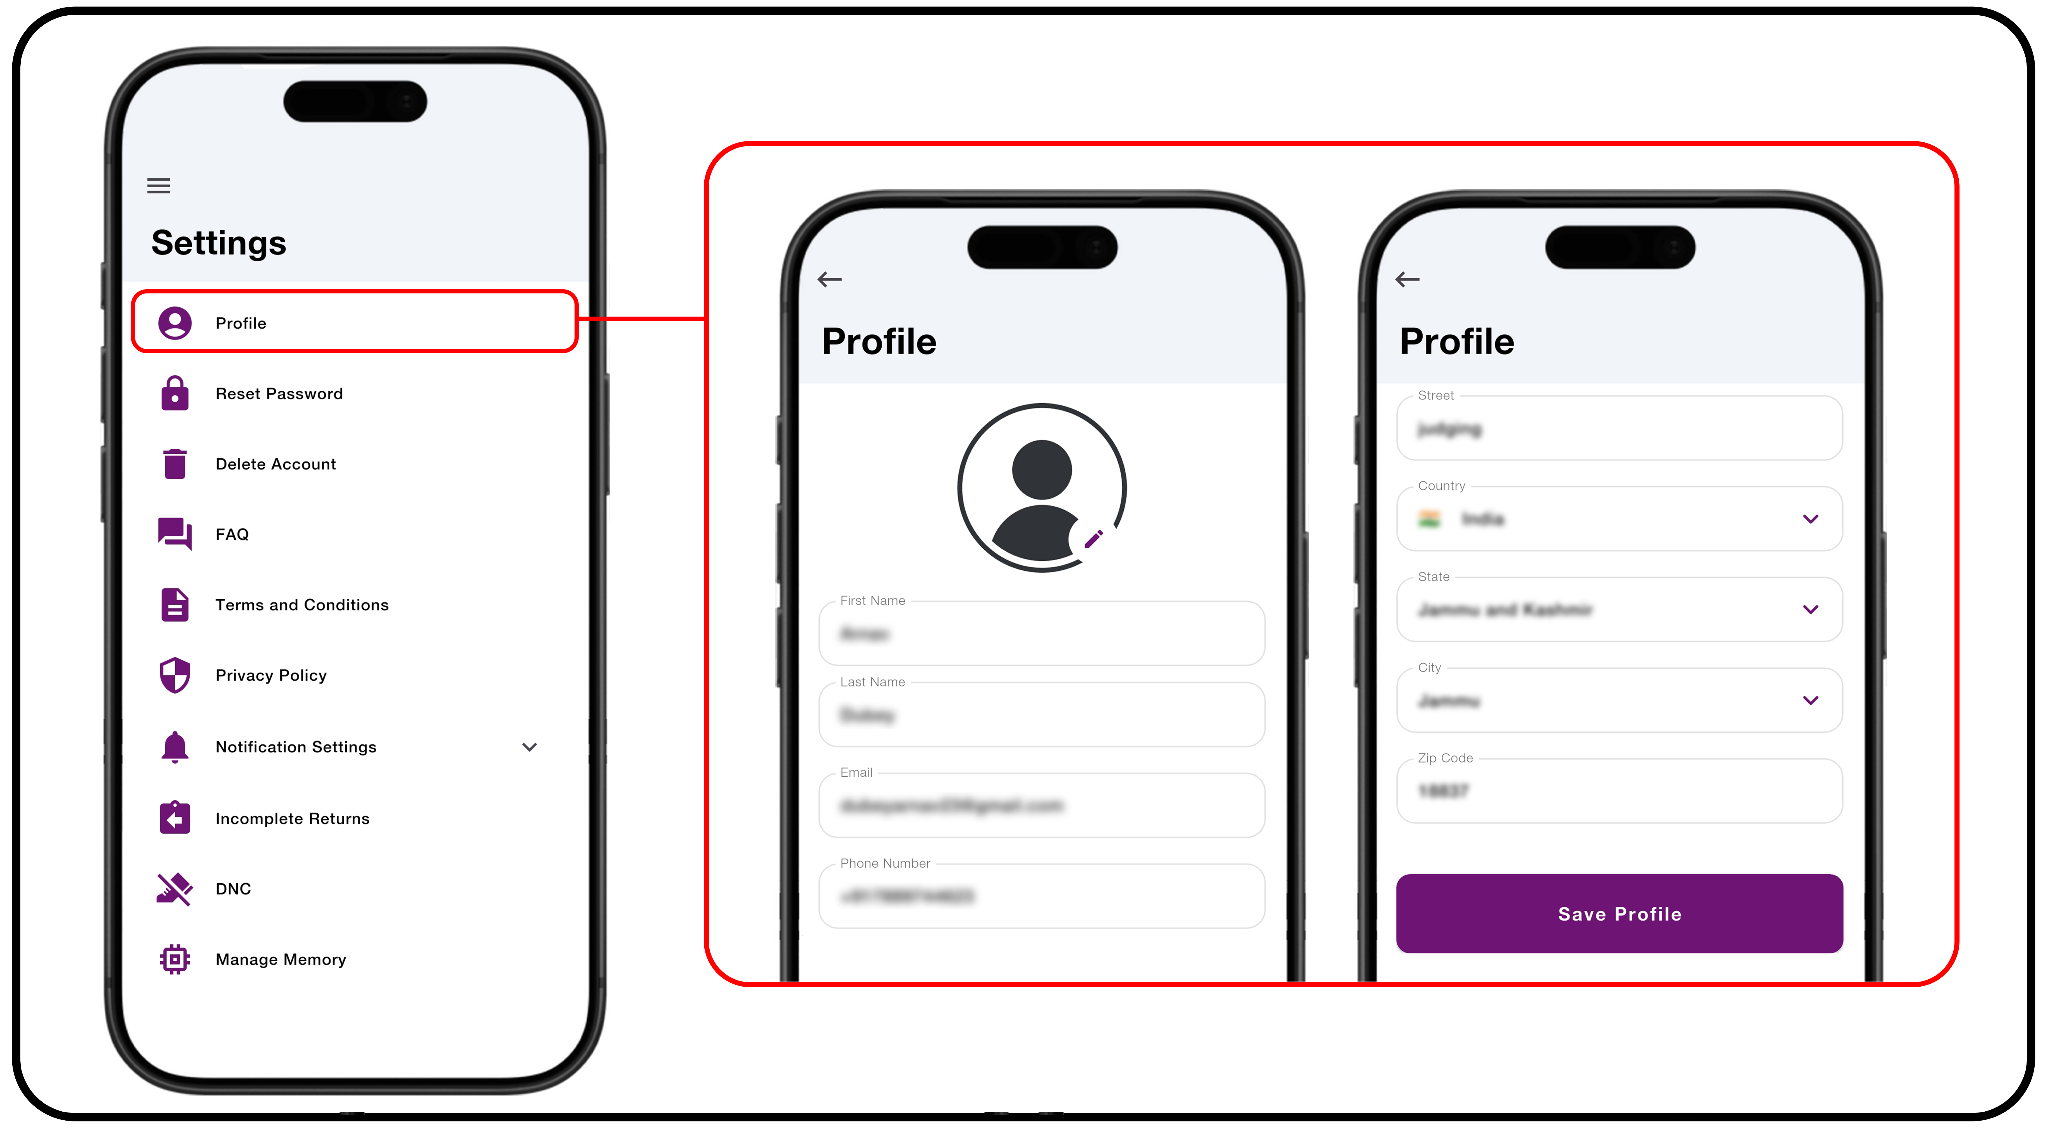
b) Tap Save Profile at the bottom to apply your changes.
Entering your location is important — it's how your congregation's Service
Overseer will be able to find you and activate ministry-related features in
your app as a publisher.
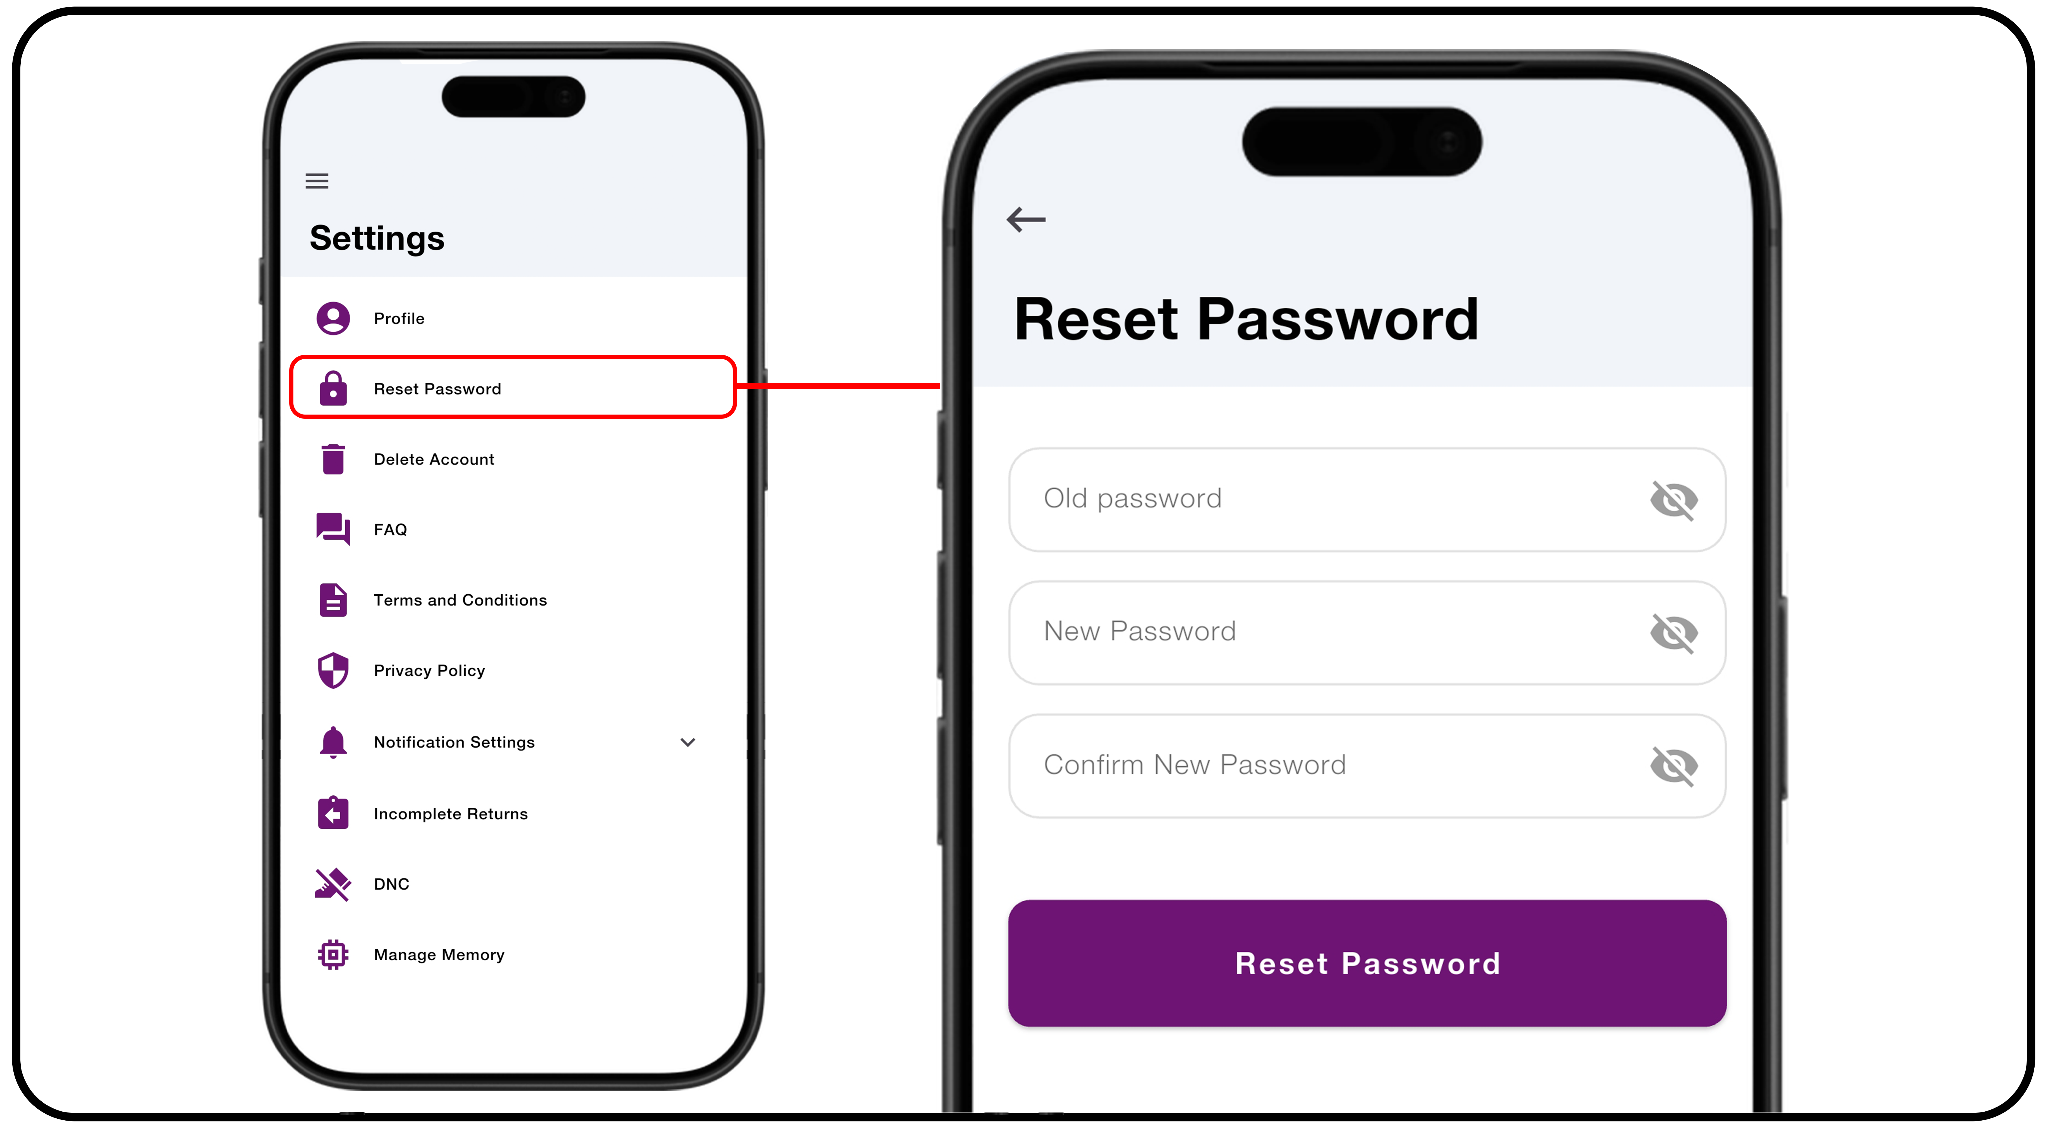
3. Reset Your Password: Tap Reset Password to update your account
credentials. Enter your current password, type your new password, confirm it,
and tap Reset Password to securely save your update.
4. Delete Your Account:
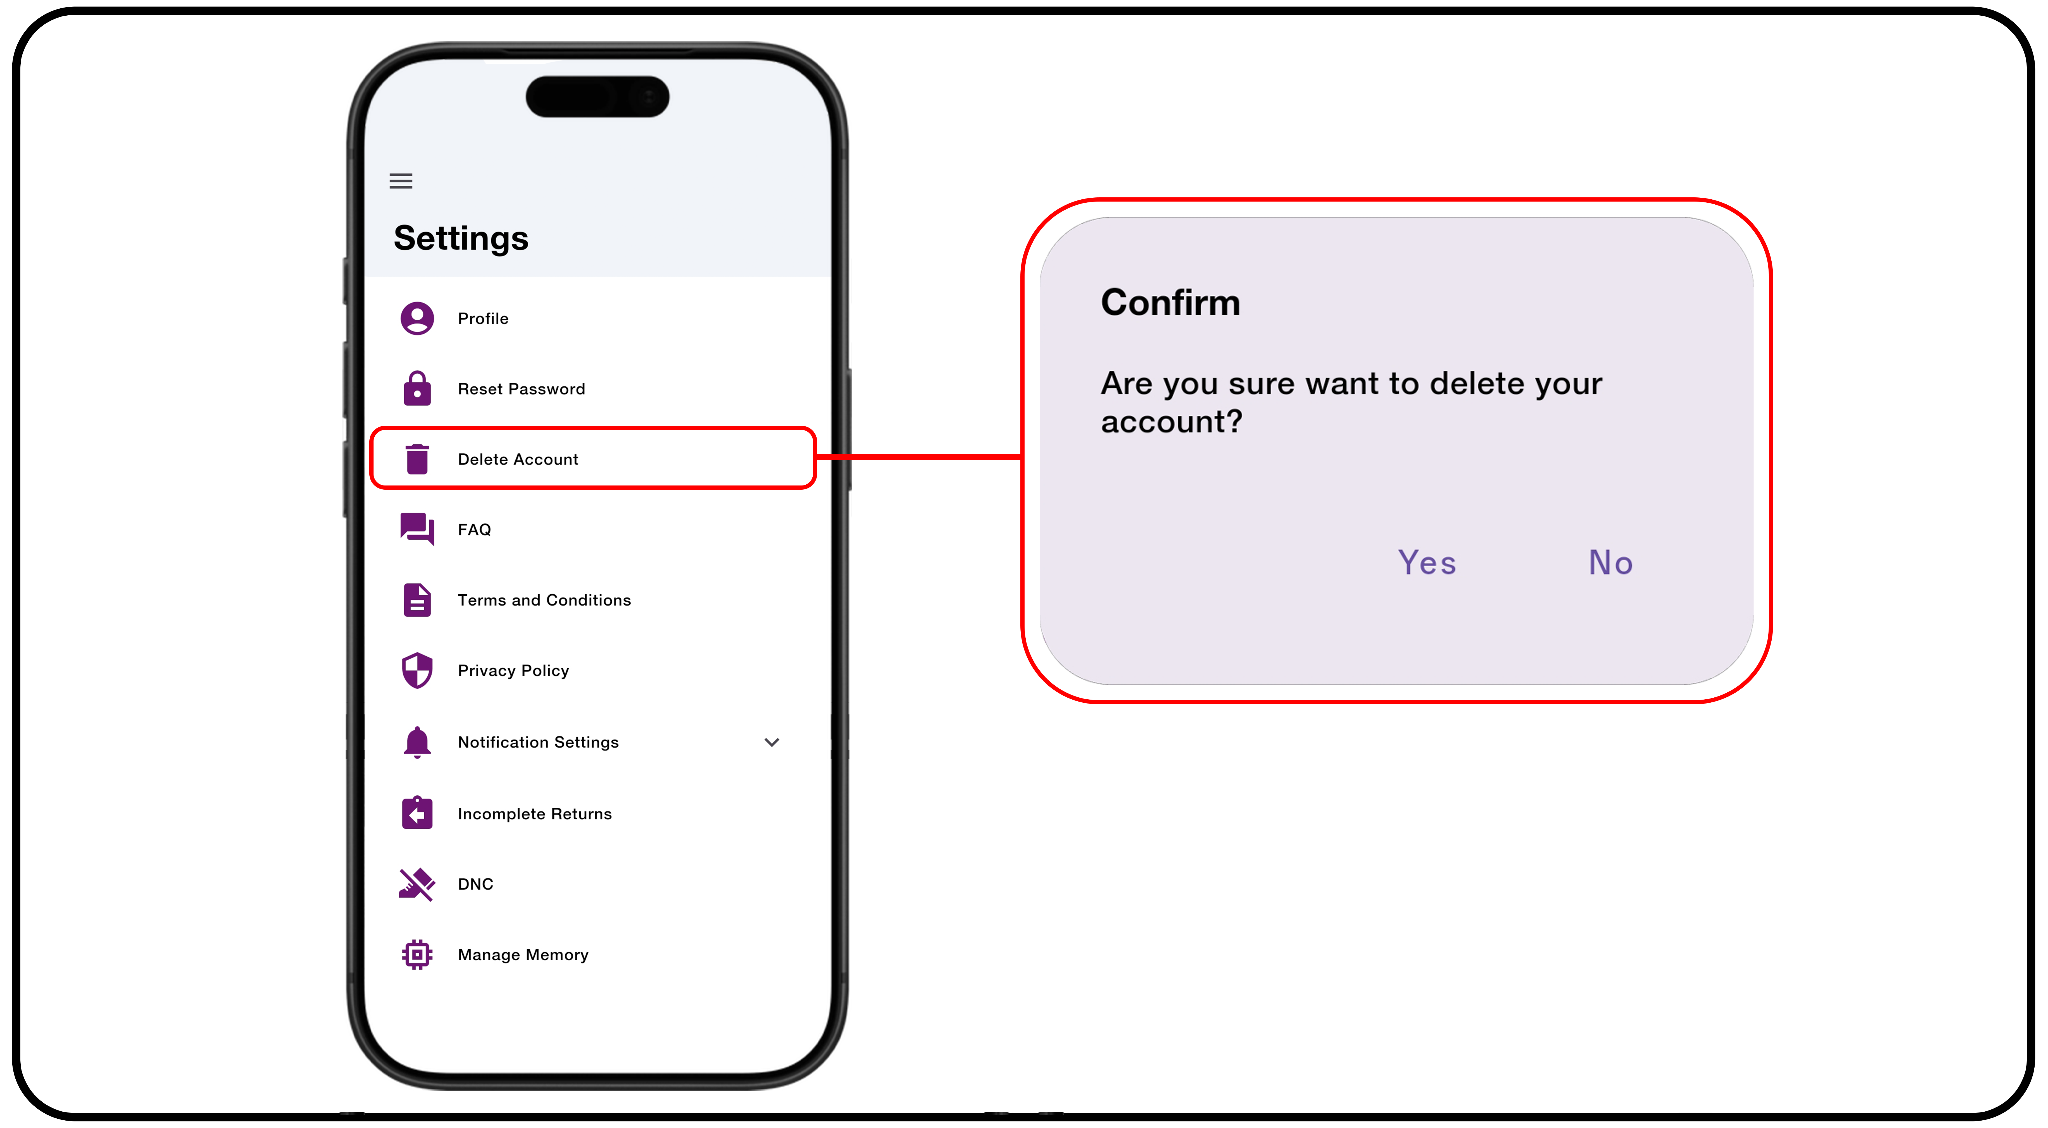
a) Select Delete Account in the settings menu.
b) Tap Yes to permanently remove your D2D account.
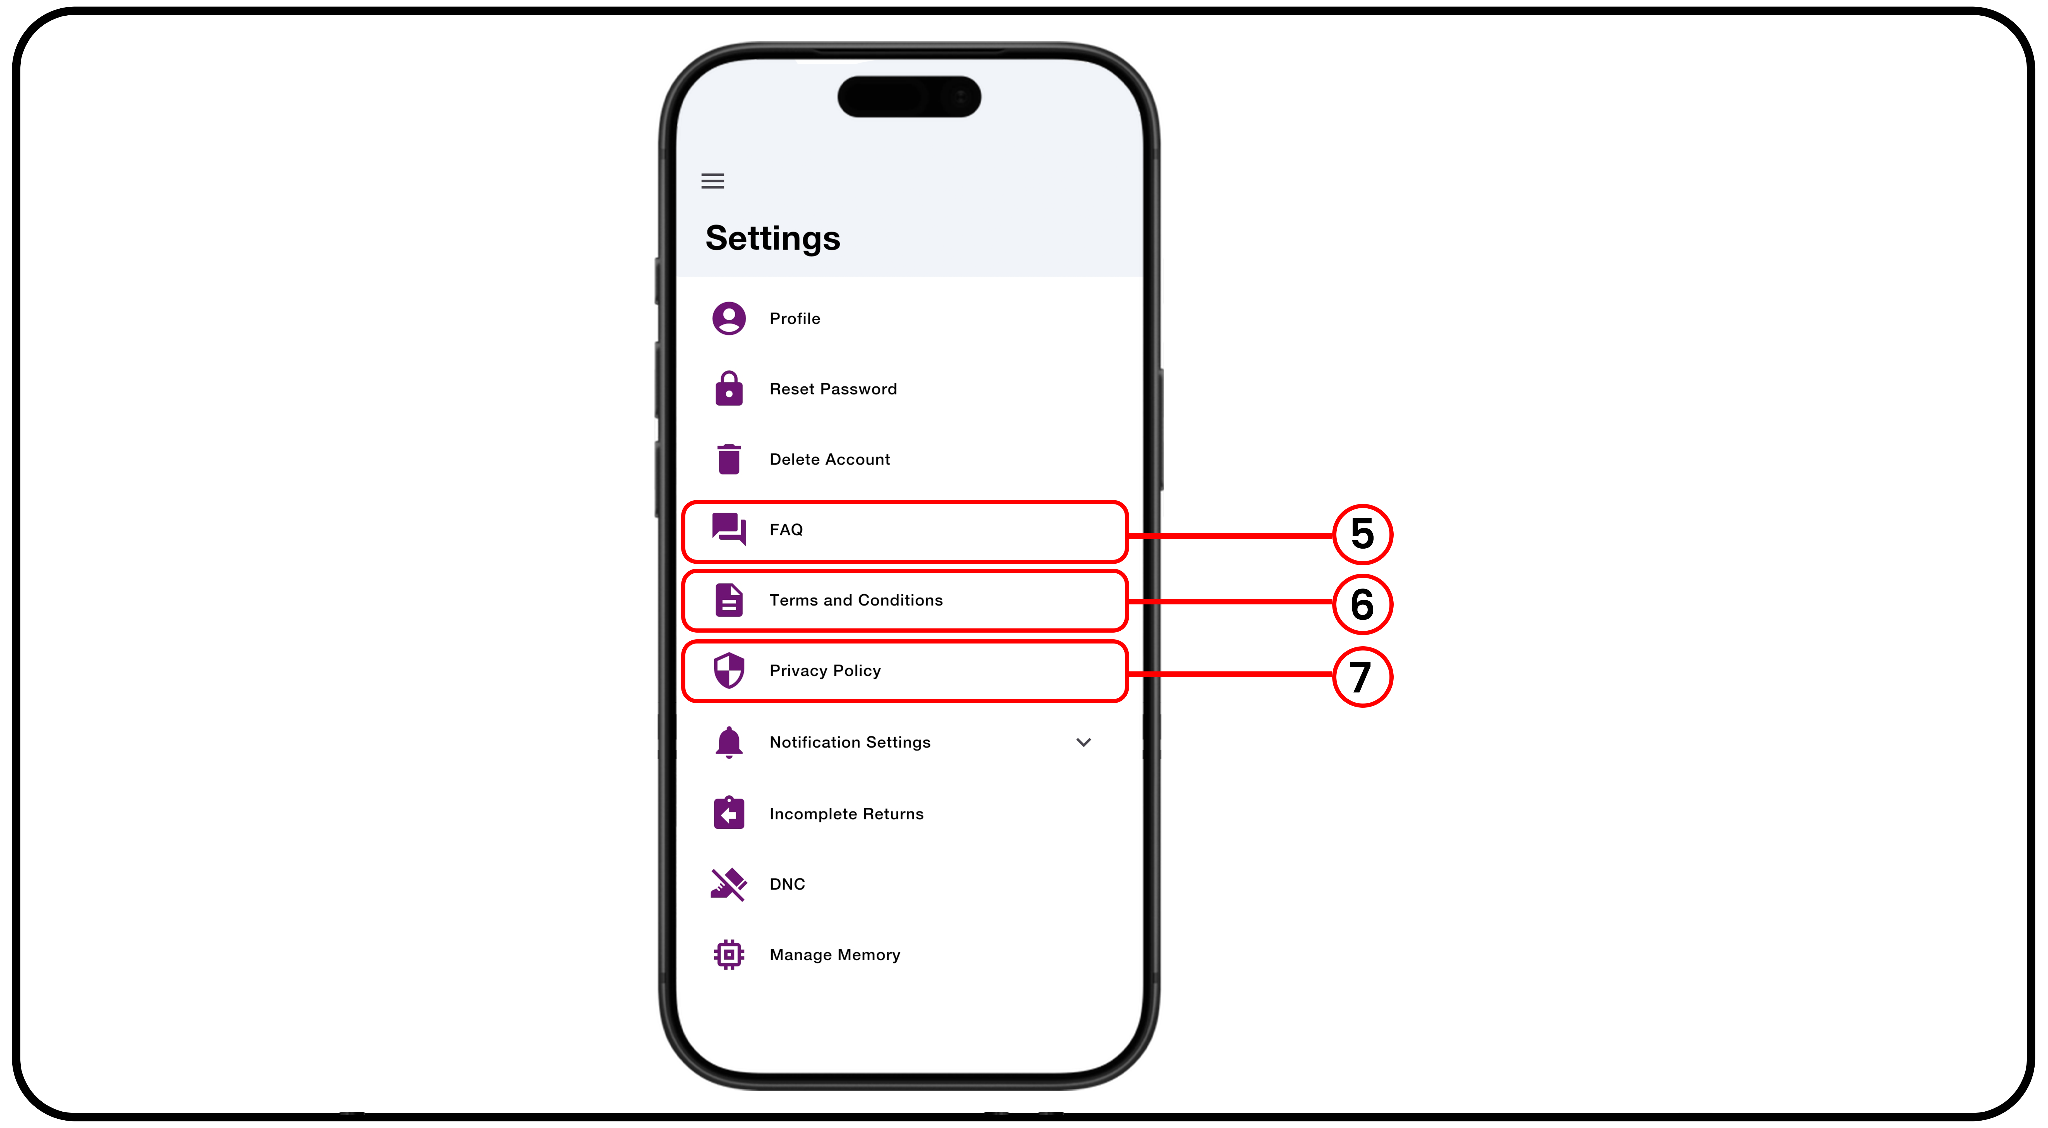
5. FAQ: Tap FAQ to open the support portal in your browser, where you can
browse answers to frequently asked questions about D2D.
6. Terms and Conditions: Select Terms and Conditions to view the official legal
agreements and guidelines for using the app.
7. Privacy Policy: Tap Privacy Policy to review detailed information on how D2D
handles and protects your data.
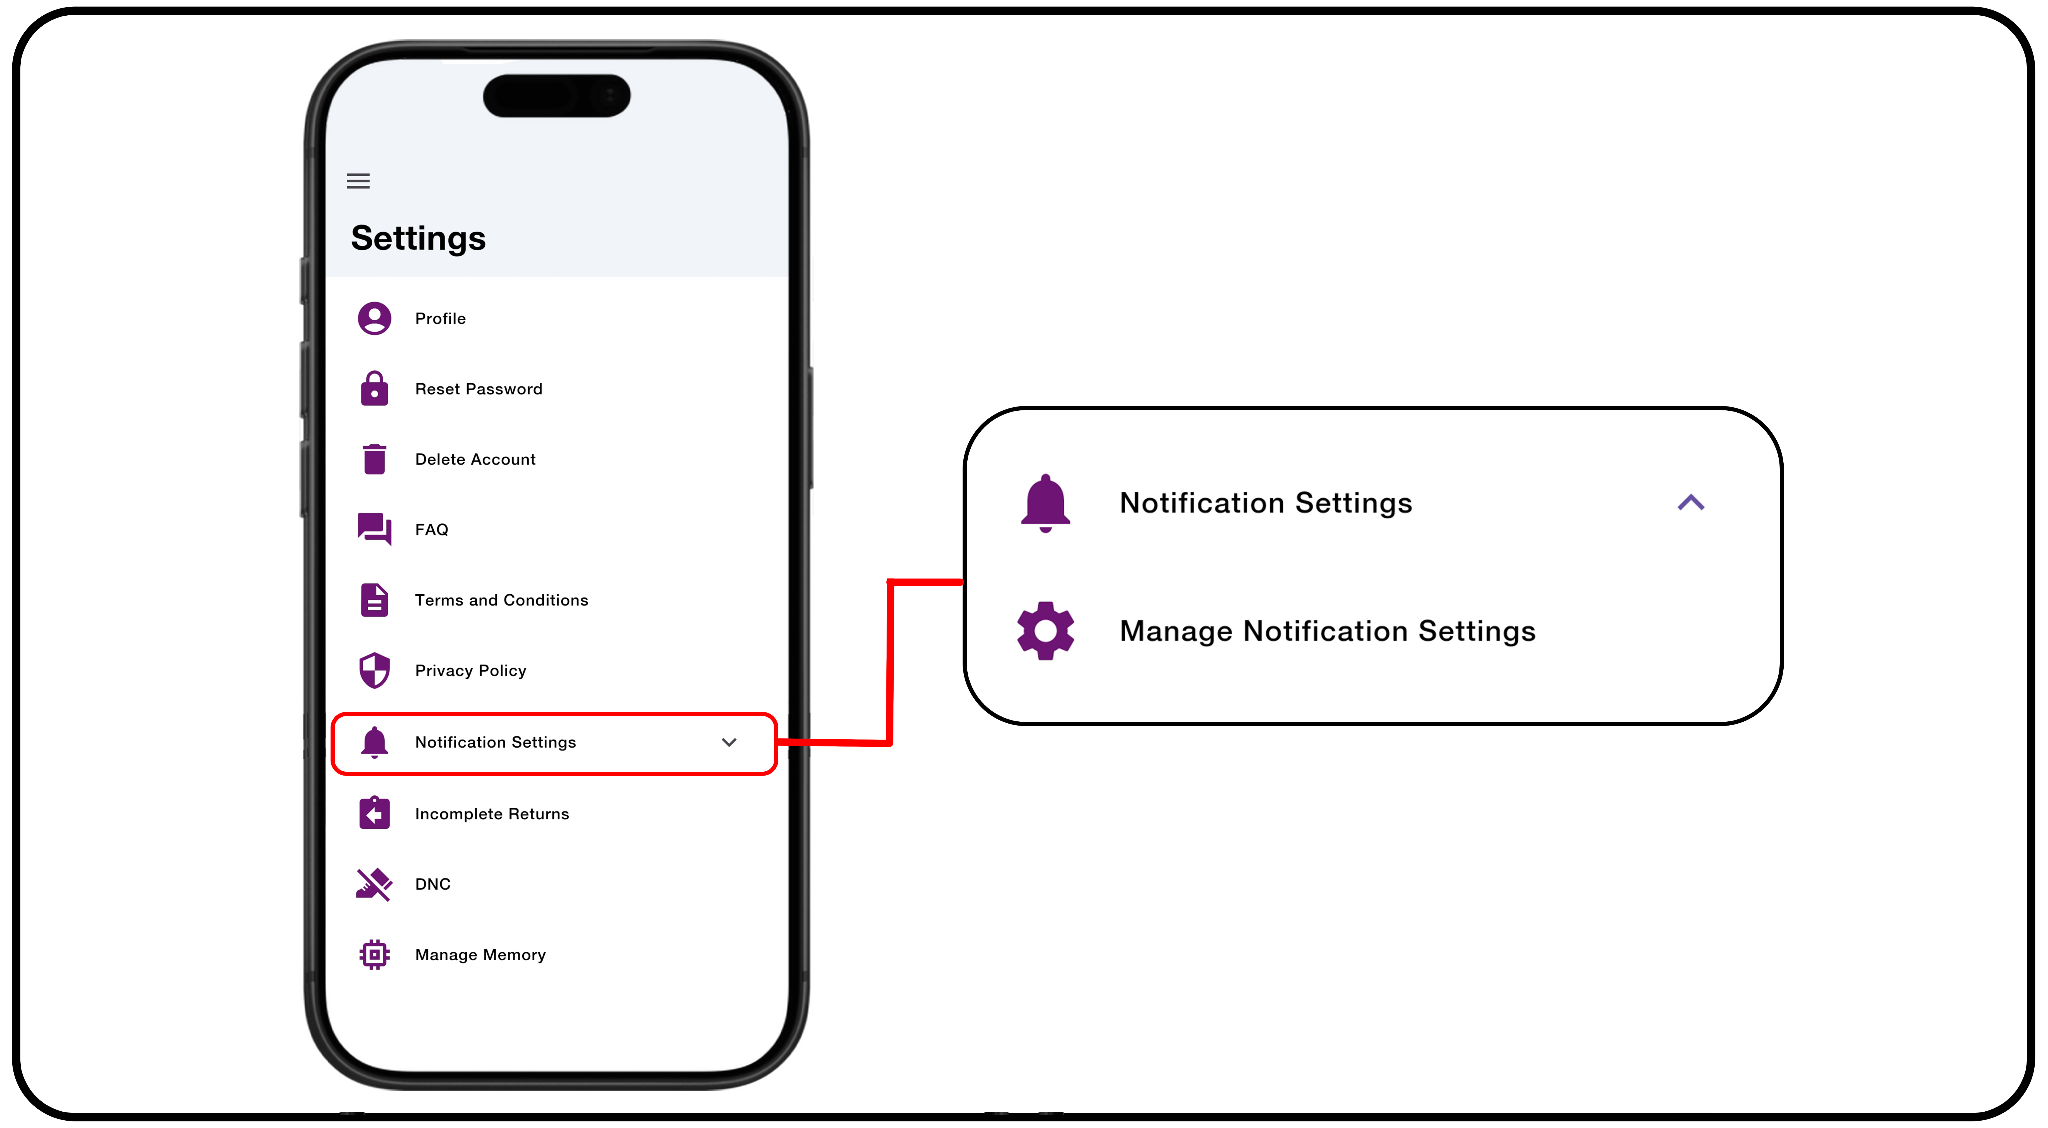
8. Manage Notification Settings: Expand Notification Settings and tap Manage
Notification Settings to access your device's system settings. From there, you
can toggle app notifications and customize your alert preferences.
9. Set Up Incomplete Returns:
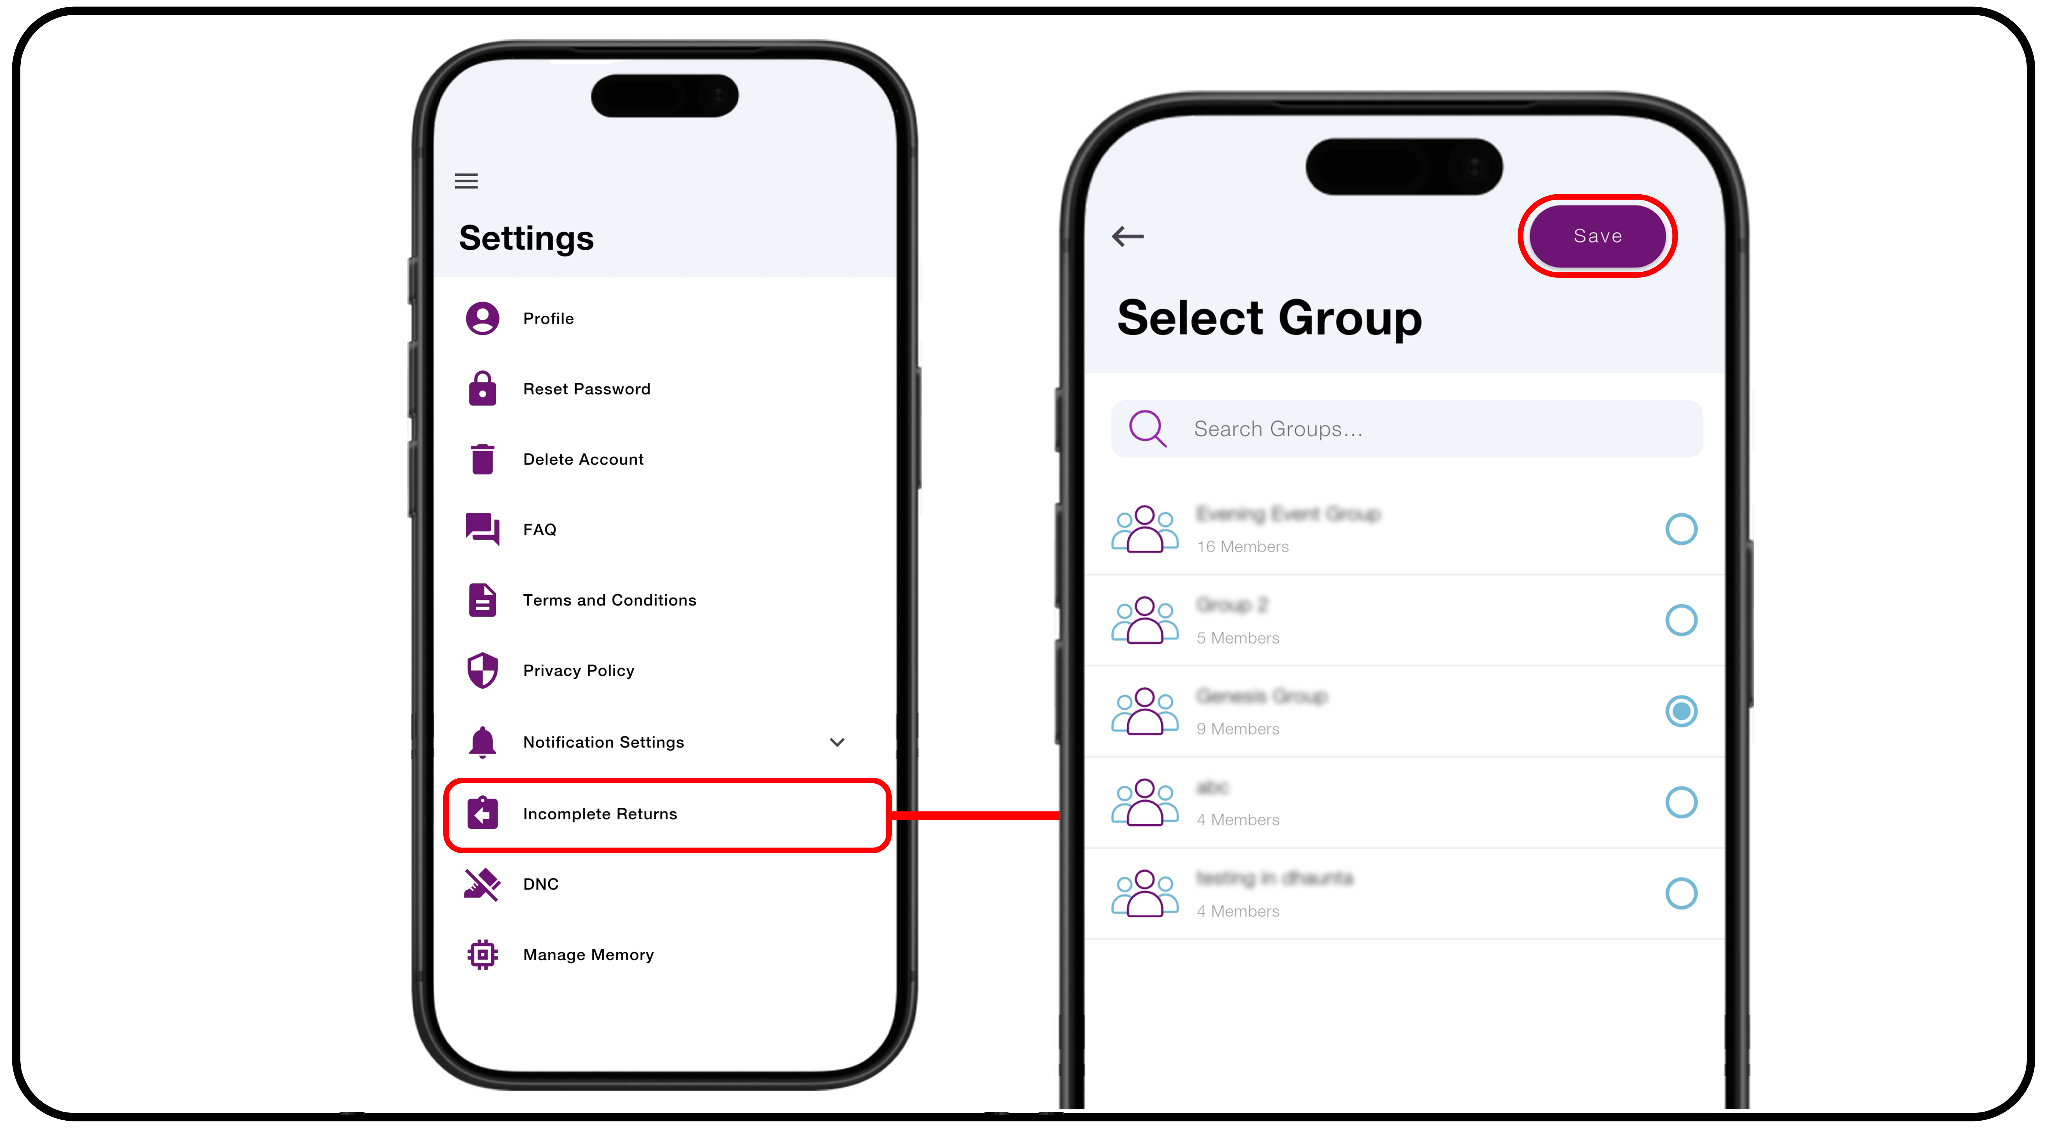
a) Select Incomplete Returns to associate specific groups with the return workflow.
b) Select a group from the list.
c) Tap Save to apply your selection.
Once selected, your incomplete return visits become visible to the groups
you've chosen.
10. Configure DNC Notifications: Do Not Call (DNC) records are sent to your Service
Overseer.You can also select a Service Group Overseer to be notified of new
DNCs:
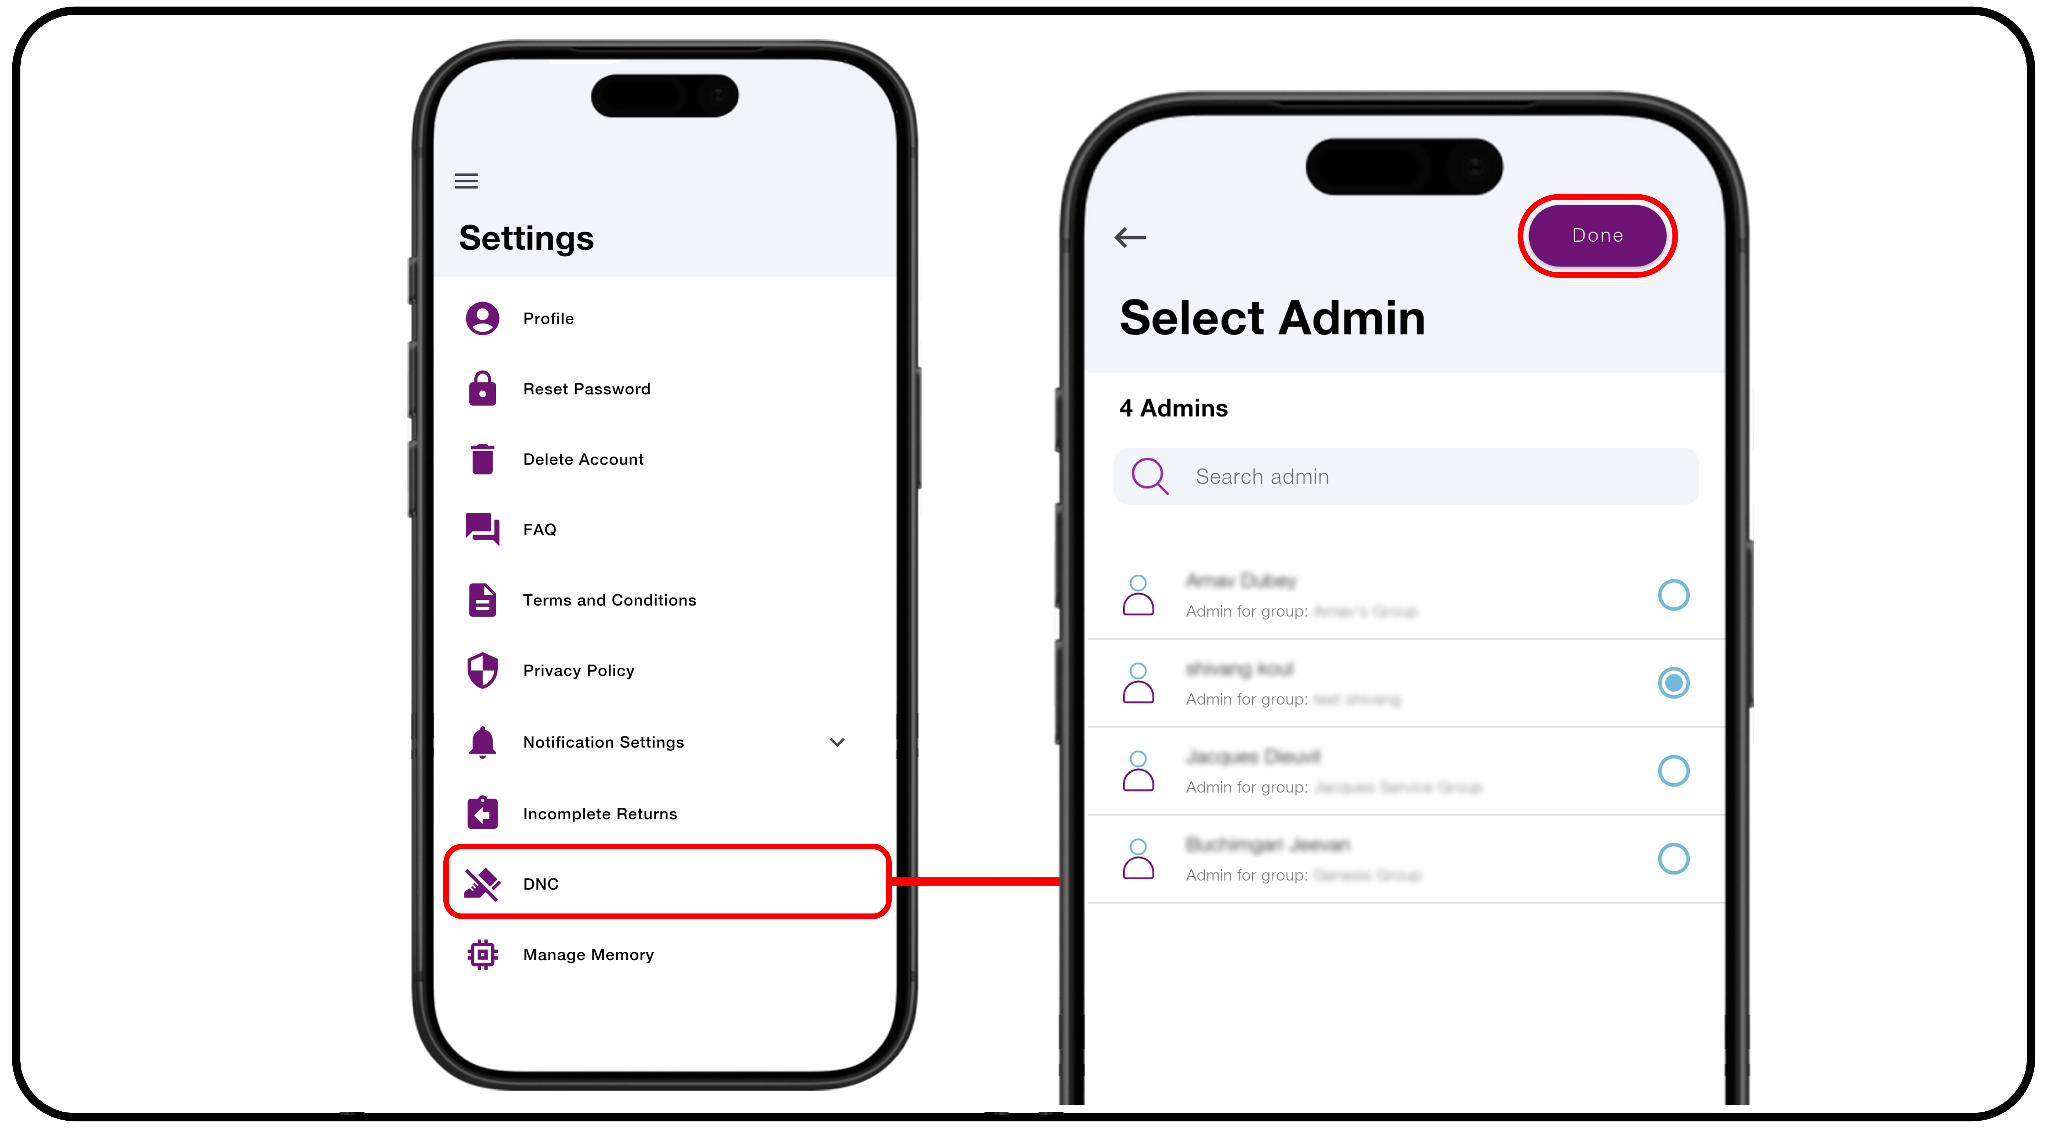
a) Tap DNC to open the list of overseers for your group
b) Make your selection
c) Tap Done to finalize and save the setting.
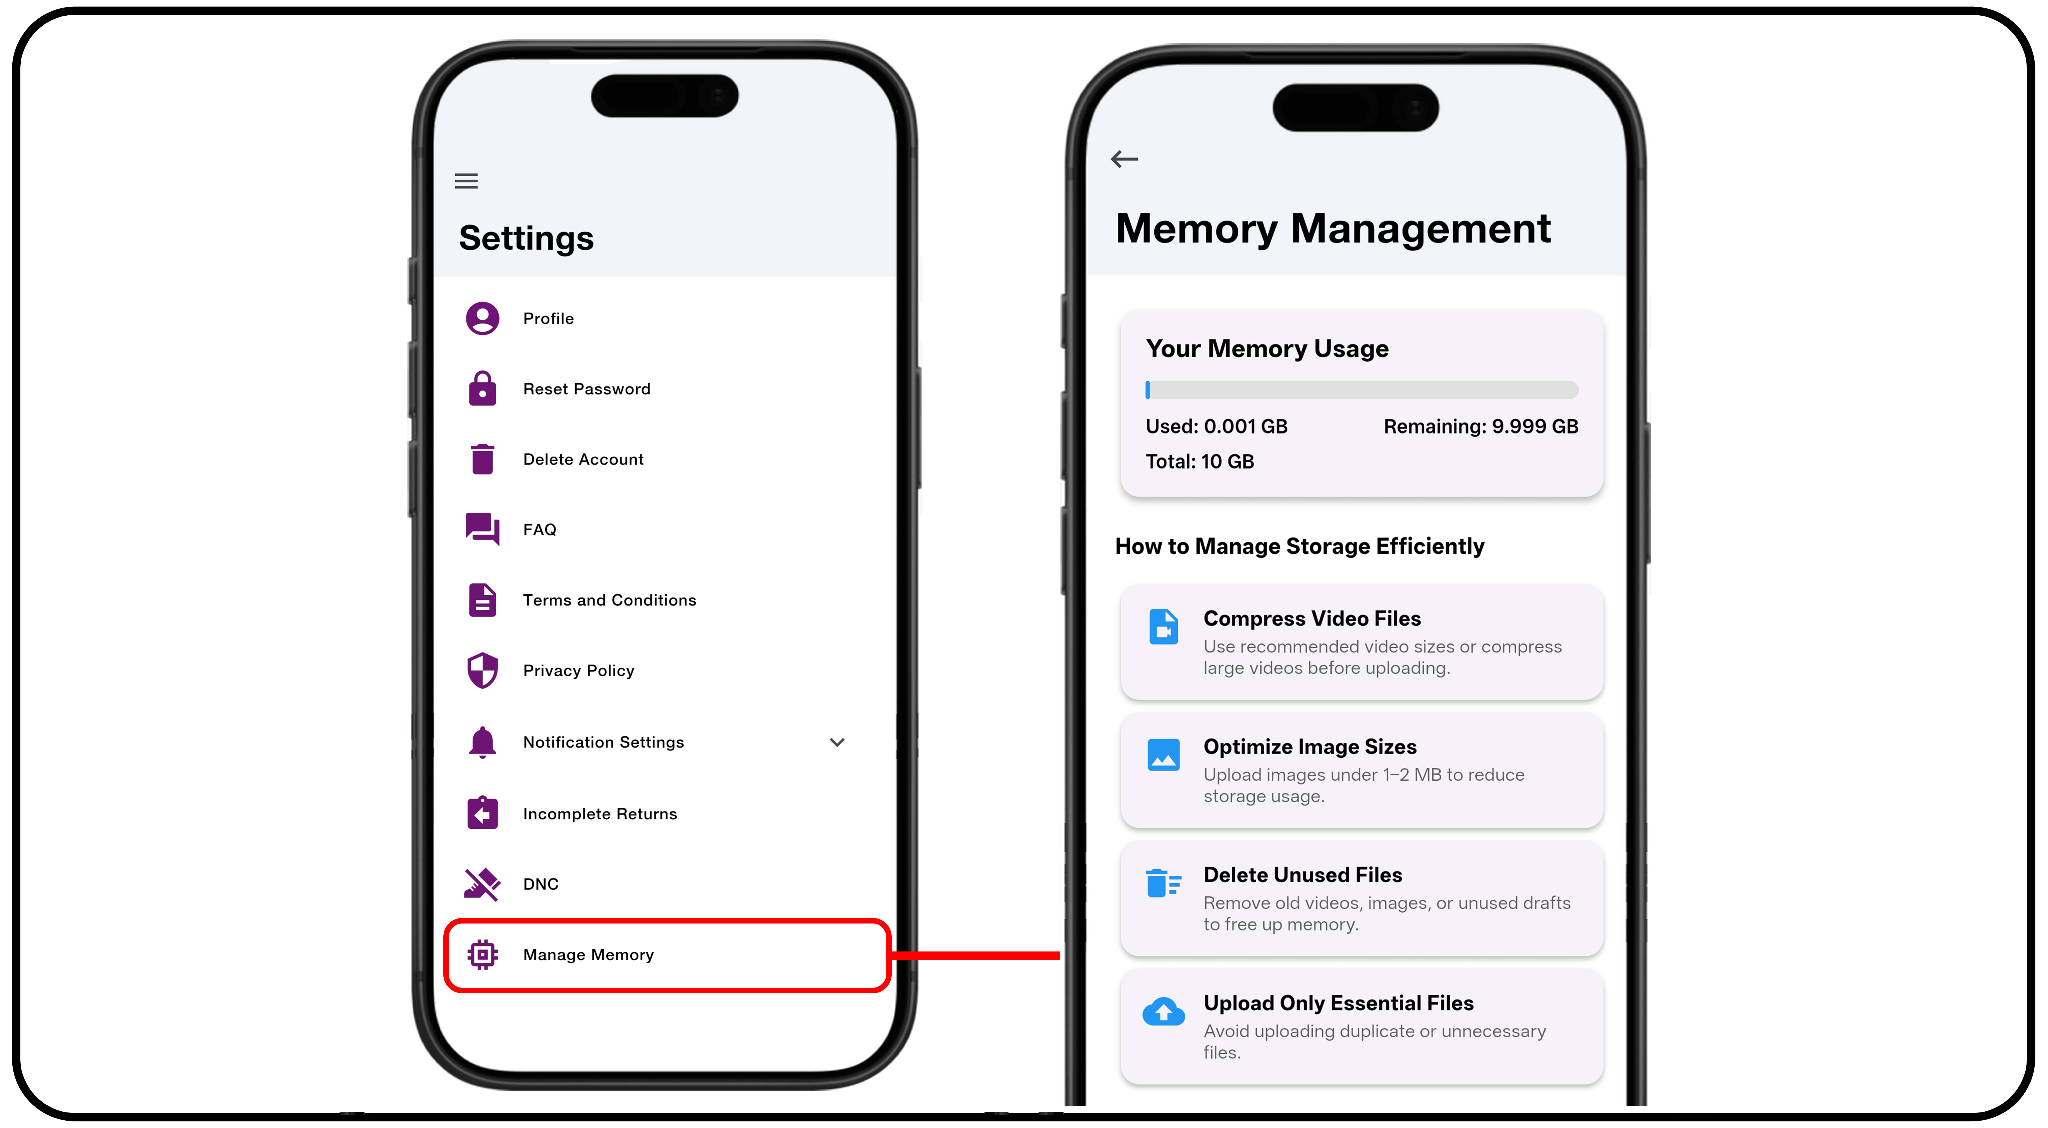
11. Manage Memory: Select Manage Memory to view your current storage
allocation and available cloud space. This screen offers tips for compressing
videos, optimizing photos & removing unused files to manage storage
efficiently.
With D2D Settings, maintaining your account & personalizing your app setup
is simple. Whether you're updating your profile, configuring groups, or
monitoring storage, each feature gives you total control — all in one place.
Creating an Event
Learn how to use the Events feature in the D2D Ministry App to create and manage events with ease. Create and schedule a new event, enter location details, select invitees and attendants, configure recurrence and privacy settings, and publish your event, all from one convenient location.
CREATING AN EVENT
1. Open the Events Section:
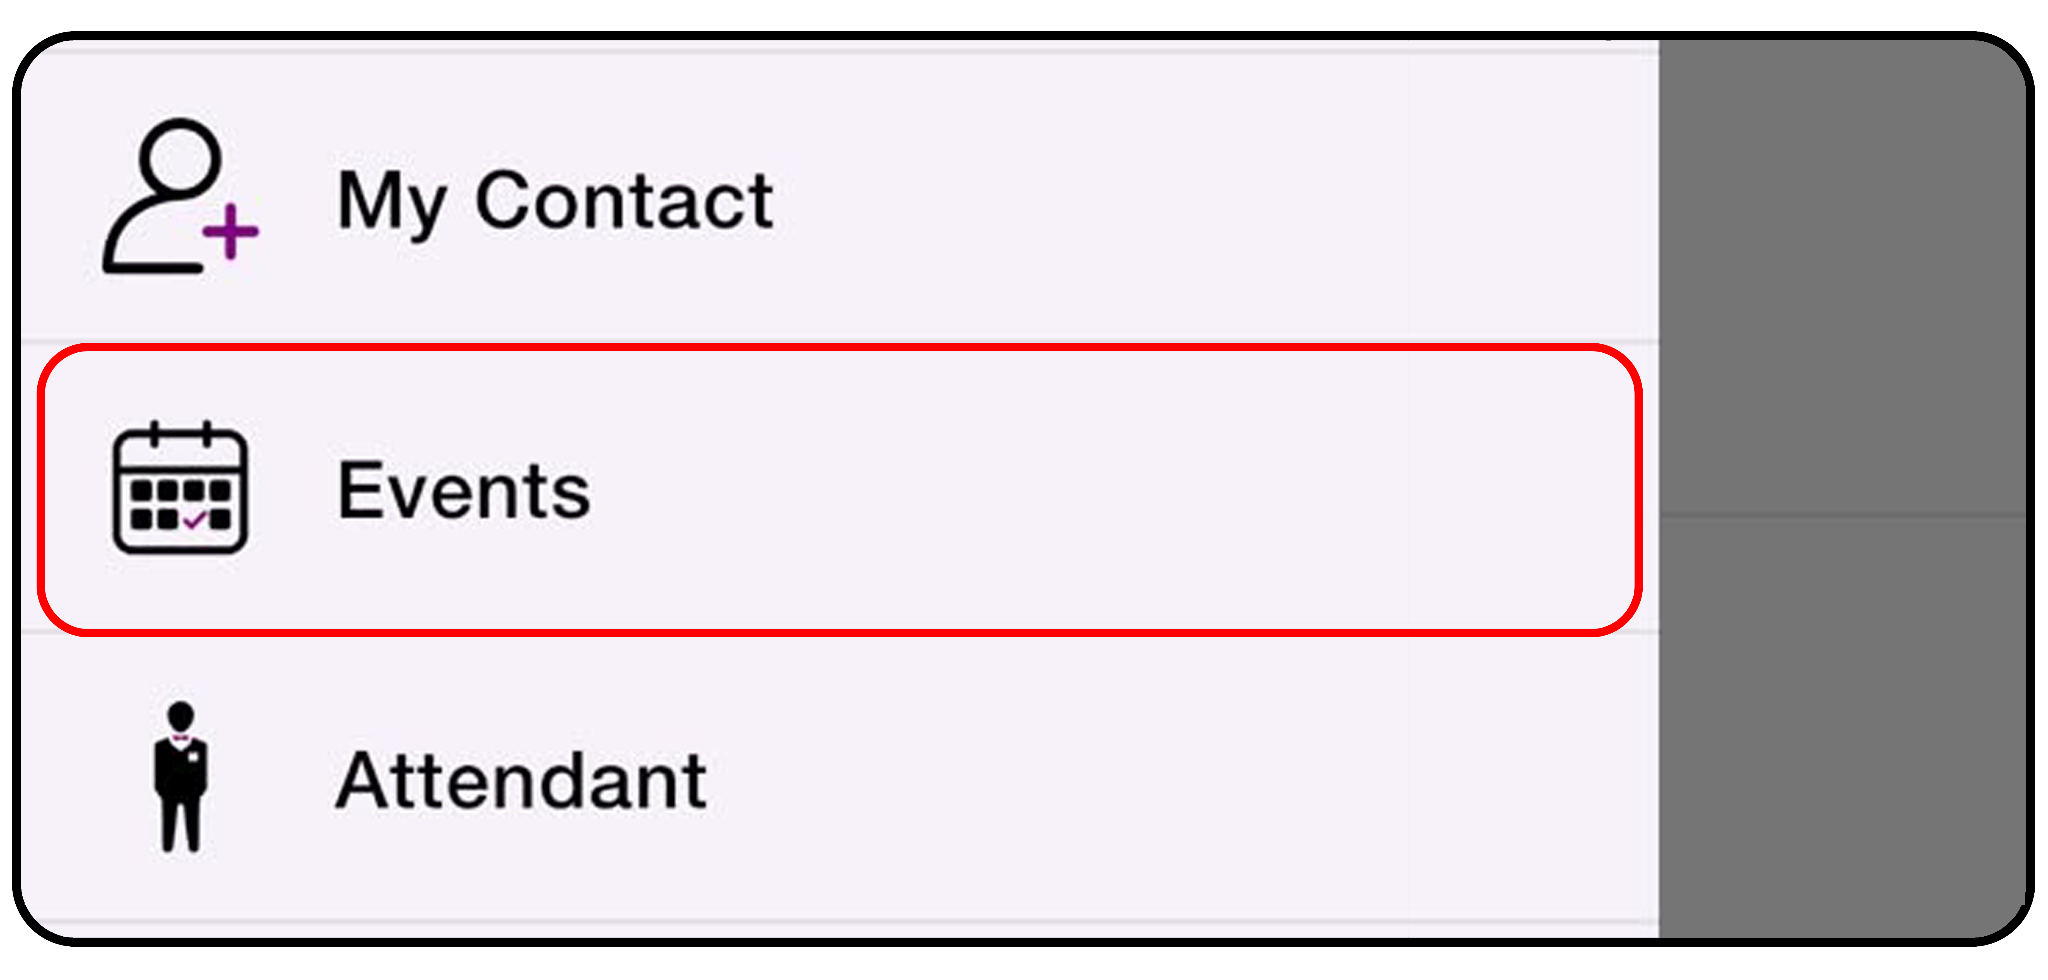
a) Open the side navigation menu from the dashboard.
b) Scroll down and tap Events.
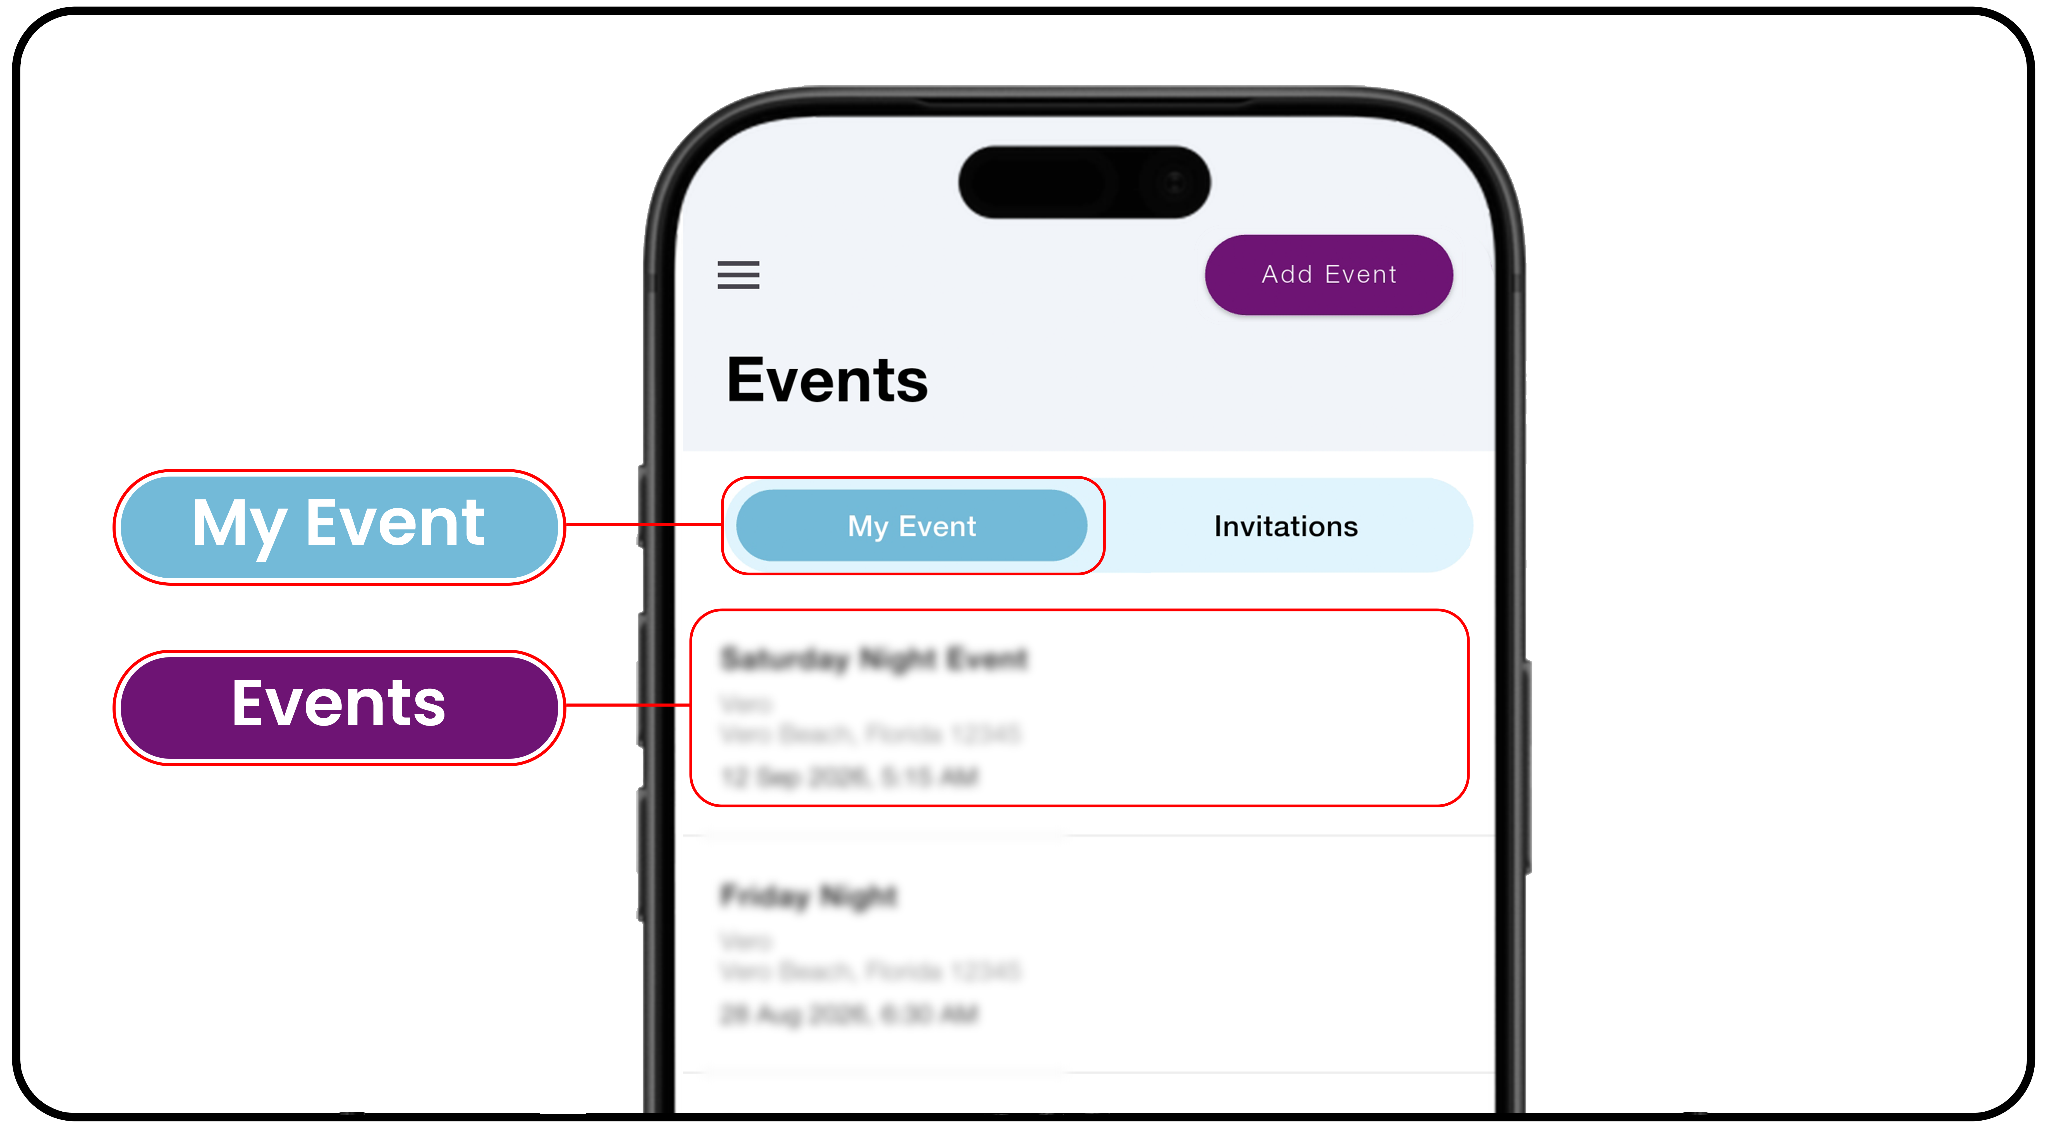
2. The Events screen has two tabs:
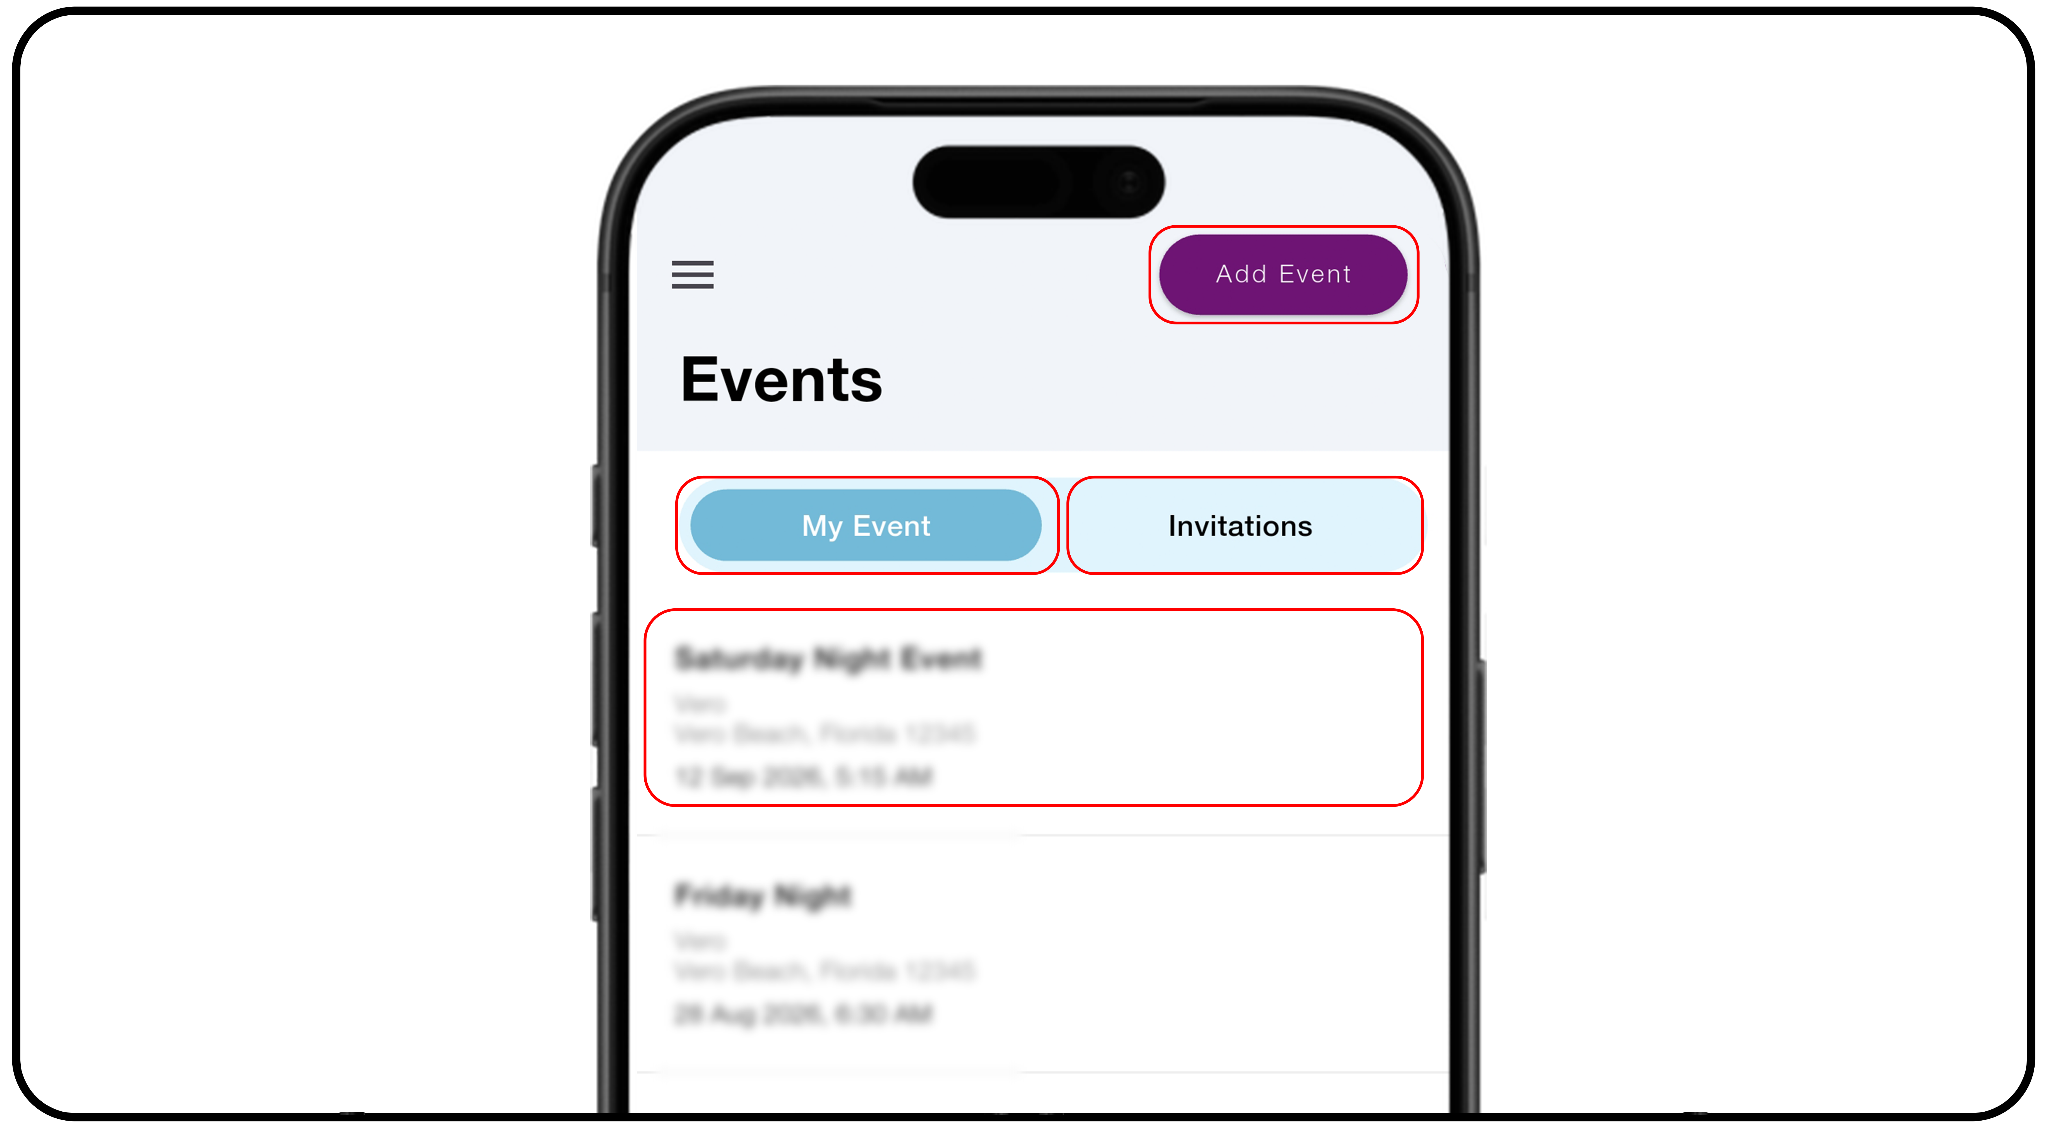
a) My Event — Events you've scheduled.
b) Invitations — Events you've been invited to.
3. Start a New Event: In the top right corner of the Events dashboard, tap
Add Event.
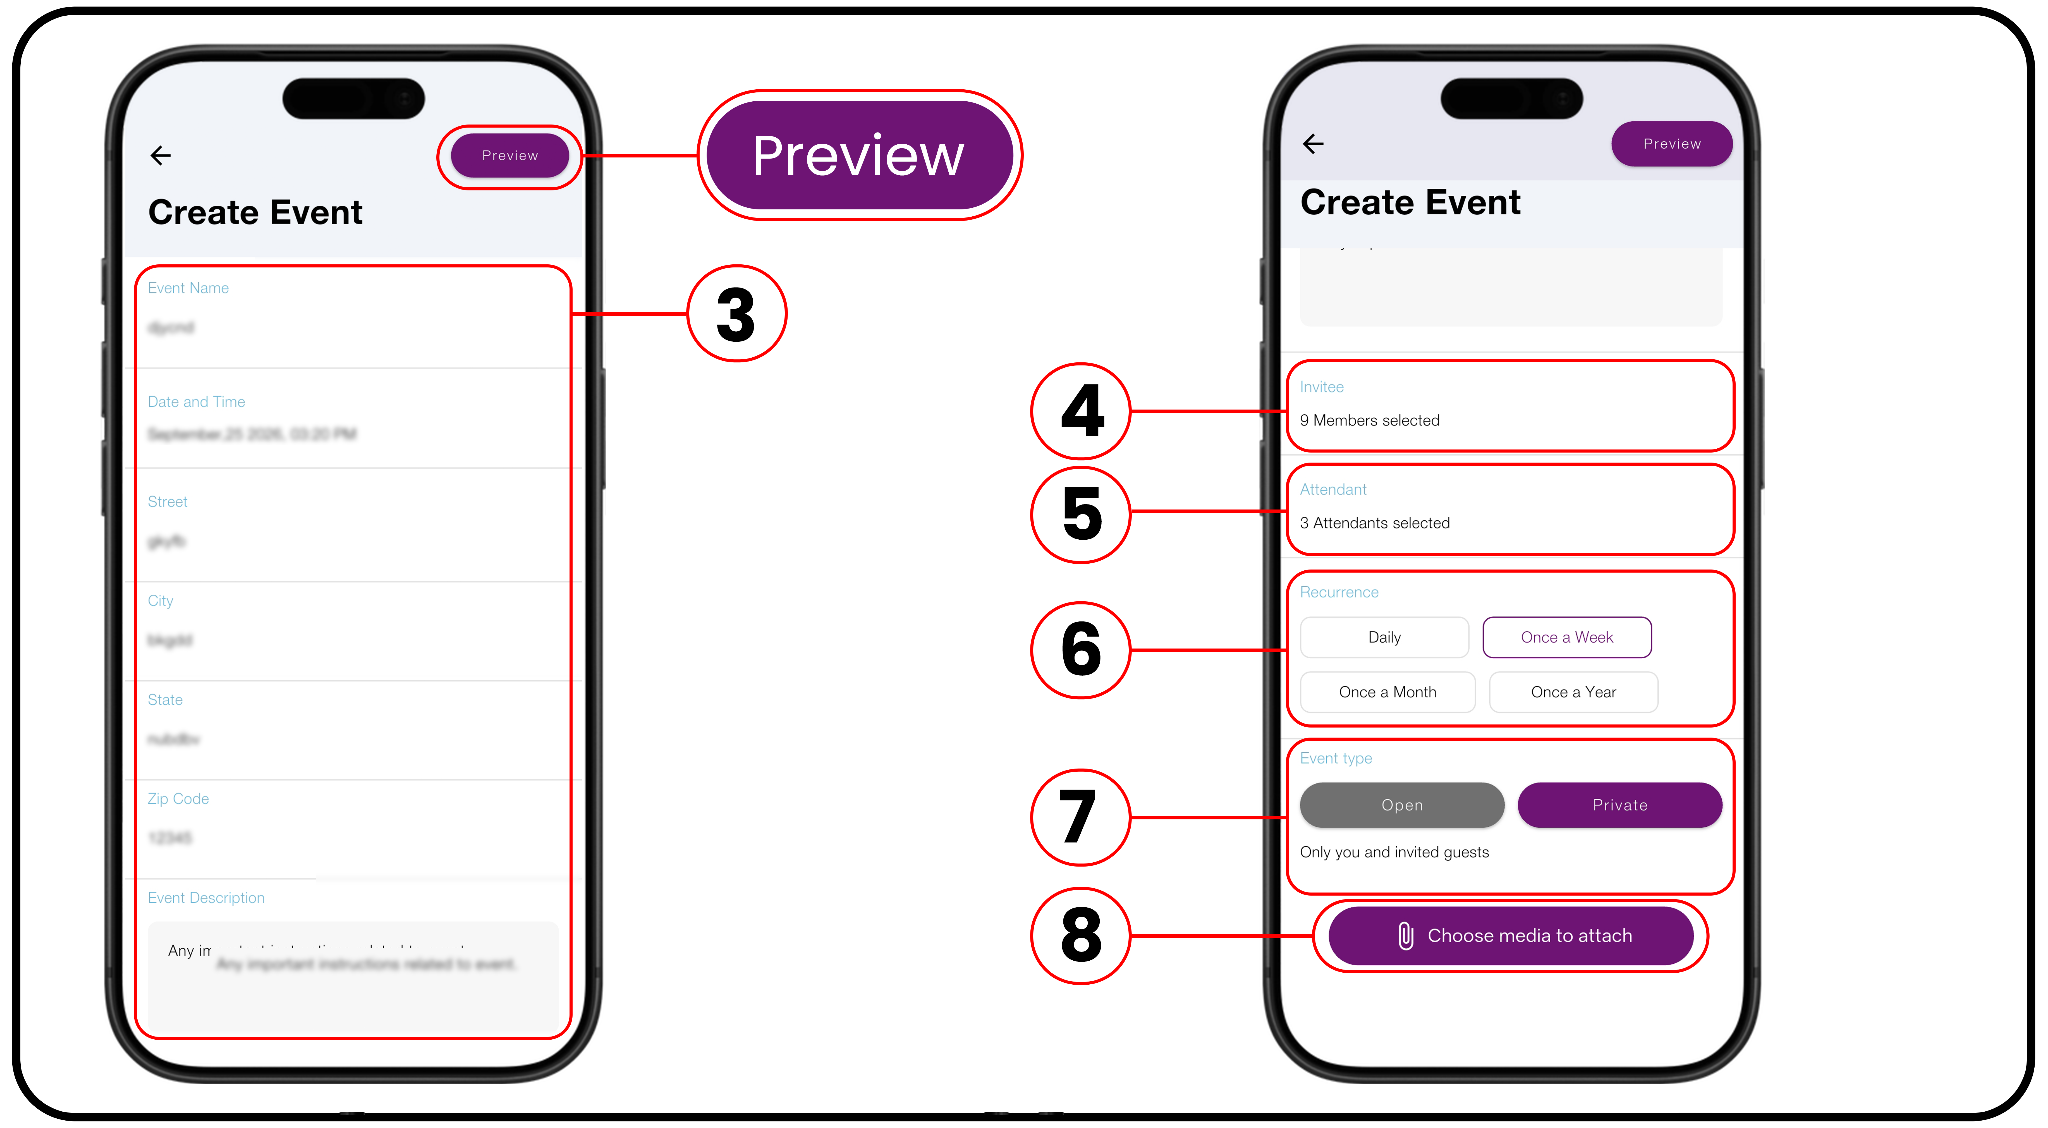
4. Enter the Basic Event Details:
a) Event Name
b) Date and Time
c) Street, City, State, Zip Code
d) Event Description
5. Select Invitees: Tap Invitee to open the Invitee screen, and choose from:
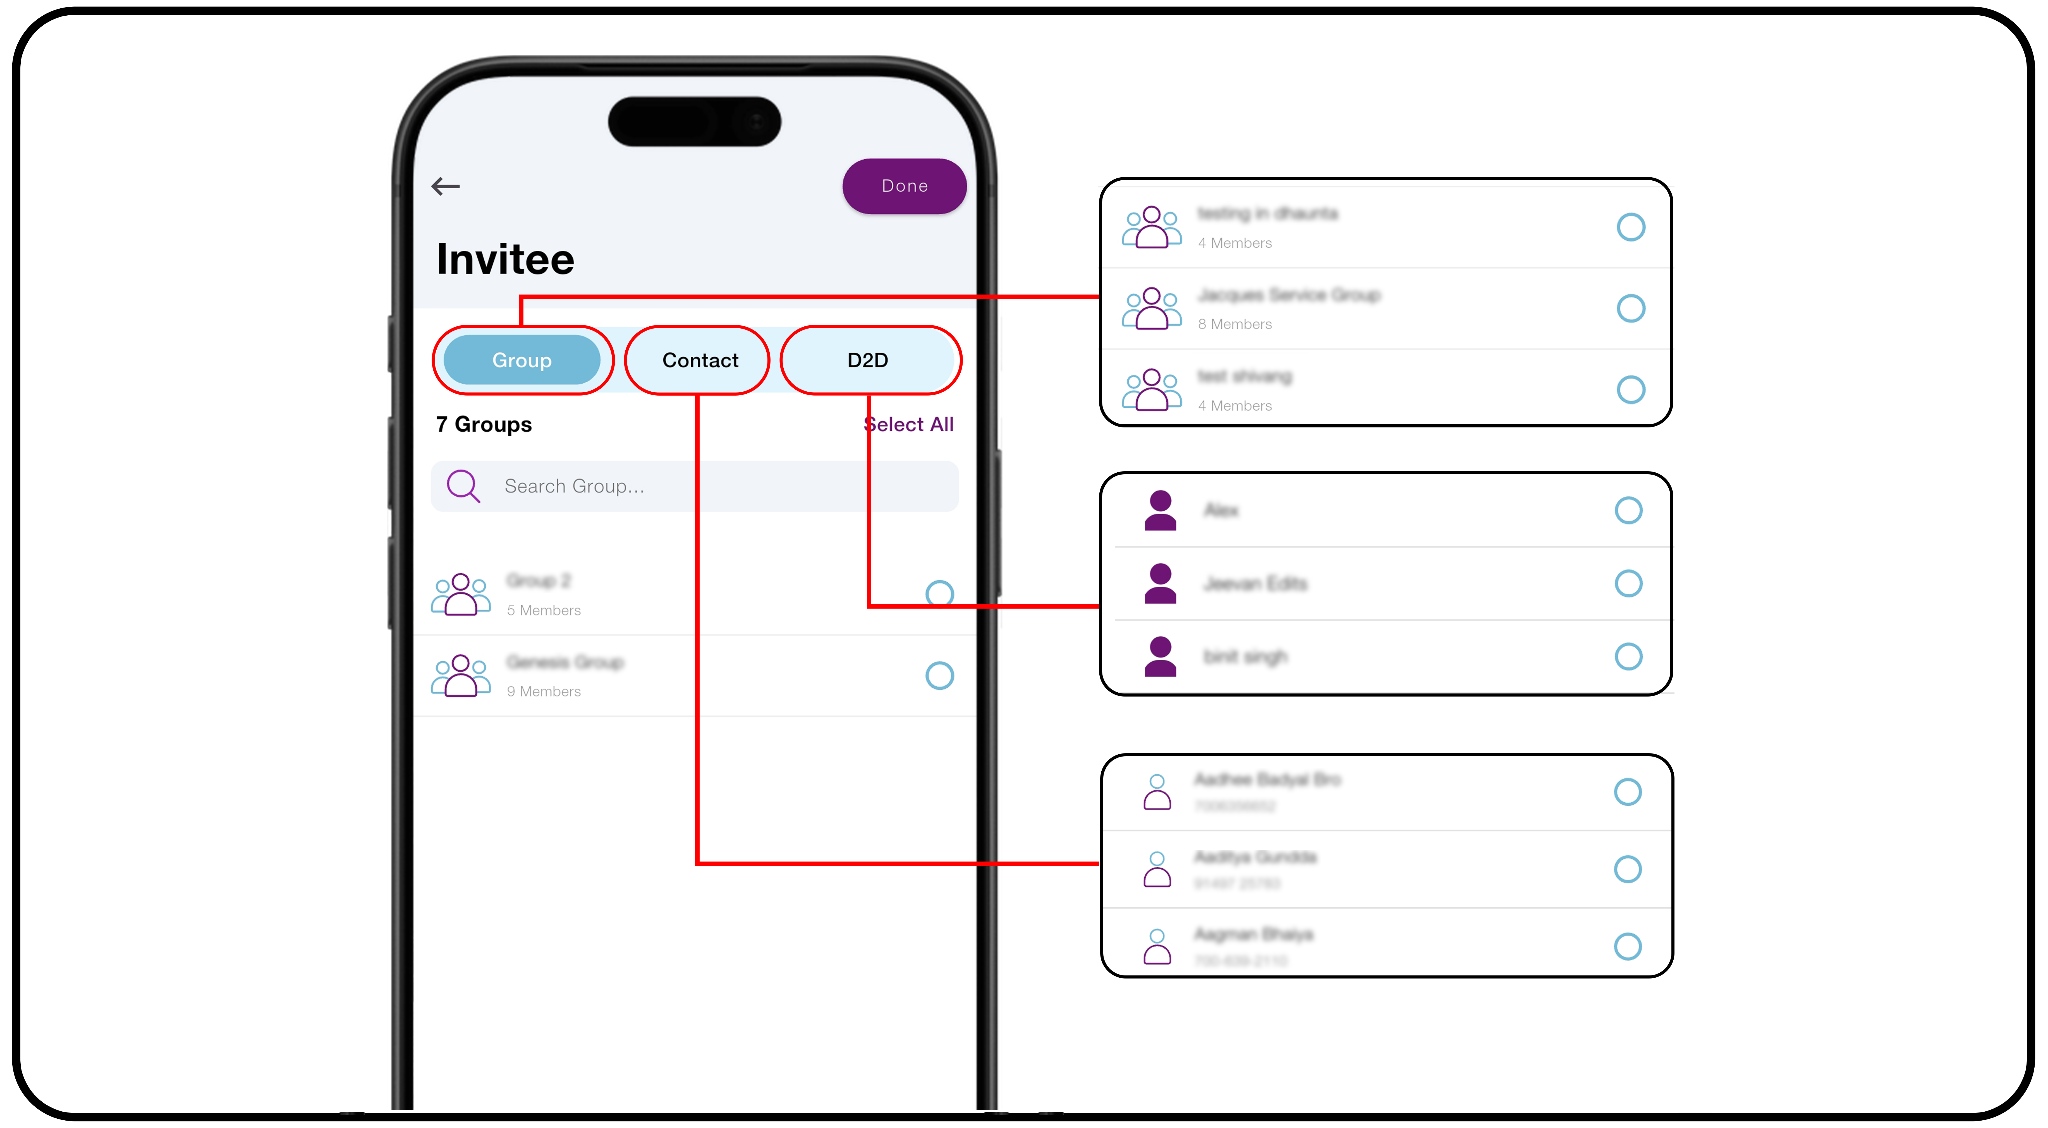
a) Select one or more groups. Everyone in the group(s) receives an invitation
b) Contacts who aren't D2D users.
c) D2D — shows only D2D members who are already in your contacts.
Tap Done in the top right corner once you've selected your invitees.
6. Assign Attendants and Configure Settings: Select one or more members
from your invitee list to designate as attendants, then return to the main form.
7. Recurrence: Select how often that event is gonna happen.
8. Event Type (Open or Private): Select either of the two options.
a) Open - System will allow invited guests to invite others to the Event.
b) Private - Invited guests are restricted from inviting others to the Event.
9. Preview and Submit: Tap the Preview button in the top right corner. Review
the event summary & tap Submit in the top right corner to publish your event.
ACCEPTING INVITATIONS
1. Accepting an Invitation: Use these steps to review an event you've been invited to.
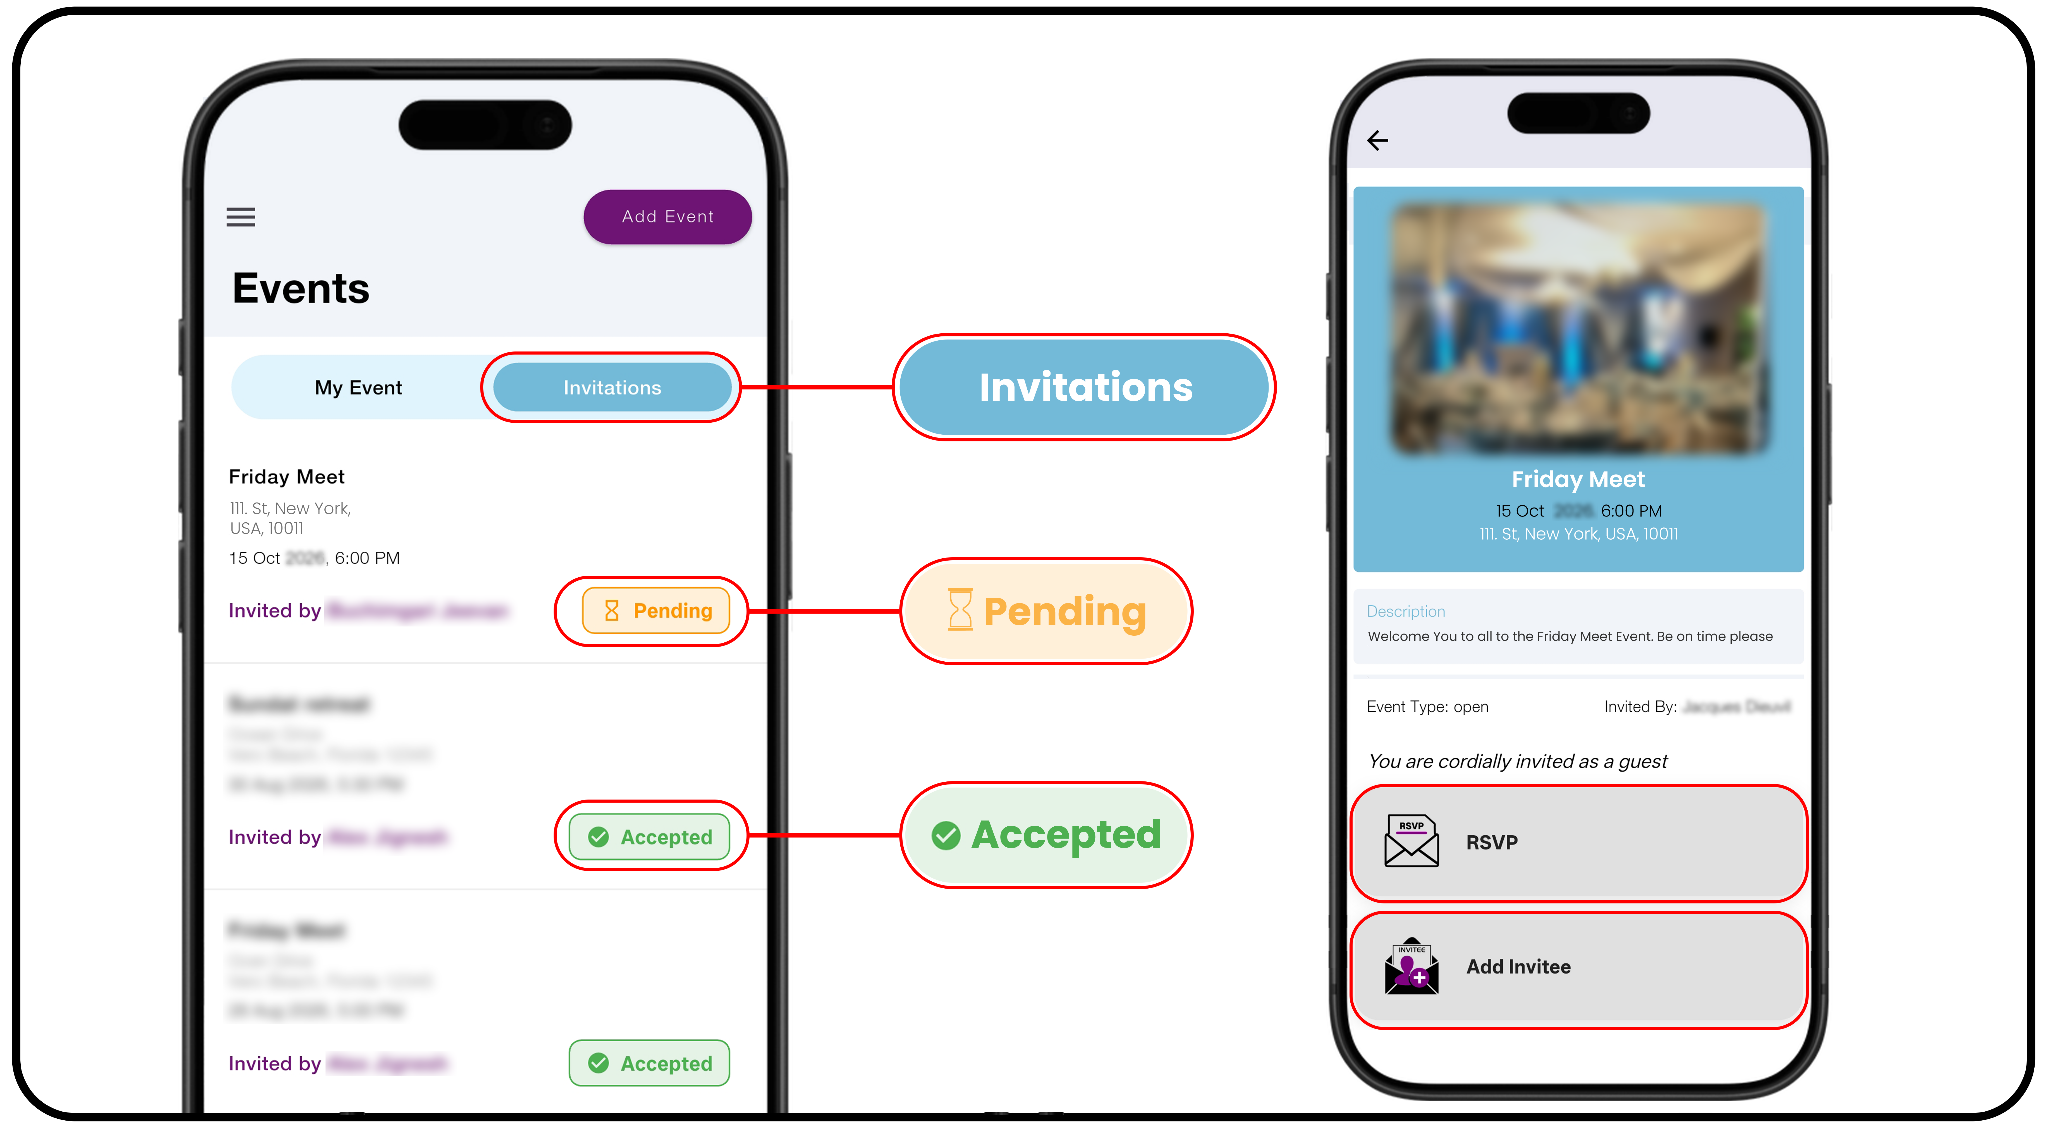
a) Open the Events Section: Open the side navigation menu from your
dashboard and tap Events.
b) Access Your Invitations: Tap the Invitations tab at the top of the Events
dashboard to view every event you've been invited to.
Scroll through the list and select the Invitation you want to open.
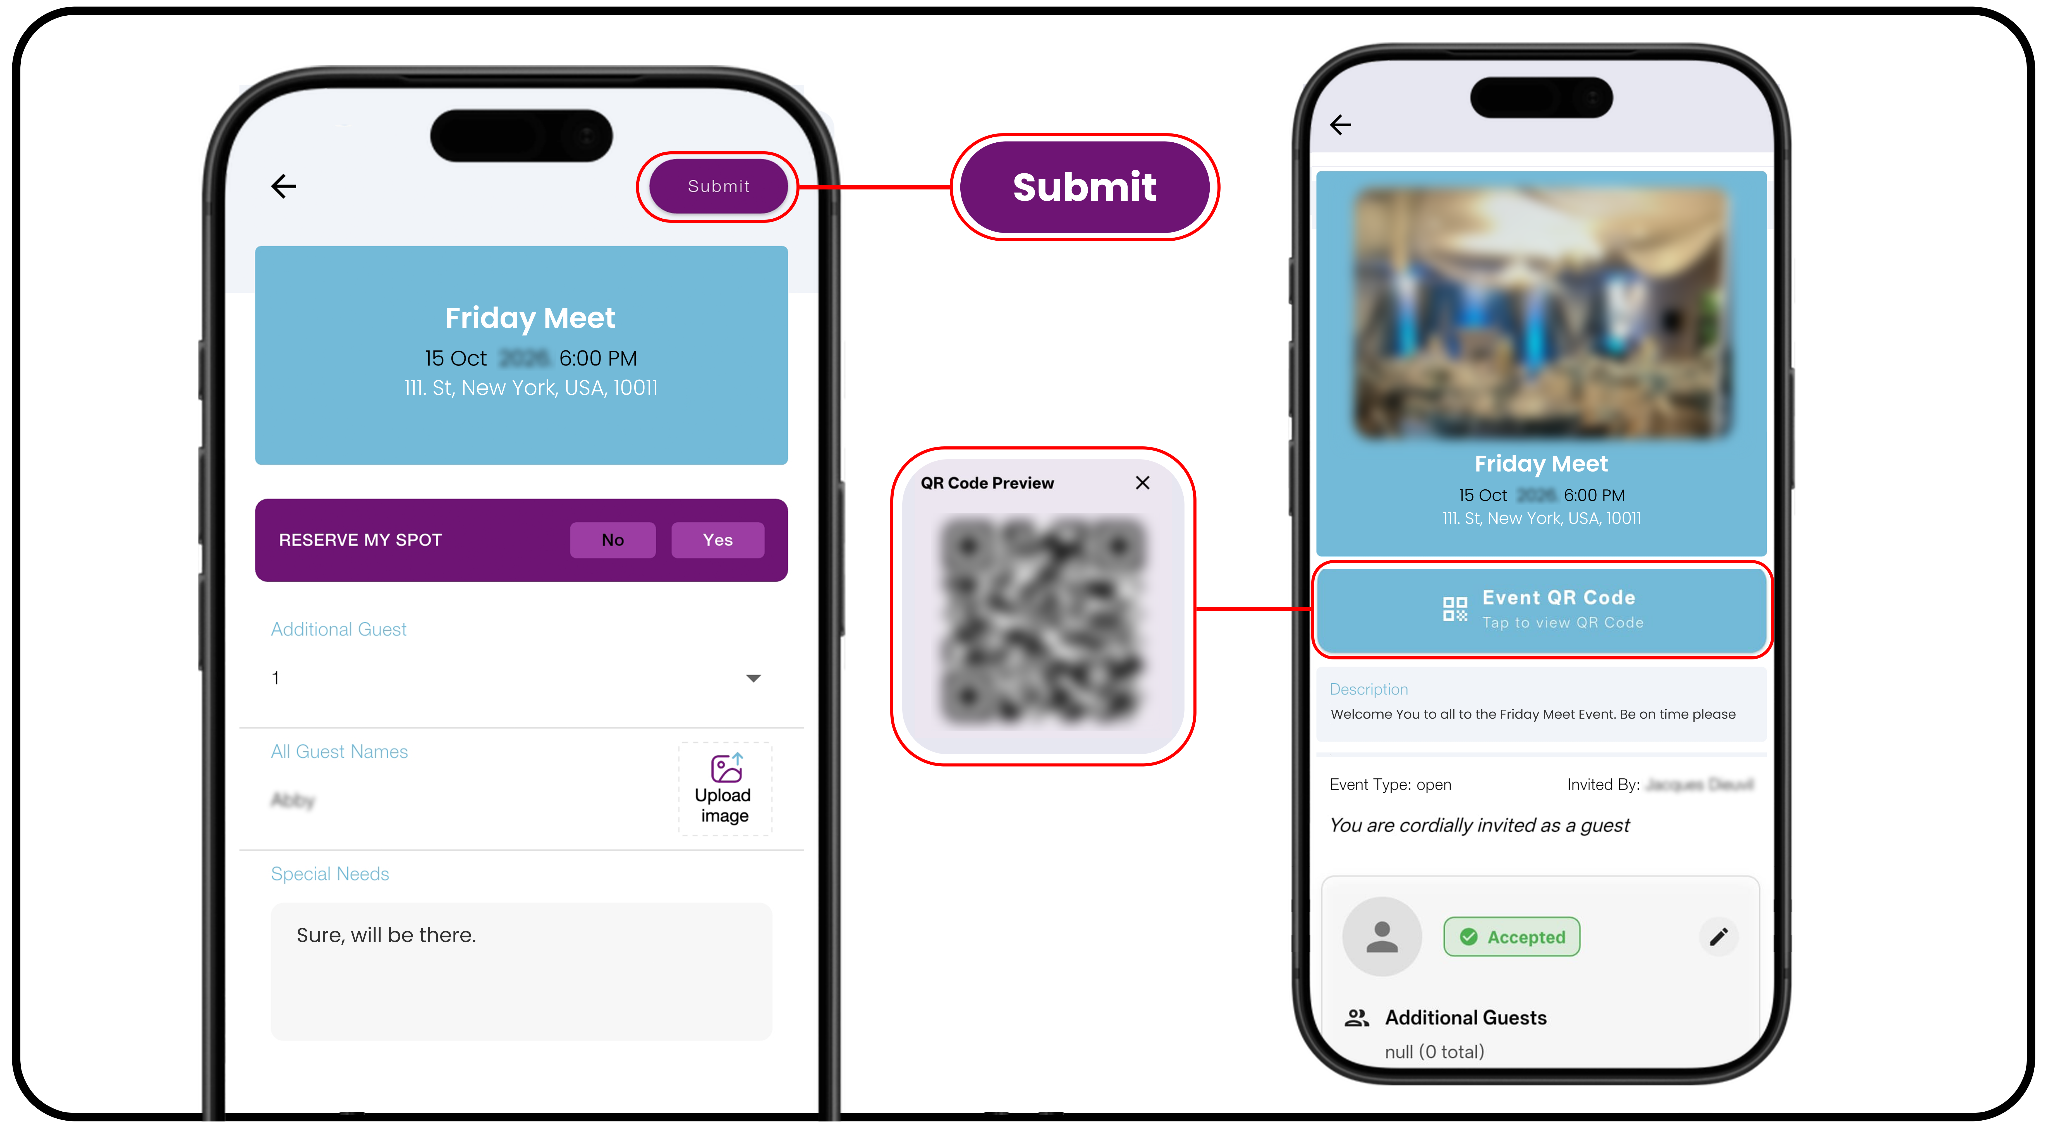
2. Reserve Your Spot and Add Guest Details: Tap RSVP to open the registration
form.
a) Tap Yes to accept the invitation.
b) Select number of guests & their names if anyone is joining you.
c) Tap Upload image if photo ID is required.
d) Note the requirements if needed.
3. Submit Your RSVP: Review everything you've entered, then tap the Submit
button in the top right corner to finalize your reservation.
4. Access Your QR Invitation: Once submitted, tap Event QR Code to view the
QR code you'll need to gain entry to the event.
MANAGE AN EVENT
Use these steps to manage an event you've created.
1. Open Your Event:
a) Open the side navigation menu and tap Events.
b) Under the My Event tab, tap the event you want to manage.
2. View Guest Locations on the Map:
a) Tap the Map icon in the top navigation bar to see the geographic distribution
of your invited guests.
b) Tap the Back arrow to return to the event dashboard.
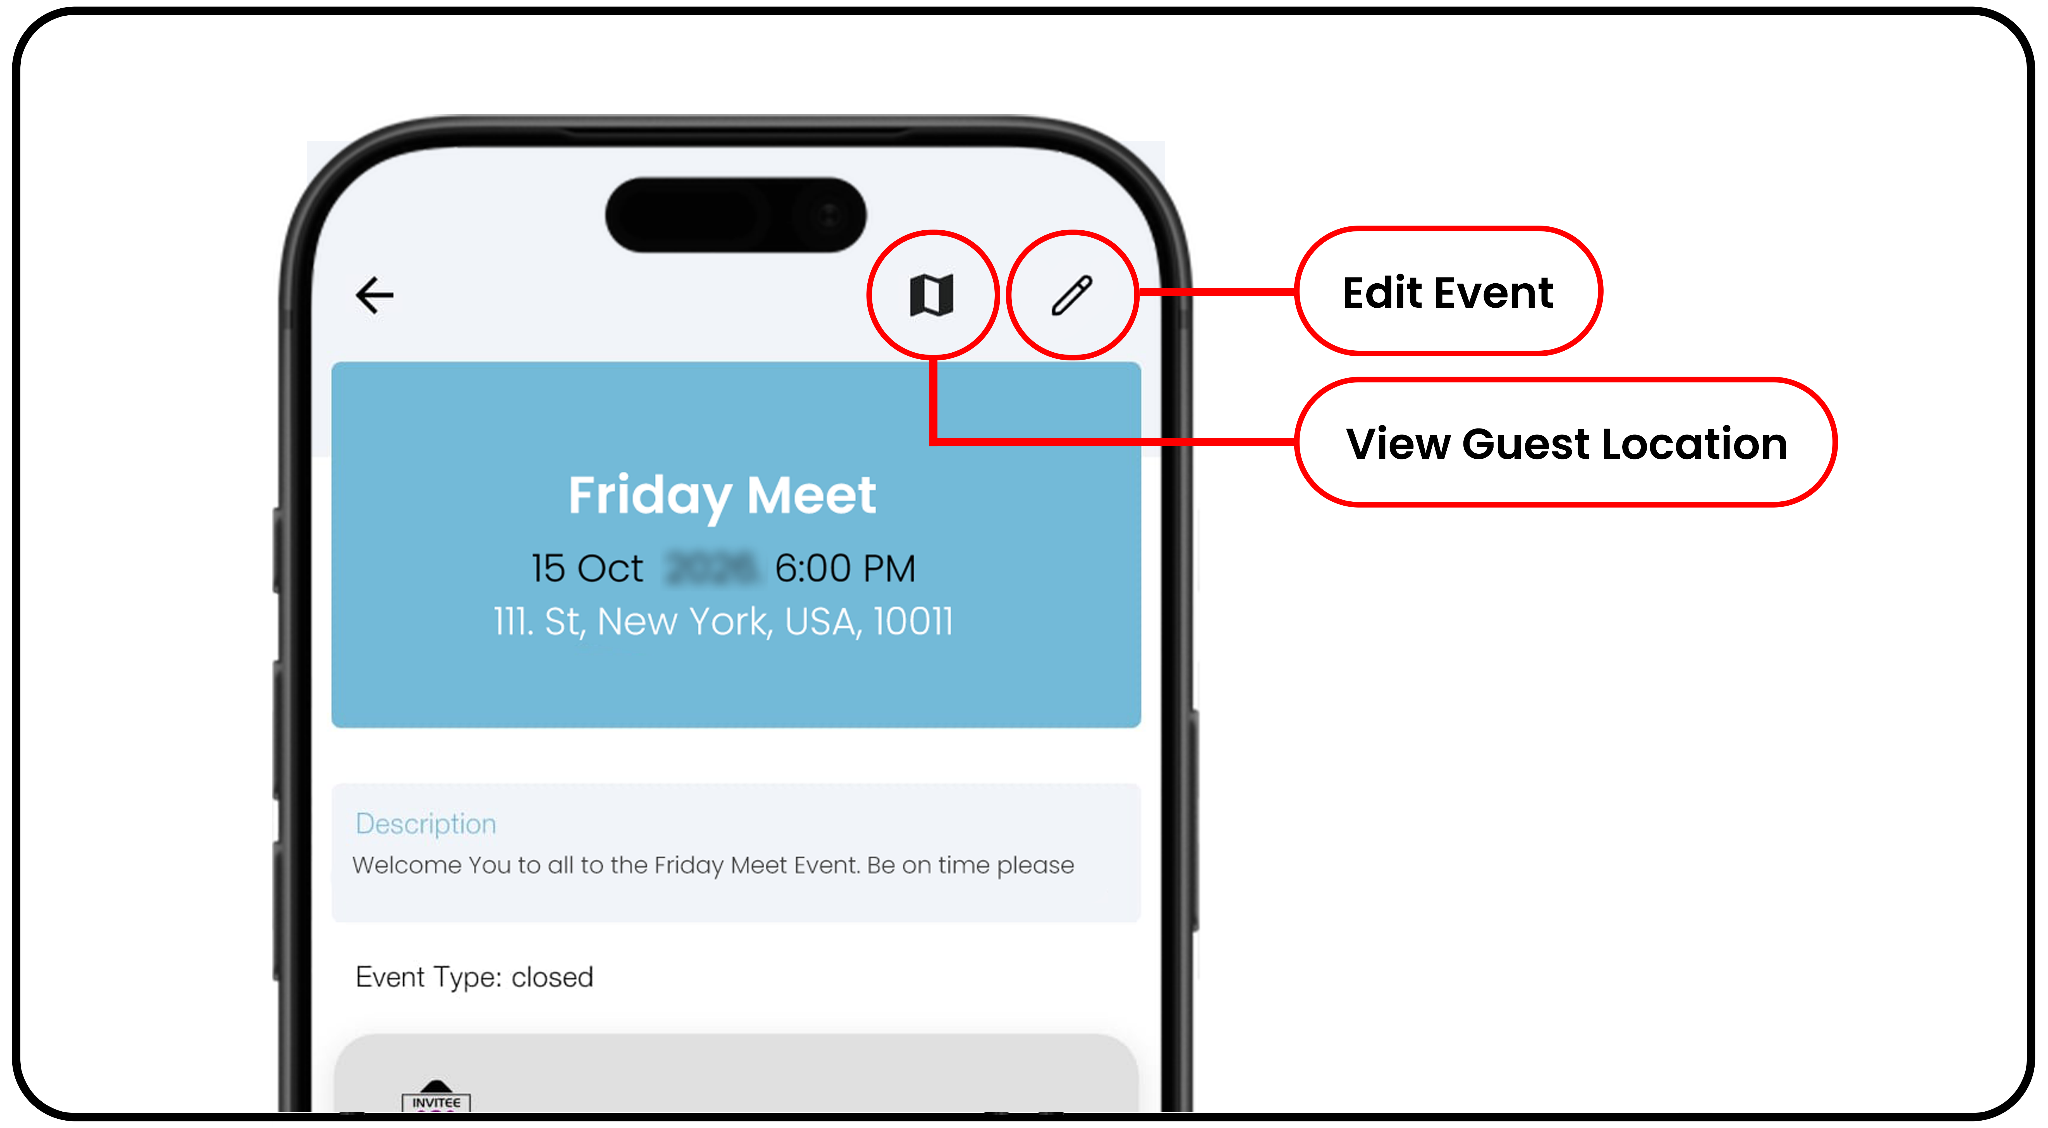
3. Edit Event Information:
a) Tap the Edit icon in the top right corner to open the Edit Event form.
b) Update any details you need to: event name, date and time, address,
description, recurrence, event type, or attachments.
c) Tap Save in the top right corner to apply your changes.
4. Manage Invitees and Attendants:
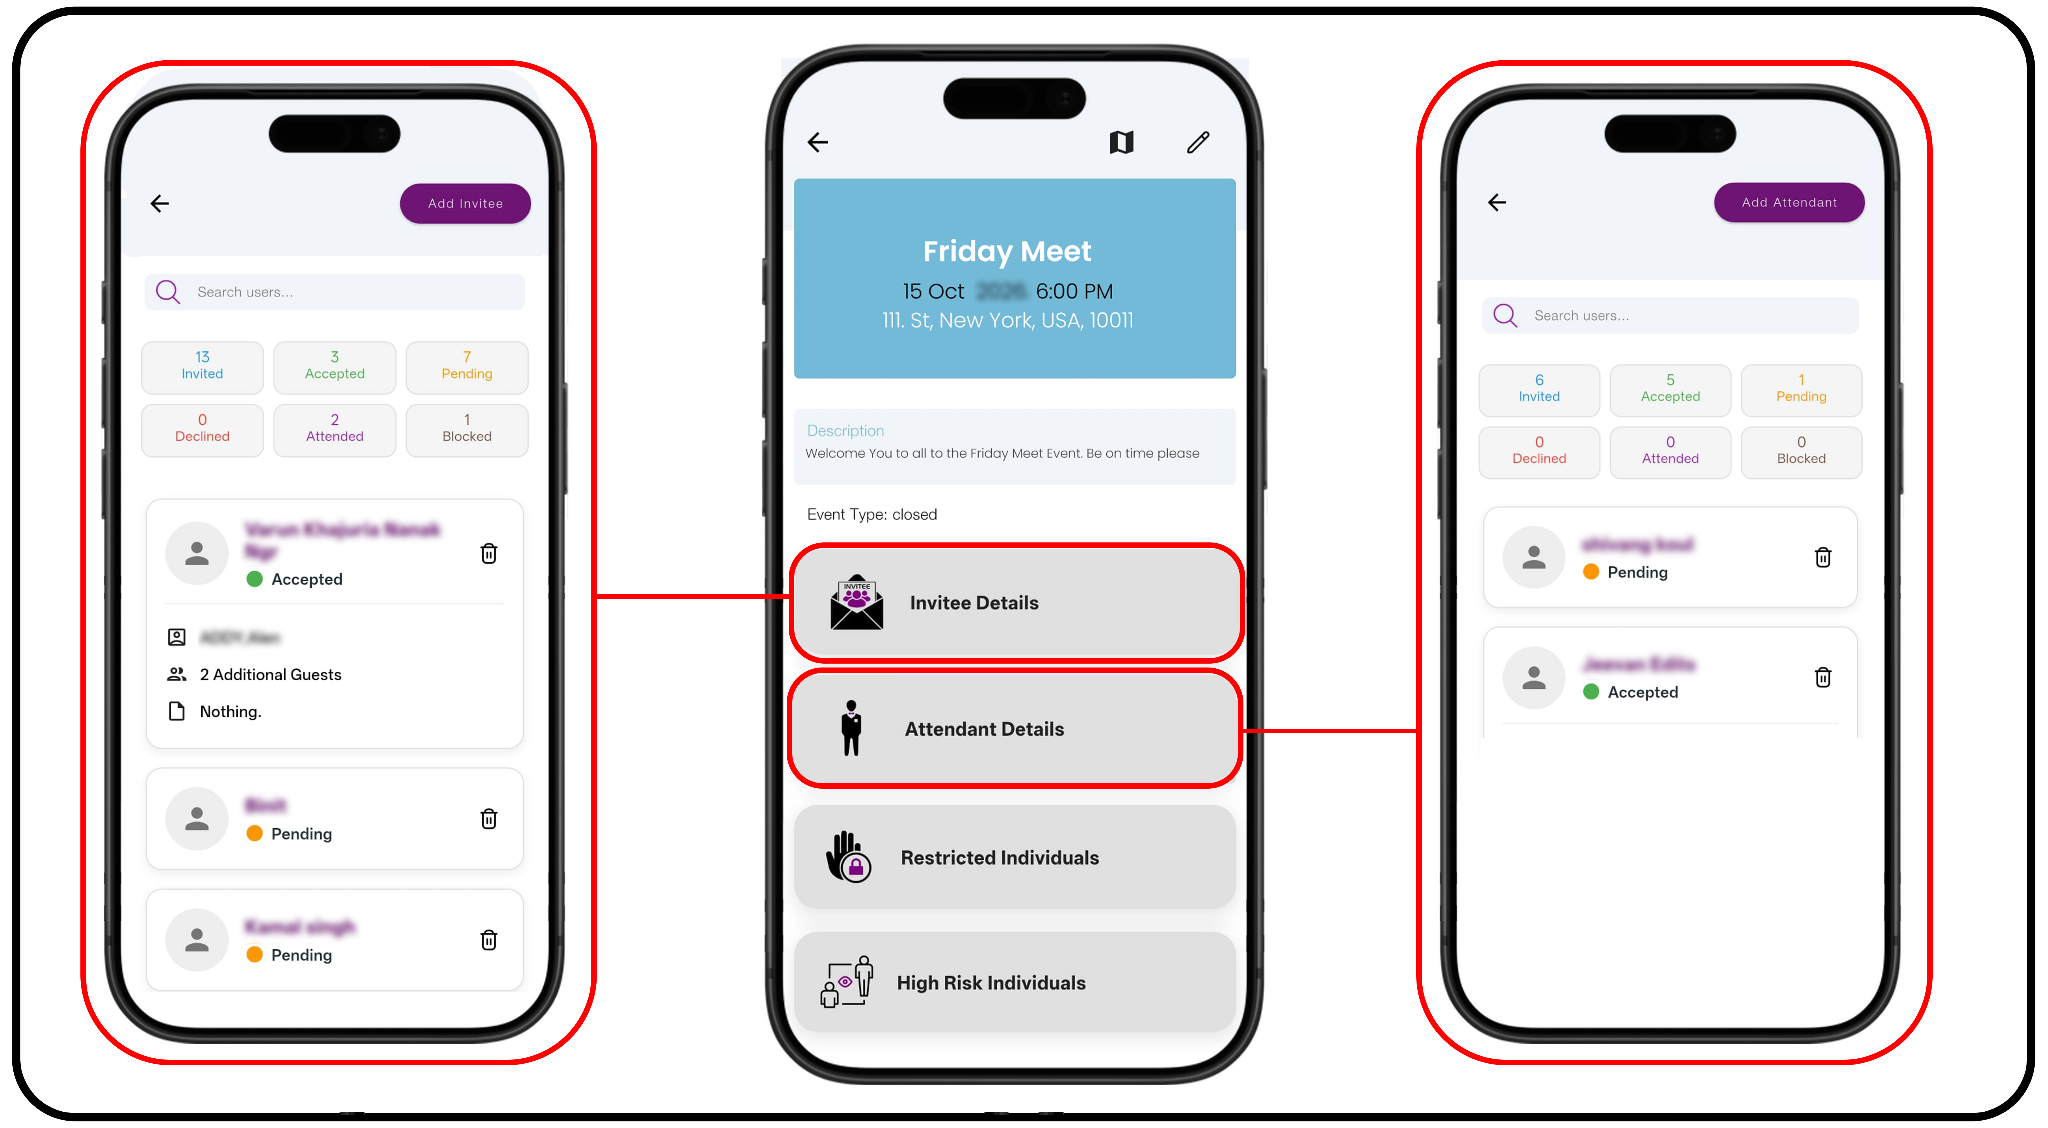
5. Invitee Details:
a) Tap Invitee Details to see status filters — Invited, Accepted, Pending,
Declined, Attended, Blocked.
b) Tap the trash icon and confirm to remove someone from the list.
c) Tap Add Invitee to invite more guests, either From Contacts (Group,
Contact, or D2D) or From Non-Contacts.
d) For someone you met out in the ministry who isn't in your contacts, enter
their name and generate a QR code as their invitation. Scanning it at the
door automatically updates their status to Attended.
6. Attendant Details:
-
- Tap Attendant Details to track your attendant list and their response
statuses. - Tap Add Attendant to choose additional attendants from Group,
Contact, or D2D, then tap Done.
- Tap Attendant Details to track your attendant list and their response
7. Set On-Site Security for Restricted Individuals: To add someone to the list:
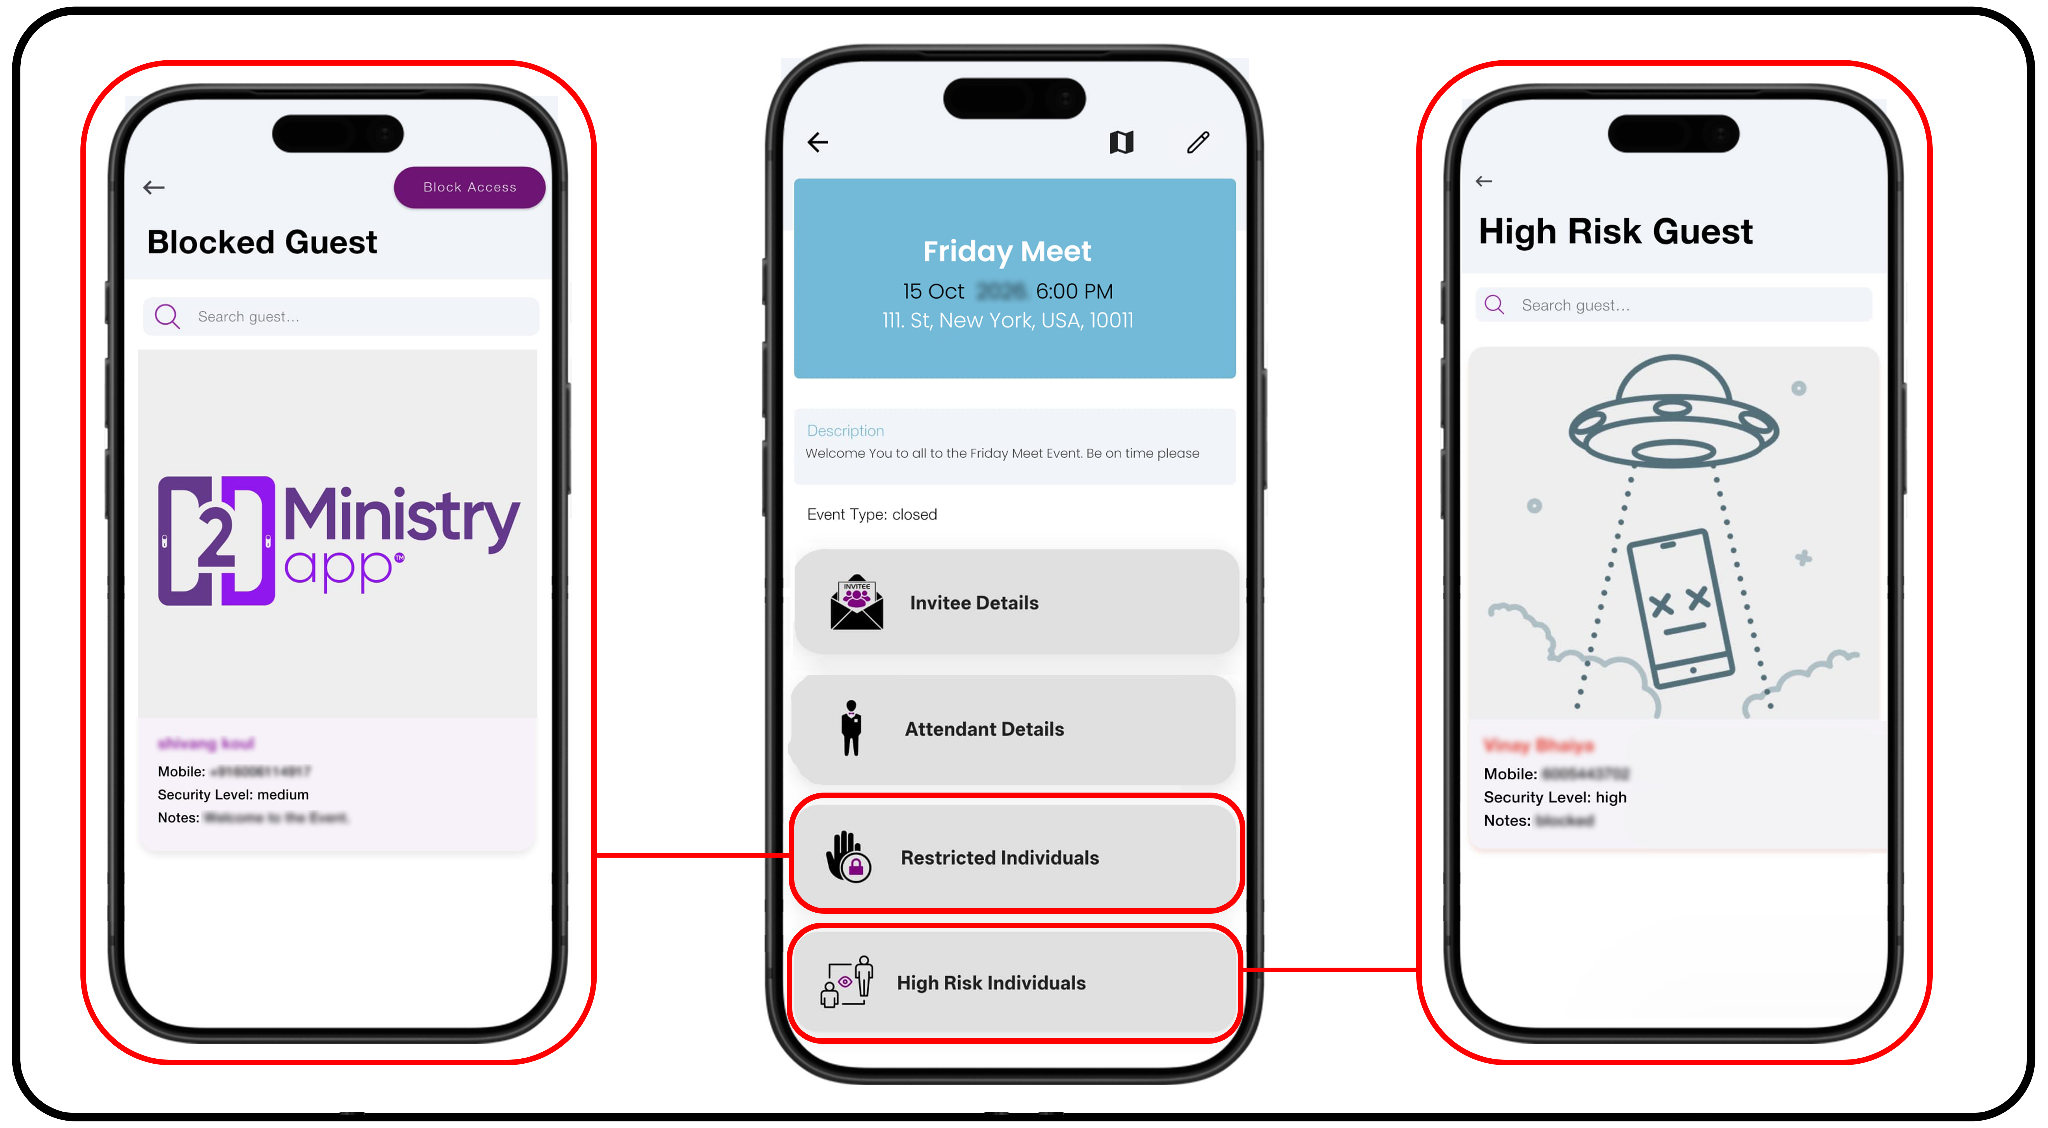
a) Tap Block Access to open the On-Site Access form.
b) Enter the person's name, or tap Select user from contacts to pull their number
automatically.
c) Assign a Security Level— Low, Medium, or High — and add any relevant notes.
d) Under Action, tap Block. Add a photo if needed, then tap Save.
8. Flag Watch List Individuals
a) Watch list have guests who are permitted to attend the event but may need
extra attention while they're there.
b) Follow the same steps as On-Site Access, but choose Accept instead of Block
under Action. This adds them to the Watch list.